
Imagine this — you have been surfing the internet for a relevant article on a particular topic, and you just found a link title that describes a piece that seemingly answers all your questions.
You can’t wait to see what’s on the page.
You click on the link to access the page, and all you see on the screen is a 403 forbidden error message.
You will most likely be disappointed and annoyed.
Visitors to your website will feel the same if they ever come across such a message on your web pages.
The HTTP error will cost you potential viewers, and if the page remains in that state for a prolonged period, your rankings could suffer.
In this article, I will show you ways to fix a 403 forbidden error, and the factors that could have triggered the error in the first place.
Frequently Asked Questions
Here are the questions people are asking regarding the 403 forbidden error on Google:
What Causes A 403 Forbidden Error?
The are several factors that could have triggered the error, and the most likely causes are improper folder permissions, incorrect .htccess settings, troublesome WordPress plugins, or malware.
The “403 Forbidden” term itself is derived from the HTTP status code that your server uses to describe those types of events.
Does 403 Forbidden Mean I’m Blocked?
Once the error is triggered, visitors to your website will no longer be able to access that web page.
Your server is still working, but you won’t have permission to view the affected parts of your site.
What Is Needed To Fix The 403 Forbidden Error
Here are the tools and resources you will need to remove the 403 error from your website:
- Web Host Login Details — you will need to login into your cPanel backend to access the root folder of your website in the file manager.
- FTP Client — some errors may make it impossible for you to access your WordPress backend, FTP helps you get around that hassle.
- WordPress Antivirus Plugin — in the event the error was triggered by malware, plugins like Wordfence or Sucuri can locate and help with bug fixes on WordPress.
How To Fix A 403 Forbidden Error: Step-By-Step Instructions
There are several variations of the 403 code, including:
- Error 403
- Error 403 forbidden
- 403 forbidden
- HTTP 403
- HTTP Error 403 — Forbidden
- 403. That’s an error. We are sorry, but you don’t have access to this page
- Forbidden: You don’t have permission to access [directory] on this server
Typically, your server will send any of these messages because it has detected an issue and is trying to stop anyone from getting access to the files.
The issue could be a settings problem on your website, or it could have originated on your web browser as a visitor.
You can trigger the error as a visitor if you loaded a page at the wrong moment, the cached data on your browser is not up to date, or you typed in the wrong URL.
You can fix browser-related issues by clearing your cached files and cookies and reloading the page.
If you mistyped, input the correct URL and tap Enter on your keyboard.
For website issues, you may have to try multiple methods until you find the one that fixes the problem.
Below, I will examine the methods you can use to fix the most common website issues associated with 403 forbidden errors.
My approach will focus exclusively on WordPress.org websites, but some of the methods can still be applied to other types of sites.
Here are 7 proven techniques for solving the 403 error:
- Reset file and directory permissions
- Change the .htaccess file
- Deactivate your plugins
- Verify where your domain is pointing to
- Redirect your4 index.php file
- Scan your WordPress site for malware
- Work with a developer to change file ownership
Method 1: Reset File And Directory Permissions
There is a specific Permission for each file and folder on your website.
The permission will specify who can read, write, and execute the file in question.
The 403 error can be triggered if a file or directory has incorrect Permissions.
This is one of the popular causes of the 404 error and you must edit your permissions to see if doing that will fix the problem.
To change your permissions, you will need to download and set up an FTP client.
I will recommend using the FileZilla FTP program.
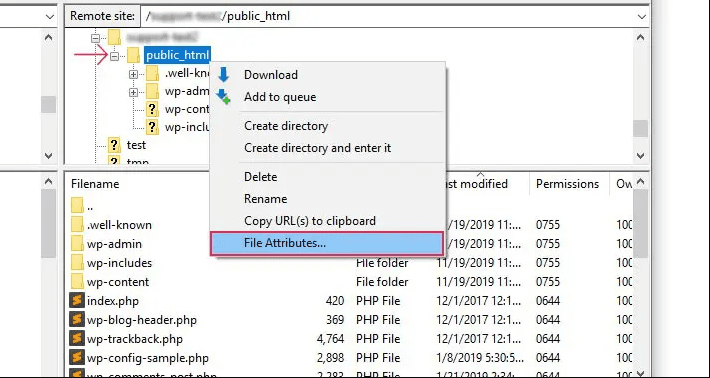
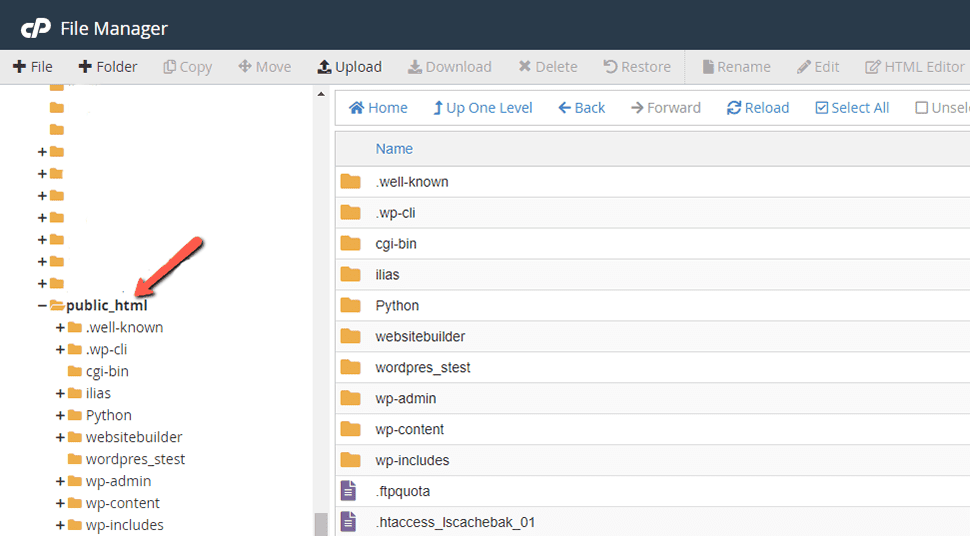
Once your website is connected to the program, search for the public_html folder and right-click on it. Select File Attributes.
On the “Change file attributes” pop-up window, type 755 into the Numeric value input box.
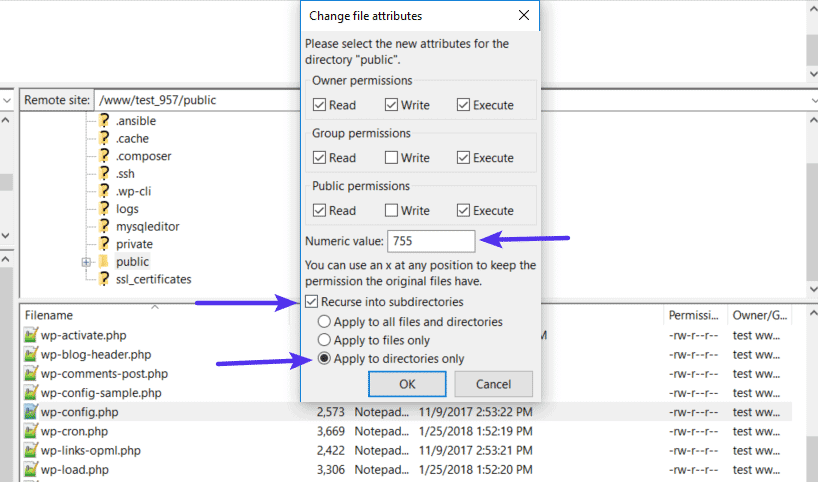
Toggle Apply to directories only. Then click the OK button.
This numeric value will be applied to your folders.
644 is the right permission for static content, while 700 is used for dynamic content.
You must also update permissions for static content.
The process is the same, except that you will use 644 as the permission code and toggle Apply to files only instead.
Once you are done editing your permissions, check out your website again to see if the error has disappeared.
If it worked, then your file permissions were the cause of the problem, if not, move on to the next method below.
Method 2: Change The .htaccess File
The configuration of the .htaccess file could be altered when you make changes to a file on your server.
The role of the .htaccess file is to adjust the settings of the Apache Web Server, and a faulty reconfiguration will trigger the 403 error.
The only way you can know if the file is the source of the error is to delete it to see if the error will disappear.
You will have to manually delete the file.
To do that, you will log into your cPanel or hPanel web host backend.
On your control panel dashboard, open the File Manager under the Files section. Then click the public_html directory on the next screen.
Next, find the .htaccess file from the list of files under the directory.
If you can’t find it in the directory, go to Settings and enable Show hidden files.
Right-click on the .htaccess file and select Download from the pop-up menu. This will create a backup of the file on your computer.
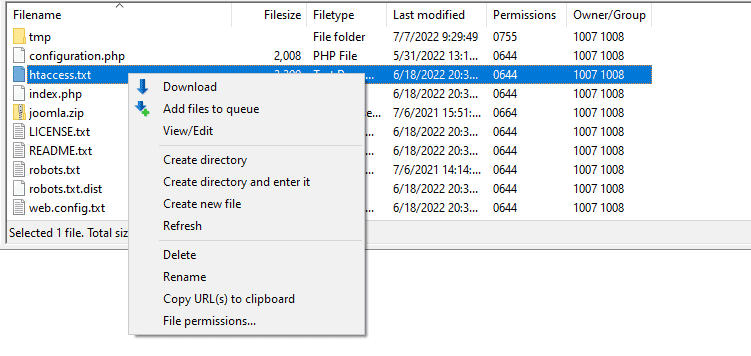
Once the download is completed, right-click on the .htaccess file again, and select Delete.
Now, access your website to see if the error has been removed.
If it’s no longer on your screen, then your .htaccess file is corrupted and you must create a new one.
To create a new one, log into your WordPress backend and move to the Settings > Permalinks page.
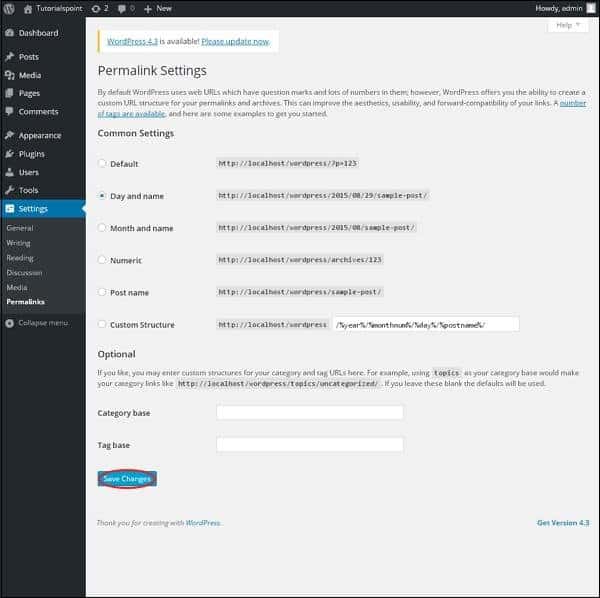
You don’t need to toggle anything on the page, just click the Save Changes button and a new .htaccess file will be created.
Method 3: Deactivate Your Plugins
An incompatible WordPress plugin could also trigger the error.
Figuring this out is a bit tricky because you have to first deactivate all your plugins to see if a plugin is the source of the problem, before reactivating them one by one until you identify the specific plugin that is the culprit.
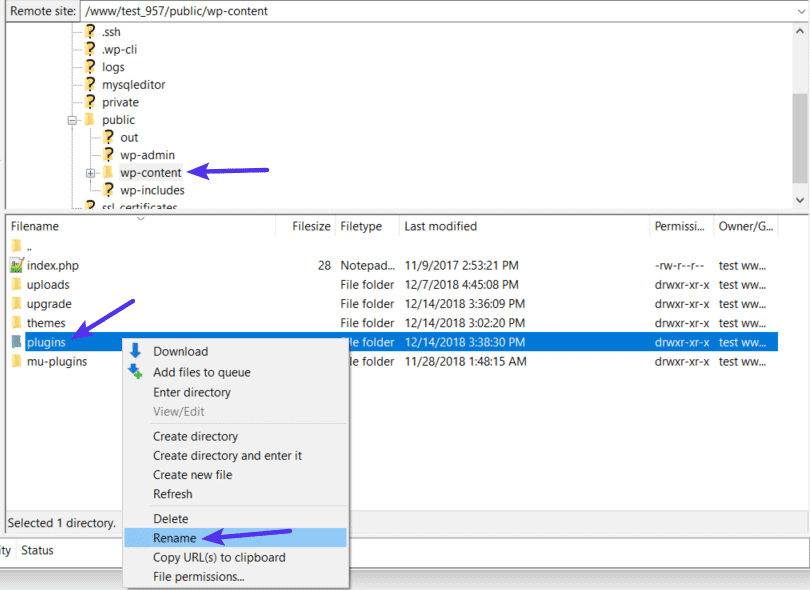
To deactivate your plugins, use an FTP client or the file manager on your web host control panel to access the public_html > wp-content folder.
On the next screen, find the Plugins folder and right-click on it.
Select Rename from the pop-up box and then give the folder another name like plugins-disabled to automatically deactivate all your plugins.
Once you are done, check out your website again to see if the error has disappeared.
If it has, then one of your plugins is the source of the problem.
Go back to the folder and change the name back to Plugins.
This will restore the plugins to your WordPress backend, but they will still be deactivated.
Go to the Plugins page on WordPress and activate the plugins one by one.
After each activation, check your live website to see if the error has returned.
Keep activating plugins and checking your browser until the error appears.
Once you identify the troublesome plugin, uninstall it.
You can also update it to see if the issue will be fixed.
Method 4: Verify Where The Locus Of Your Domain
It’s possible that you recently changed your web host and your domain is still pointing to the wrong IP address because you failed to update your nameservers.
This will trigger the 403 error as soon as your old web host terminates your account.
You can determine whether this is the source of the problem by making sure your domain name is pointing to the correct address.
Type your domain into the DNS Watch online tool to get your current IP address, then log into your cPanel to see if your A records are aligned.
On the cPanel dashboard, open the DNS Zone Editor under the Domains section.
On the next screen, check if the IP address under the Record column beside A (Type column) on the first row is correct.
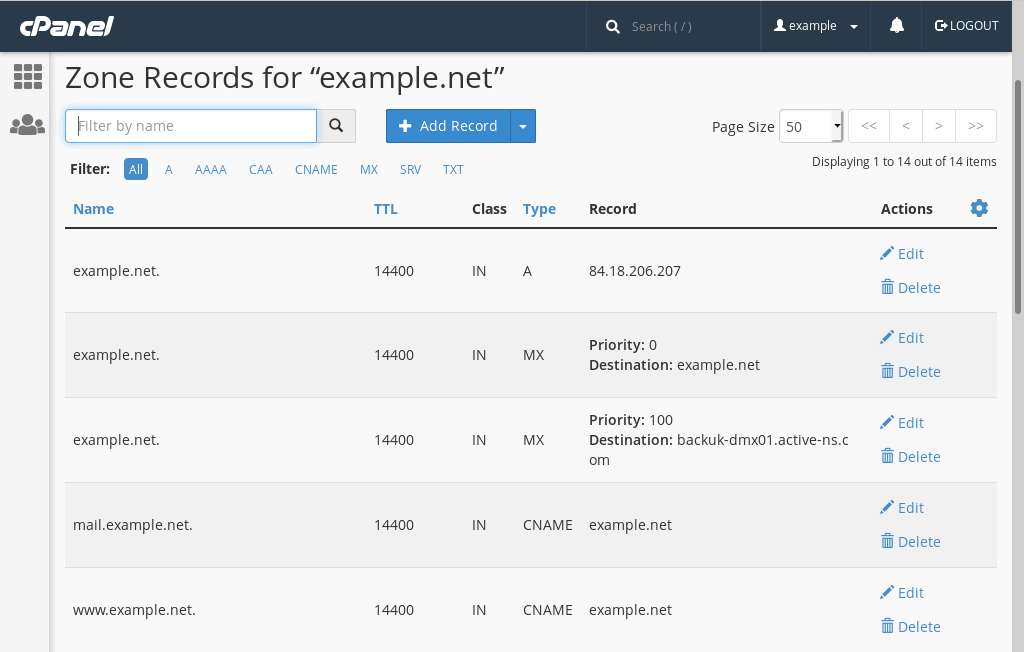
If it’s wrong, change it and then click Update.
Check your website to see if the error has been fixed, if not, move on to the next method.
Method 5: Redirect Your Index.php File
The homepage of your WordPress site should be named index.php or index.html.
If there is no page with either name on your website, the 403 error code could be triggered when visitors land on your site.
You can use the .htaccess file to see whether you have the page on your site.
Navigate to the file and right-click on it. Then enter the code below to redirect your current homepage to index.html.
Redirect/index.html/xxxhomepage.html Note: replace “xxxhomepage.html” with the actual name of your current homepage.
Once you are done, check your website to see if the issue has been fixed. Move on to the next method if the error still persists.
Method 6: Scan Your WordPress Site For Malware
Malware can cause the 403 error to persist on your website.
If your server is infected, the malware will keep adding corrupted lines to the .htaccess file making it impossible to fix the error code unless the infection is removed.
Use your security plugin to run a scan and follow the prompts to remove the malware from your website.
Method 7: Change File Ownership
With VPS or Linux web hosting, all the files on your server must be assigned to a specific owner.
Improper file ownership can trigger a 403 error.
You will need SSH access to fix this problem and the process requires technical knowledge.
If you have tried all the methods above without resolving the error, WordPress developers can help you try out this method.
If it still doesn’t work, then you will have to reach out to your web host’s customer support staff.
Similar Tutorial Types To Check Out
- How to Fix 400 Errors: this article will show you the causes of the Bad Request error and ways to remove it from your web page.
- How to Fix 401 Errors: discover what the error means and how you can rectify it on WordPress.
- How to Fix 405 Errors: this article will give you the best solutions for diagnosing and fixing the error on your website.
Wrapping Up
Moving from one method to another can be time-consuming. Luckily, the steps in each method can be easily implemented without any technical knowledge.
If have any questions on how to fix the 403 forbidden error, feel free to reach out to me in the comments section below.


