
Are you struggling with measuring how users interact with your WordPress website?
Adding Google Tag Manager to WordPress is the once-and-for-all solution.
While popular website analytics tools offer general features like tracking bounce and exit rates, Google Tag Manager lets you get granular data that matters most to your business.
Page view, clicks, views downloads, etc.
You can capture them all.
This tutorial will show you how to add Google Tag Manager to WordPress.
And will do it with tons of screenshots.
Let’s go.
- Frequently Asked Questions
- What You’ll Need to Add Google Tag Manager to WordPress
- How to Add Google Tag Manager to WordPress in 4 Simple Steps
- Step 1: Set up Your Google Tag Manager Account
- Step 2: Add Google Tag Manager Code to WordPress
- Step 3: Create a New Google Tag Manager Tracking Tag
- Step 4: Publish Your New GTM Tracking Tags
- More Helpful WordPress Tutorials
- Wrapping Up
Frequently Asked Questions
Where Do I Add Google Tag Manager in WordPress?
Google Tag Manager is two code snippets you need to add to all the pages on WordPress.
Your first code goes in between the head tags of your WordPress website and the second to the opening body tag.
You can add Google Tag Manager to WordPress manually or with a Plugin.
Is there a Google Tag Manager WordPress Plugin?
Yes, there are several Google Tag Manager plugins.
Although Google Tag Manager by Thomas Geiger is the most popular, there are easier-to-use plugins.
This tutorial presents 3 of the most straightforward Google Tag Manager WordPress plugins and how to use them.
What You’ll Need to Add Google Tag Manager to WordPress
- A Google Account: You must first create a Google account to use any Google services. If you have a Gmail account, you already have a Google account.
- A Google Tag Manager Account: You’ll also need to set up a Google Tag Manager account before adding it to your website. We’ll show you how in the next section.
- WordPress Admin Access: Without an Admin or super Admin role in WordPress, you won’t have access to the WordPress admin dashboard, meaning you can’t add Google Tag Manager.
- Chrome Web Browser (optional): You can use other secure web browsers. But we recommend Chrome for a better experience because all the steps and screenshot in this tutorial is taken on the browser.
- A WordPress Tag Manager Plugin: If you prefer the plugin option to add features to your website, you’ll need one of the Google Tag Manager WordPress plugins mentioned in this tutorial.
- A Google Analytics Account: If you already have a Google Analytics account and tracking code, you can use the same account to set up Google Tag Manager.
How to Add Google Tag Manager to WordPress in 4 Simple Steps
To add Google Tag Manager to WordPress, you only need to follow these 4 steps.
- Step 1: Set up Your Google Tag Manager account
- Step 2: Add Google Tag Manager code to WordPress
- Step 3: Connect Tag Manager with your Website
- Step 3: Publish Tag in You Tag Manager
Step 1: Set up Your Google Tag Manager Account
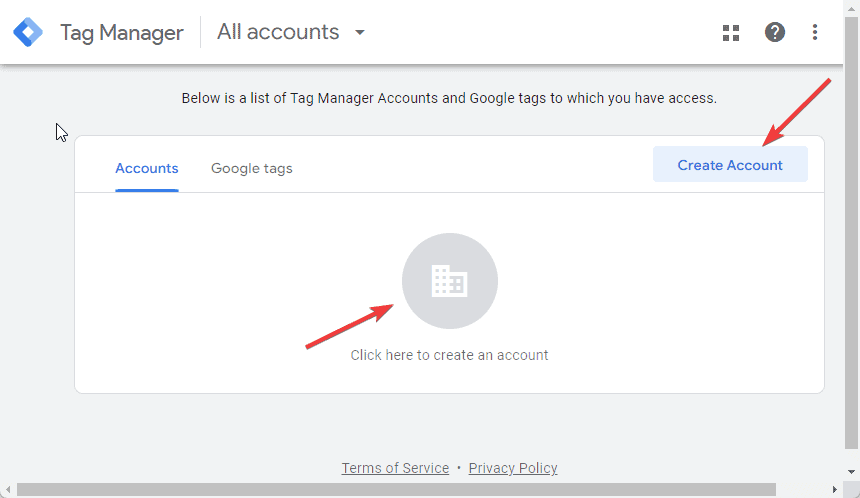
Visit the Google Tag Manager website and click the Start for Free button.

You’ll be automatically logged in with your Gmail Account.
The Google Tag Manager account creation page will open.
Now click Create Account at the top right corner or at the center of the page.
On the account setup screen, enter your Account Name and select your Country.
If you are setting up tag management for your business, use your business name as the account name here.
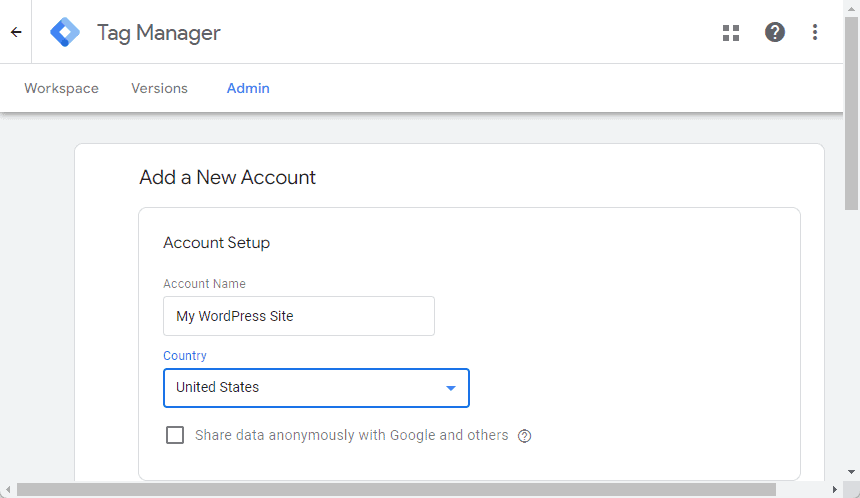
Scroll down to the Container Setup section, enter your website URL as the Container name, and select Web as the Target platform.
Now click the Create button at the bottom.

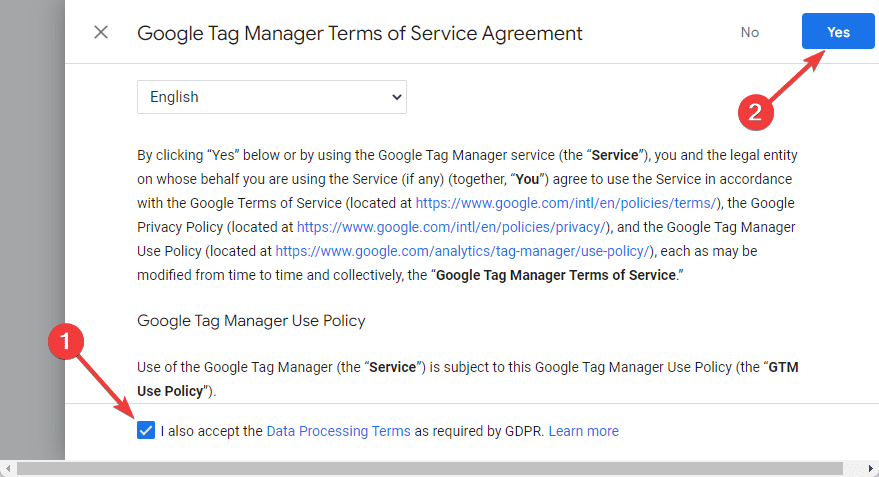
The Tag Manager Terms of Service Agreement window will pop up.
Check the box next to I also accept the Data Processing Terms as required by GDPR and click on YES.
Now, Google Tag Manager will create your account.
A new window containing two code snippets will pop up.
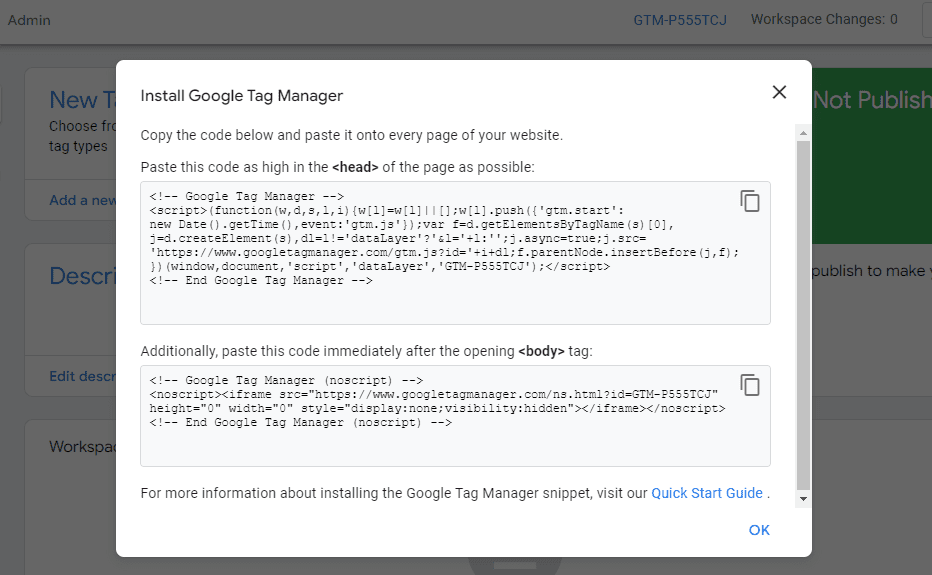
You can copy and paste these codes to a notepad or keep the tab open.
You’ll be using it in the next step.
Now you are done with setting up your Google Tag Manager account.
The next step is to add these Google Tag Manager code snippets to WordPress.
Note: A container is a collection of tags installed on a website.
You can add more than one container to your Google Tag Manager account.
And you can have as many tags as under each container.
Step 2: Add Google Tag Manager Code to WordPress
There are two methods to install Google Tag Manager on WordPress.
- Method 1: Adding Google Tag Manager Tracking Code Manually to WordPress
- Method 2: Using a Plugin to Add Google Tag Manager Code to WordPress
Both methods are straightforward.
So you can use either.
Method 1: Adding Google Tag Manager Tracking Code Manually to WordPress
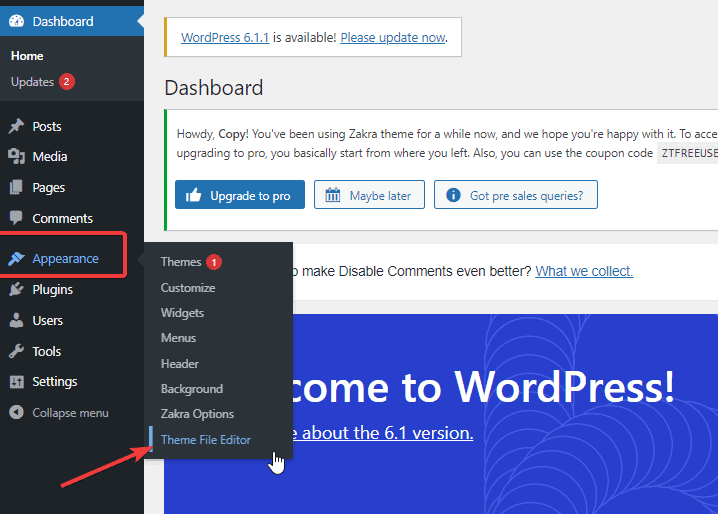
Log in to your WordPress admin dashboard.
On the left pane, go to Appearance and select Theme File Editor from the menu.
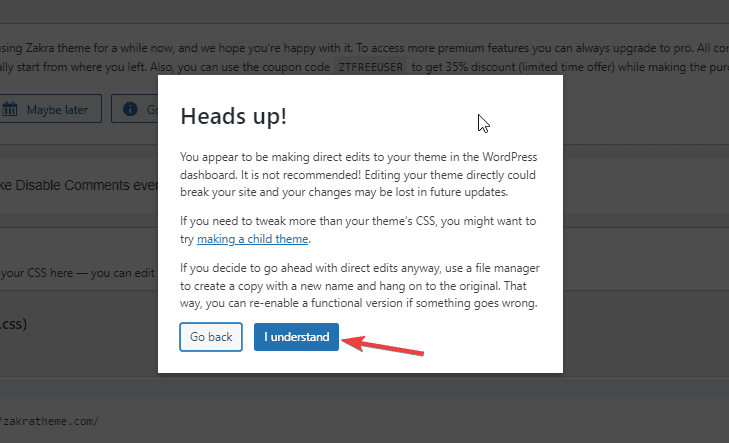
A Heads up dialogue will pop up.
Click on I understand to continue.
On the right side, under Theme Files, look for Theme Header files or header.php.
Most themes use either of these names.
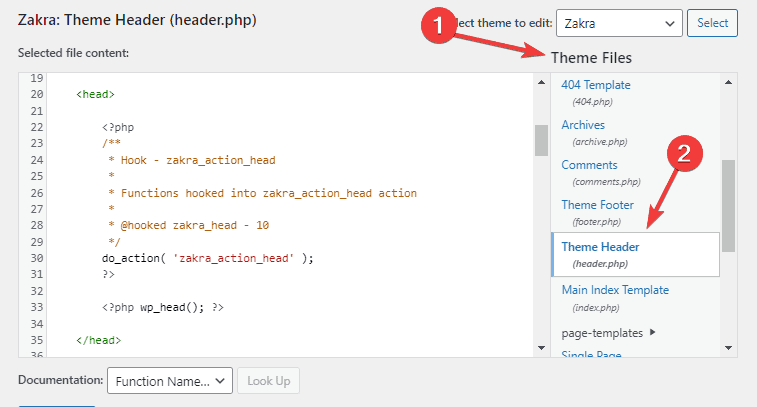
Click on header.php and locate the header tag, <head>.
Now go back to the Google Tag Manager code snippet, copy the first code and paste it as high in the <head> of the page as possible.
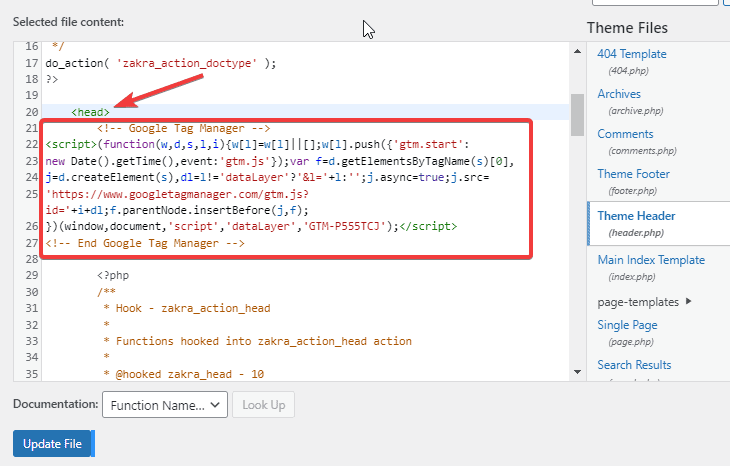
Next, Locate the body tag, <body>, then copy and paste the second code snippet immediately after the opening body tag.
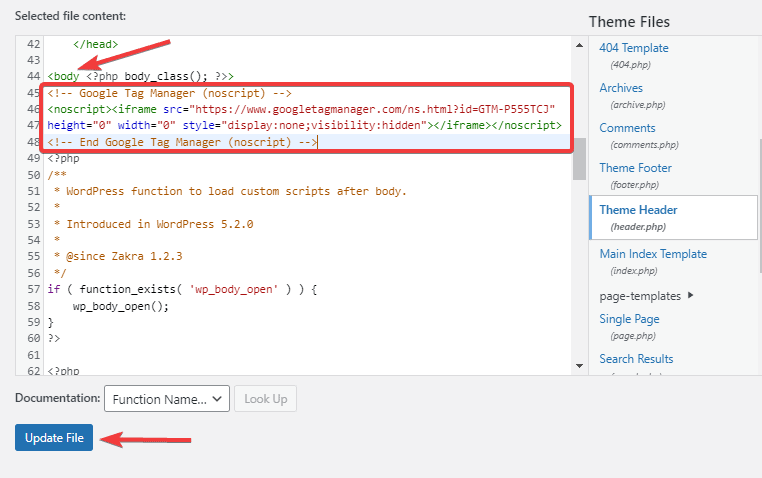
Once done, click the Update File button at the bottom of the page.
Thumbs up.
You have successfully add Google Tag Manager to WordPress.
The only disadvantage of this method is that the code will disappear anytime you update your WordPress theme.
So you’ll have to repeat the process.
But if you don’t want to, using a plugin doesn’t come with this concern.
That’s what you’ll learn next.
Method 2: Add Google Tag Manager to WordPress with a Plugin
The second method to add Google Tag Manager to your WordPres website is by using a plugin.
There are many plugin you can use for this purpose.
We’ll be using the easiest in this guide.
But here’s a list of other Google Tag Manager Plugins to try out:
- Google Tag Manager Plugin by Thomas Geiger
- Insert Header and Footers by WPbeginner
- Header and Footer Post Injection Plugin
- WPCode plugin.
Using WPCode Snippet Plugin to Add Google Tag Manager Code to WordPress
Once you have your Google Tag Manager tracking code, the next step is to install the WordPress plugin.
Activate the plugin, then follow these steps:
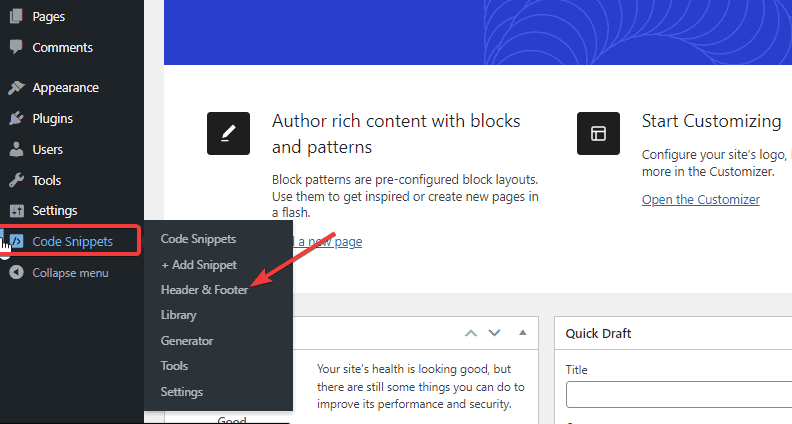
Open your WordPress Admin dashboard, go to Code Snippets and select Header & Footer from the options.
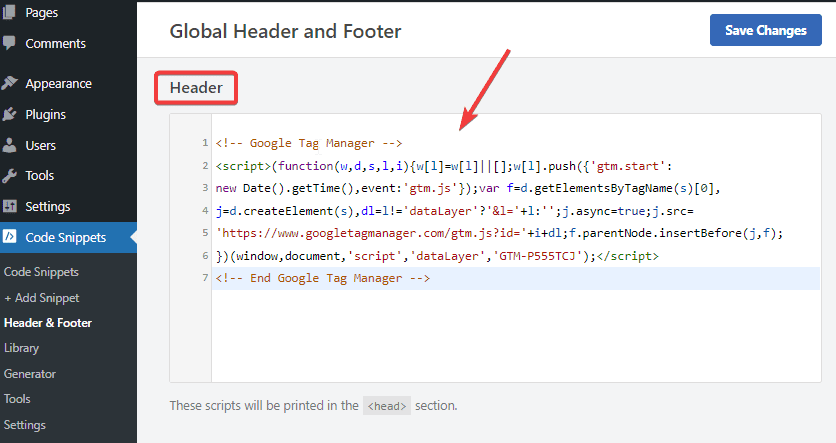
Paste the first Code snippets into the Header field.
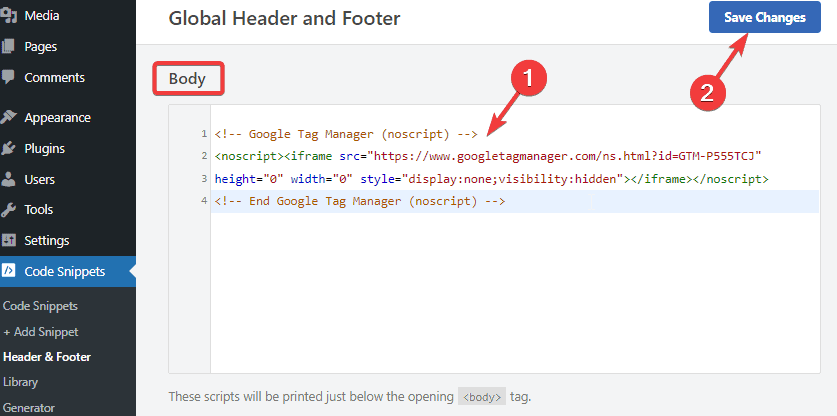
Paste the second code snippet into the Body field, then click the Save Changes button.
That’s it.
You are done adding Google Tag Manager to WordPress.
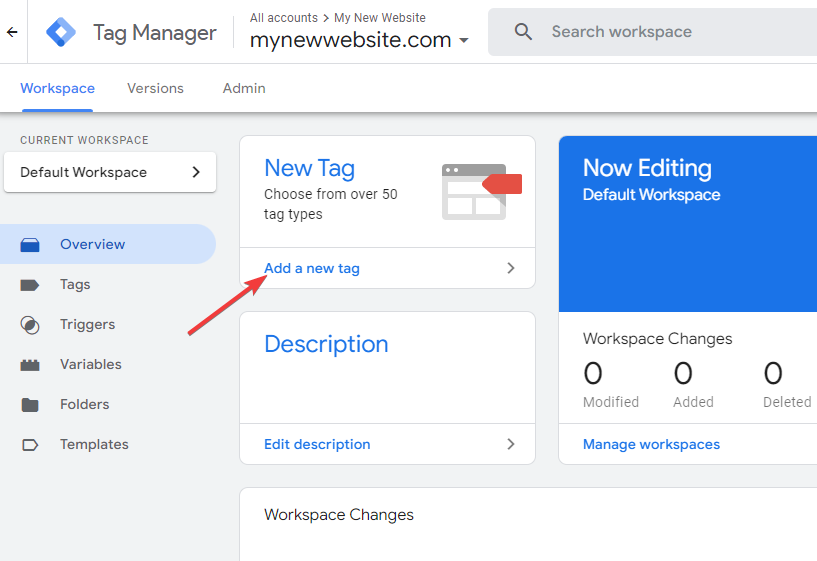
Step 3: Create a New Google Tag Manager Tracking Tag
Open your Google Tag Manager dashboard.
Click on Add a new tag under the New Tag Card.
Click on the Tag icon at the center of the Tag Configuration tile.
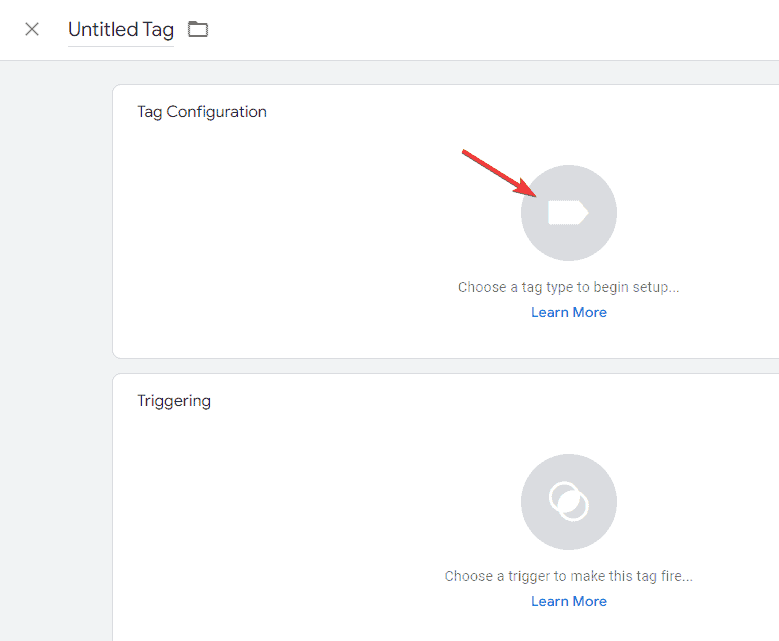
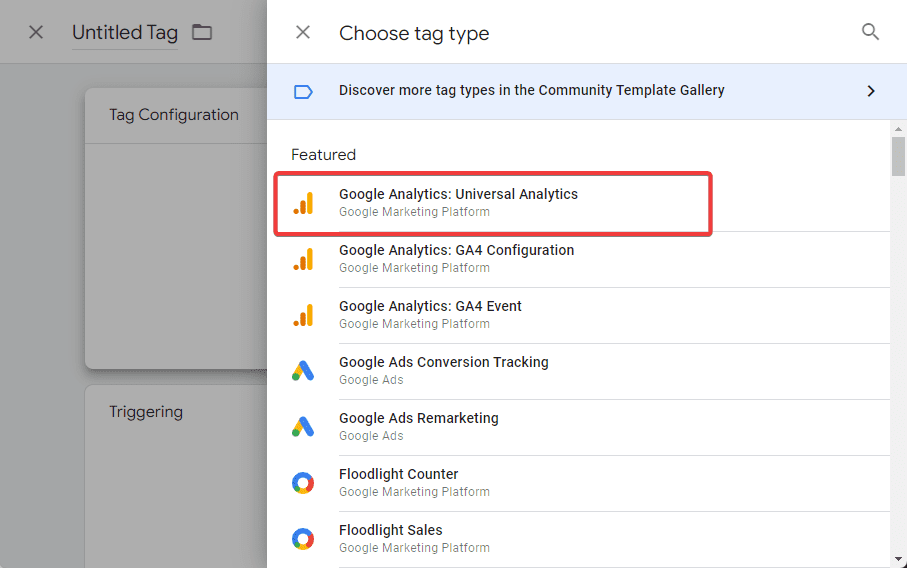
Choose a tag type from the list to begin setup.
There are more than 50 preset tag types in Google Tag Manager you can select from.
For this tutorial, we’ll select Google Analytics: Universal Analytics.
Under Track Type, select what data you want to collect on your website.
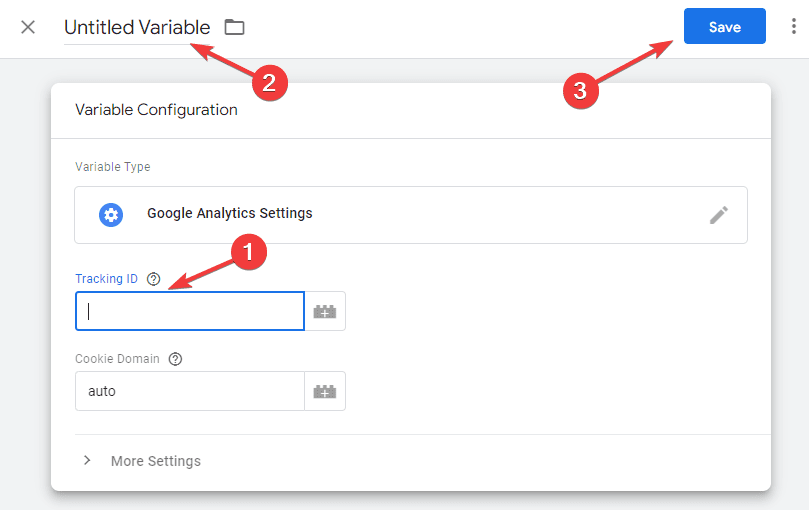
Then, choose New Variables under Google Analytics Settings.
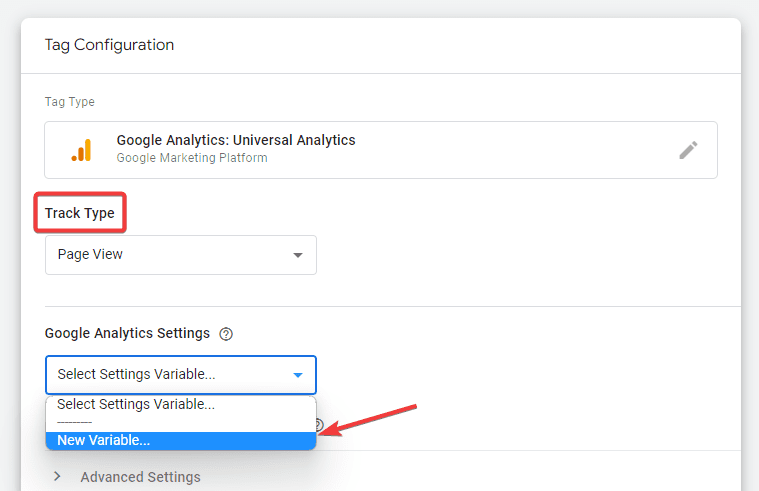
A Variable Configuration window will appear.
Enter your Google Analytics Tracking ID, rename the variable as you want it and click the Save Button.
Hint: To find your tracking ID on your Google Analytics Tracking ID, log in to your Analytic account and go to Admin>Property>Tracking info.
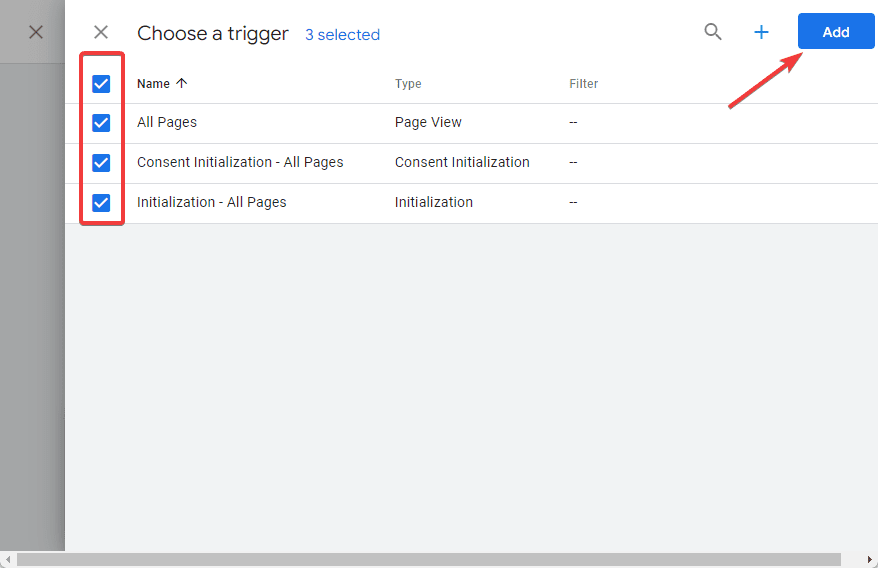
Now scroll down to Triggering on the tag configuration page and click the icon at the center.

Next, select all the triggers you want to fire your tag with and click the Add button.
Next, Give your tag a name and click on the Save button.
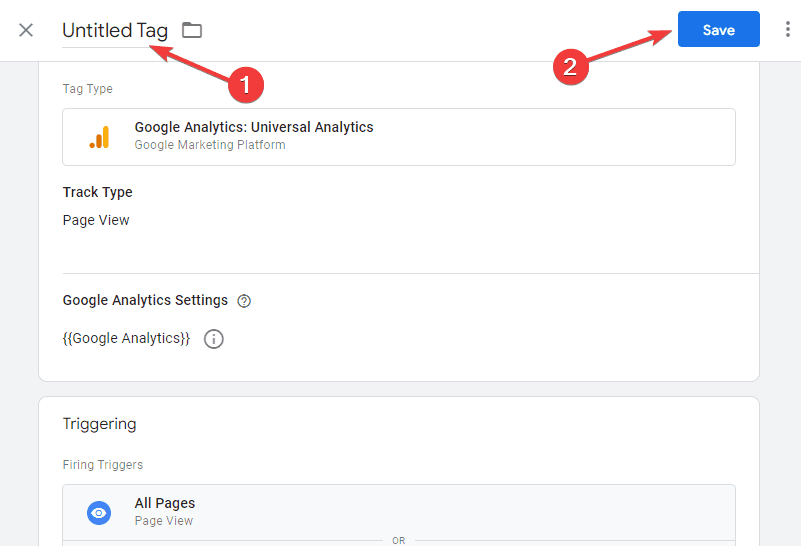
Done.
You have just created a GTM tag.
The last step is to publish your tag.
Step 4: Publish Your New GTM Tracking Tags
Open your Google Tag Manager dashboard and click the Submit button at the top of the page.
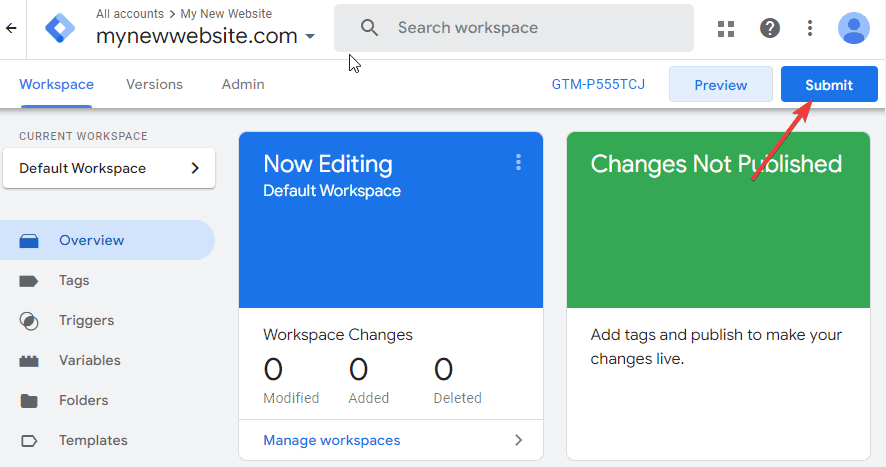
Enter a Version Name of your choice and click Publish to publish your container.

Again, go back to your tag management dashboard and click Preview.
A new window to connect tag assistants to your site will appear.
Enter your website URL and click Connect.
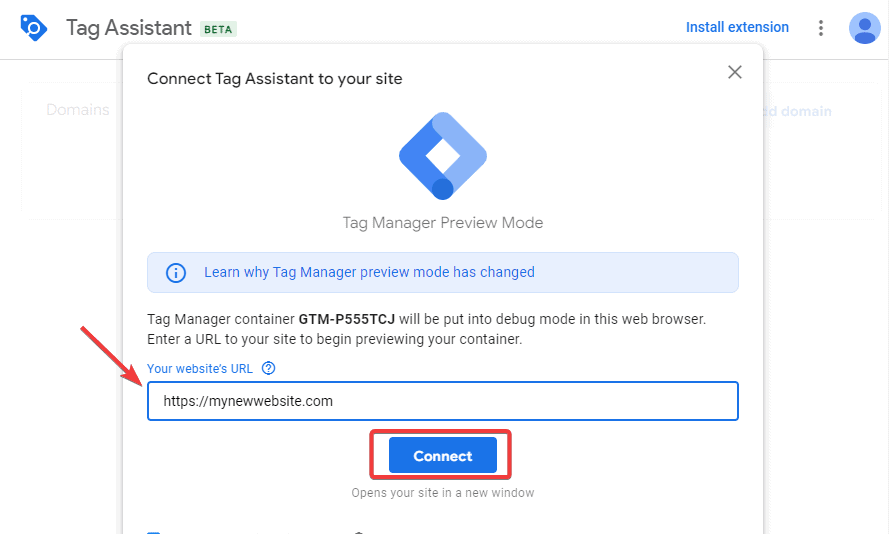
Your website will open in a new tab as Tag Manager tries to connect with your website.
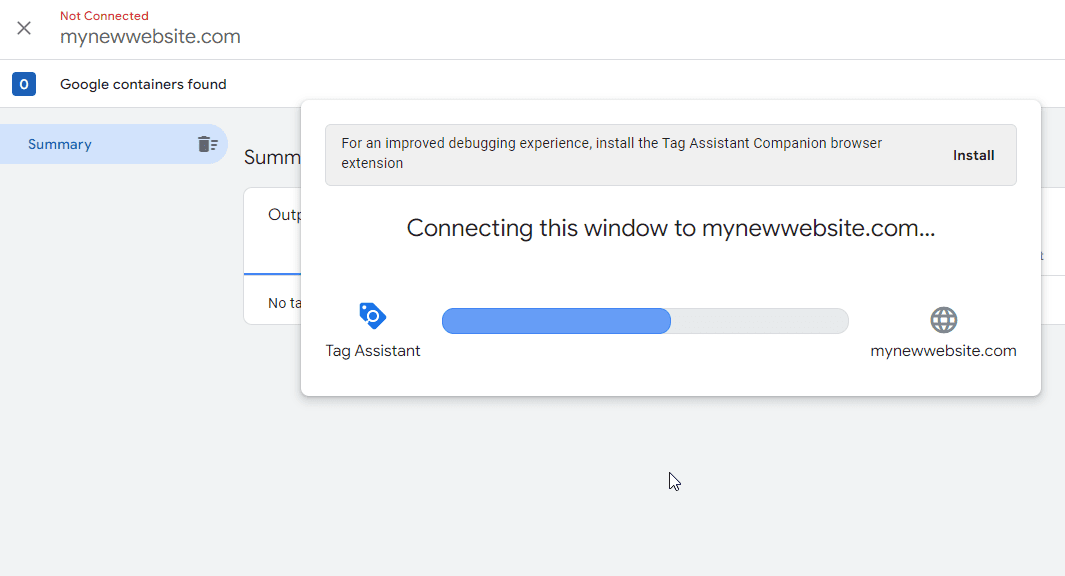
Wait for the connection to complete.
Go back to your GTM preview window.
You will see this notification: Google container found along with your container ID.
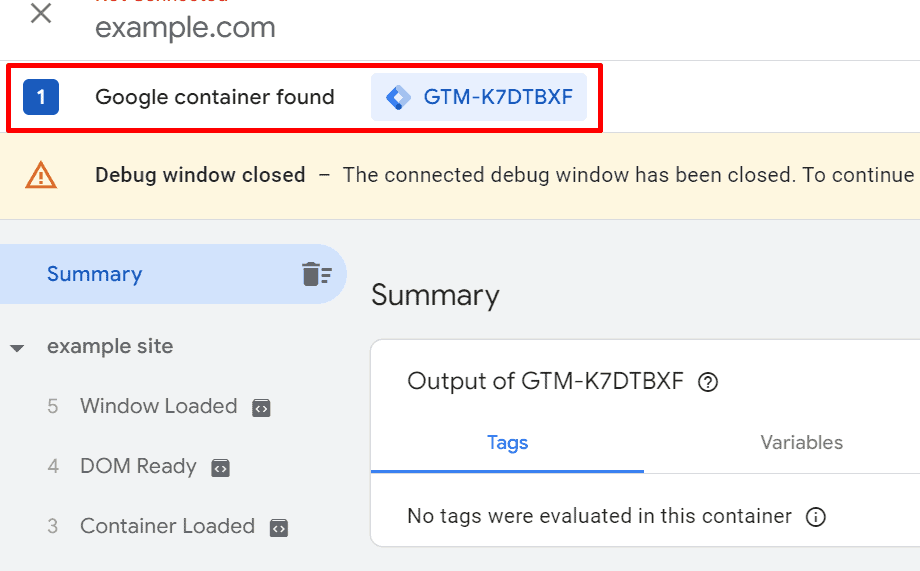
With that, you have completed connecting Google Tag Manager to your WordPress Website.
Let the tracking begin!
More Helpful WordPress Tutorials
- How to Add Google Adsense to WordPress: If you want to monetize your WordPress blog, Google Adsense is one of the best way. Here’s a practical guide for you.
- How to Use Google Analytics: Understanding how people engage with your website can help you make better business decision. Check out how to use Google Analytics to uncover information that matters to your business.
- How to Add Google Analytics to WordPress: In this comprehensive guide, you’ll learn how to set up Google Analytics for your WordPress Website step by step.
Wrapping Up
With Google Tag Manager on your WordPress website, you don’t need a hundred-and-one tool to track clicks, conversion, traffic, and other data.
Tag manager also allows you to easily integrate multiple marketing and analytics tracking scripts into your website without dealing with codes whatsoever.
And you can manage them all from a single dashboard.
We try our best to cover the A-Z of adding Google Tag Manager to WordPress in this tutorial.
Something missing?
Let us know in the comment section below.


