
Do you want to create your own WordPress widget?
Widgets are handy customization tools for adding non-content elements, such as signup forms, social share buttons, banners, links, etc., outside the body of your WordPress post or page.
While the default WordPress widgets might be enough when starting, as your business and website grow, you may want extra functionality not offered by any pre-packaged widgets.
Fortunately, you can code a WordPress widget and add it to designated widget areas on your site.
Creating a custom WordPress Widget is easier than you think. This tutorial will show you how to code and implement your custom widget.
- Frequently Asked Questions
- What You’ll Need to Create Custom WordPress Widgets
- How to create a WordPress Widget: The Basics
- How to create a WordPress Widget Step by Step
- Step #1: Extend the Base WP Widget Class
- Step #2: Use the Constructor Function to Add Widget Parameters
- Step #3: Use the Widget Function Create Widget Front-end
- Step #4: Configure the Widget Backend with the Form Function
- Step #5: Add the Widget Update Function
- Step #6: Register and Load the Widget
- Step #7: Adding Widget Code to WordPress
- Using Custom Widgets in WordPress
- More Helpful WordPress Tutorials:
- Wrapping up
Frequently Asked Questions
What is the Difference Between a Plugin and a Widget?
A plugin is a piece of software that keeps your website running efficiently. On the other hand, a widget adds content blocks that users can see and interact with on your website.
In other words, plugins are behind-the-scene WordPress performance tools, while Widgets are geared towards appearance and user interaction on a page.
Are Widgets Free on WordPress?
WordPress comes with a variety of pre-built free Widgets. If those are insufficient for your needs, you can find more free widgets by searching the WordPress repository.
In addition, there are paid widgets you can purchase from marketplaces like CodeCayon. Some plugins and themes also come with widgets.
Can I Make My Own WordPress Widget?
Of course, you can create your own WordPress widget. If you can’t find what you want in the default widgets set in WordPress and none of the existing third-party widgets offers what you need, creating a widget for your purpose is the way to go. And it’s fairly simple, as we’ll show you soon.
What You’ll Need to Create Custom WordPress Widgets
- WordPress Admin Access: To code and implement a custom widget on any WordPress site, you need access to the admin dashboard. In other words, you must have an admin or super admin role on the website.
- Basic PHP Coding Knowledge: WordPress is written with PHP programming language. To create a customised widget that works with WordPress, you must be familiar with PHP coding basics. However, you don’t need to be an expert to get started, as the WordPress codex offers reference code syntax that can guide you.
- A Text Editor: When writing any form of code, It’s advisable always to use a text editor instead of word processing tools like Google Docs and Microsoft Word. The problem is that these tools often add hidden characters to the code text strings, which might cause the code not to work.
- An FTP Client: After writing your widget code in a text editor, there are 3 ways to deploy it on your WordPress website. You can either add the code to the function.php file of your theme, use a code snippet plugin or add it to a custom plugin file. If you choose the first option, you will need an FTP Client to add the code to the theme file on your server.
- Hosting Account Cpanel: To access your FTP credentials, you have to log in to your hosting account dashboard. Also, you can add widget code directly to your website File Manager from within your Cpanel.
- Local or Staging Environment: Experimenting with a live WordPress site is never a good practice. It’s best to test your widget on a staging or local site before attempting it on a live site. You can check out our guide on how to set up a staging environment for your experiment.
How to create a WordPress Widget: The Basics
Before we show you the steps to create a custom WordPress widget, it’s good to understand how a WordPress widget works. Let’s see
The WordPress Widget lass is the built-in portion of WordPress that governs the action of widgets. Every new widget added to the WordPress site extends this class.
Therefore, to create a custom widget, the first step is to extend the base WP Widget Class. After that, there are 18 active WordPress functions with the wp widget class.
For the sake of this tutorial and since we are creating a simple custom widget, we’ll focus only on the four methods, which are the basic requirements for any widget to work.
- __construct() – The constructor function lets you define your widget’s parameters, such as widget ID, title and description.
- widget() – The widget function dictates your widgets’ front-end and output. It includes the HTML layout and design.
- form() – This function determines the WordPress dashboard’s back-end settings and widget options.
- update() – This function updates a particular instance of a widget in the database when new settings are saved in the WordPress admin area.
Of course, there are 14 other functions to create more sophisticated widgets. However, we only chose the four fundamentals. You can learn more about widget functions and classes here.
How to create a WordPress Widget Step by Step
Now that you understand the basics of widget creation, we’ll show you how to create your first custom widget using the above functions. Here are the steps involved.
- Step #1: Extend the Base WP Widget Class
- Step #2: Use the Constructor Function to Add Widget Parameters
- Step #3: Use the Widget Function Create Widget Front-end
- Step #4: Configure the Widget Backend with the Form Function
- Step #5: Add the Widget Update Function
- Step #6: Register and Load the Widget
- Step #7: Add Widget Code to WordPress
For this tutorial, we’ll create a simple custom widget that displays this message on our website sidebar; Hello user, we are delighted to have you here! Let’s go.
Step #1: Extend the Base WP Widget Class
The wp widget class must be extended for each widget. That’s the first step in creating a custom widget.
To create a new class that extends the widget class, copy and paste the line of code below into your Text Editor.
class [name of your widget] extends WP_widget {Go ahead and replace the placeholder text with your widget name. You can use any name you like. Here’s what ours look like.
class mycustom_widget extends WP_Widget {Now that we’ve created the widget, Next, we’ll write the functions of our widget using the four basic methods listed above, one or after the other. So we start with the constructor function.
Step #2: Use the Constructor Function to Add Widget Parameters
The constructor function assigns basic information like title, ID, description and class name to your widget. Here’s what the constructor function for our widget looks like.
function __construct() {

parent::__construct(

// WIDGET ID

‘mycustom_widget’,

// WIDGET NAME

__(‘MyCustom Widget’, ‘mycustom_widget_domain’),

// WIDGET DESCRIPTION

array( ‘description’ => __( ‘Sample widget based for custom widget tutorial’, ‘mycustom_widget’ ), )

);

}
Step #3: Use the Widget Function Create Widget Front-end
The widget() function is where you put the code that displays the content that users see. Since we just want to create a widget that welcomes users to our website, our code will look like
public function widget( $args, $instance ) {

$title = apply_filters( ‘widget_title’, $instance[‘title’] );

// before and after widget arguments are defined by themes

echo $args[‘before_widget’];

if ( ! empty( $title ) )

echo $args[‘before_title’] . $title . $args[‘after_title’];

// This is where you run the code and display the output

echo __( ‘Hello user, we are delighted to have you here!’, ‘mycustom_widget_domain’ );

echo $args[‘after_widget’];

}
With the code above, we have set up this widget to use a user-specified title and display “‘Hello user, We are delighted to have you here!”
You’ll see this when we eventually deploy it.
Step #4: Configure the Widget Backend with the Form Function
The form function controls how the widget will look in the admin area.
The code will be a bit complex for a widget with many options. In our case, the widget does a single simple thing. Therefore, the code will be minimal.
public function form( $instance ) {

if ( isset( $instance[ ‘title’ ] ) )

$title = $instance[ ‘title’ ];

else

$title = __( ‘Default Title’, ‘mycustom_widget_domain’ );

?>

<p>

<label for=”<?php echo $this->get_field_id( ‘title’ ); ?>”><?php _e( ‘Title:’ ); ?></label>

<input class=”widefat” id=”<?php echo $this->get_field_id( ‘title’ ); ?>” name=”<?php echo $this->get_field_name( ‘title’ ); ?>” type=”text” value=”<?php echo esc_attr( $title ); ?>” />

</p>

<?php

}
Step #5: Add the Widget Update Function
To get this custom widget to work properly, we need to implement the update function, which updates the information in the database every time a setting is saved.
public function update( $new_instance, $old_instance ) {

$instance = array();

$instance[‘title’] = ( ! empty( $new_instance[‘title’] ) ) ? strip_tags( $new_instance[‘title’] ) : ”;

return $instance;

}
This code takes the title of the newly created instance, strips away any HTML or PHP tags, replaces the old instance with the new one, and then returns the updated instance.
Step #6: Register and Load the Widget
The final step to creating a custom WordPress widget is registering your widget using the add_action() function and the widget_init hook. Here’s how
function mycustom_register_widget() {

register_widget( ‘mycustom_widget’ );

}

add_action( ‘widgets_init’, ‘mycustom_register_widget’ );
With this code, we created a new function to register our widget and use the Widget ID specified in the constructor fiction to identify it.
Next, we hook this registration function with WordPress using the widgets init hook and the name of the registration function.
Anytime the add action function is called, it will identify the widget and run the codes. So now, our complete widget code will look like this.
class mycustom_widget extends WP_Widget {

function __construct() {

parent::__construct(

// WIDGET ID

‘mycustom_widget’,

// WIDGET NAME

__(‘MyCustom Widget’, ‘mycustom_widget_domain’),

// Widget description

array( ‘description’ => __( ‘Sample widget based for custom widget tutorial’, ‘mycustom_widget’ ), )

);

}

public function widget( $args, $instance ) {

$title = apply_filters( ‘widget_title’, $instance[‘title’] );

// before and after widget arguments are defined by themes

echo $args[‘before_widget’];

if ( ! empty( $title ) )

echo $args[‘before_title’] . $title . $args[‘after_title’];

// This is where you run the code and display the output

echo __( ‘Hello user, we are delighted to have you here!’, ‘mycustom_widget_domain’ );

echo $args[‘after_widget’];

}

public function form( $instance ) {

if ( isset( $instance[ ‘title’ ] ) )

$title = $instance[ ‘title’ ];

else

$title = __( ‘Default Title’, ‘mycustom_widget_domain’ );

?>

<p>

<label for=”<?php echo $this->get_field_id( ‘title’ ); ?>”><?php _e( ‘Title:’ ); ?></label>

<input class=”widefat” id=”<?php echo $this->get_field_id( ‘title’ ); ?>” name=”<?php echo $this->get_field_name( ‘title’ ); ?>” type=”text” value=”<?php echo esc_attr( $title ); ?>” />

</p>

<?php

}

public function update( $new_instance, $old_instance ) {

$instance = array();

$instance[‘title’] = ( ! empty( $new_instance[‘title’] ) ) ? strip_tags( $new_instance[‘title’] ) : ”;

return $instance;

}

}

function mycustom_register_widget() {

register_widget( ‘mycustom_widget’ );

}

add_action( ‘widgets_init’, ‘mycustom_register_widget’ );
Now the last step is to add these lines of code to WordPress.
Step #7: Adding Widget Code to WordPress
Lastly, It’s time to add the widget code to WordPress. There are 3 ways to do this.
- Custom plugin: You can create a site-specific plugin and add the widget code inside the plugin PHP file. You can check out our guide on how to create a plugin.
- Code Snippet Plugin: The safest way to add custom code in WordPress is to use a code snippet plugin. We advise beginners to use this method as it poses no risk to your WordPress website.
- Theme function.php File: Another way which we’ll use in this guide is to add the widget code to the function.php file of your WordPress theme.
Adding Widget Code Snippet to Theme function.php File
You can access your theme function.php file via your admin dashboard by navigating to Appearance, Theme File Editor, and then the function.php file.
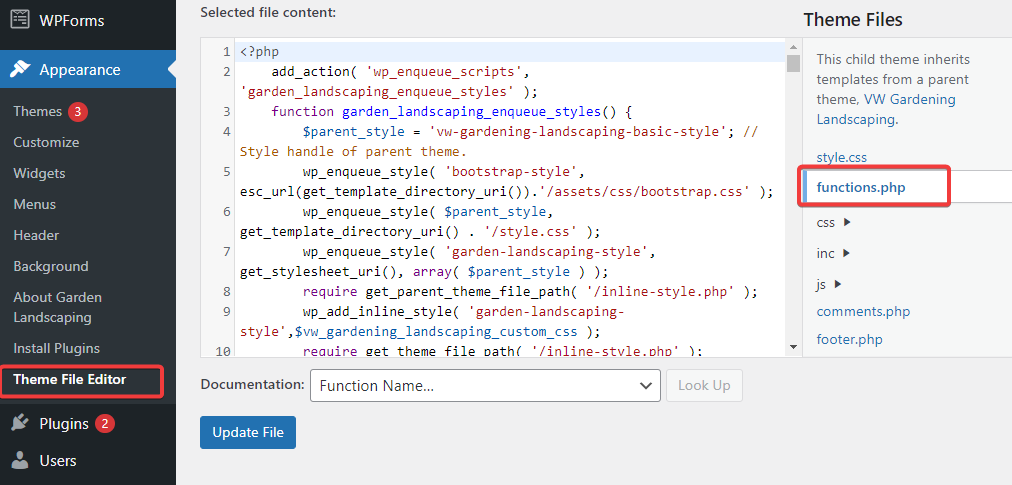
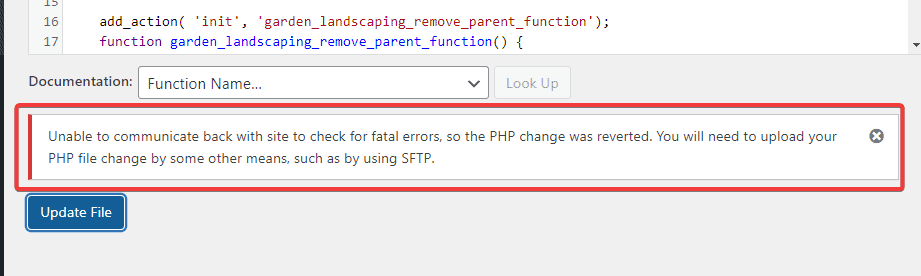
However, some themes will not allow you to edit theme files using this method, especially live themes.
The best way is to access your website file with an FTP or Cpanel File Manager.
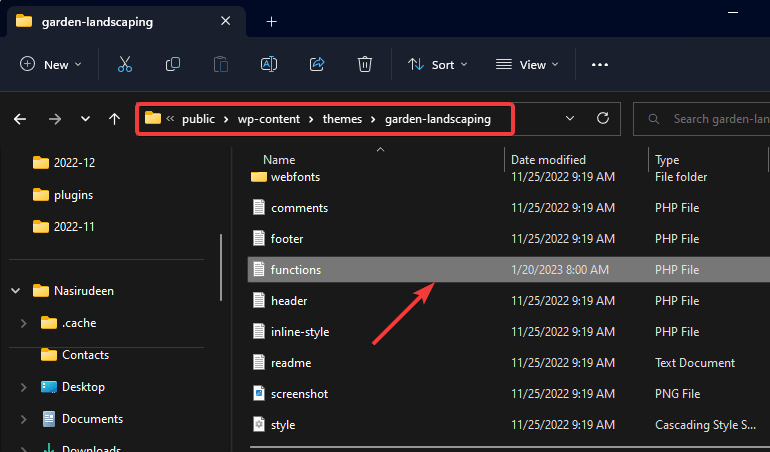
Since we are running this example on a local testing environment, we don’t need an FTP or Cpanel to access website files. Instead, we need to locate it on local storage and add the widget code.
So we’ll open the local site folder and navigate to public>wp-content>themes>theme name. From here, we’ll open the function.php file.
Next, we copy and paste the widget code and then save the changes.
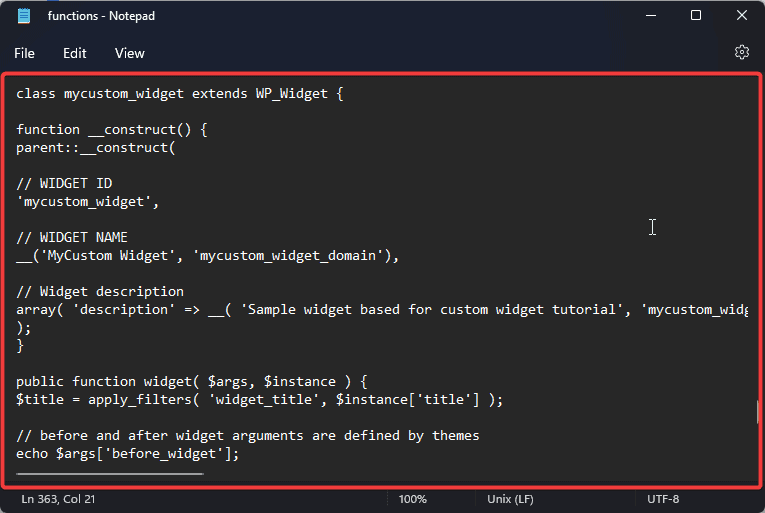
That’s it. You’ve added your custom widget to WordPress. Now let’s see our custom widget in action.
Using Custom Widgets in WordPress
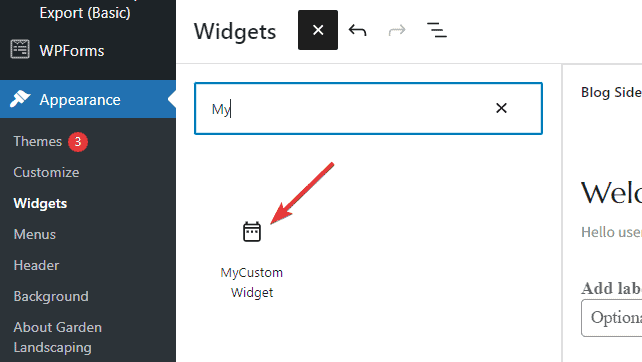
Log in to your WordPress admin dashboard, and go to Appearance>Widget.
You’ll see your newly installed Widget from the list of available widgets.
The widget we created is MyCustom Widget. Here;
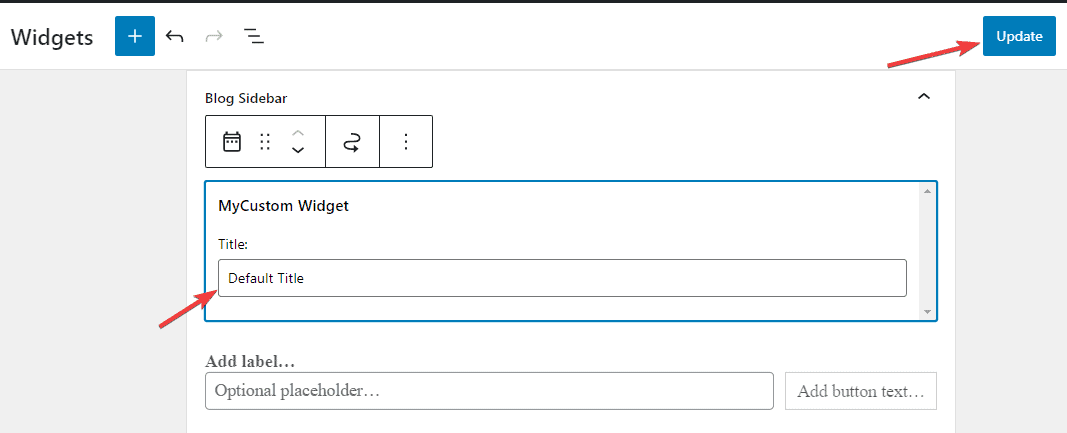
Now drag this widget and drop it in the Blog Sidebar. You can change the Default Title to anything.
Once you are done, click the Update button to apply your changes.
Finally, visit your website. You’ll see your widget in action. The one we just created looks like this;
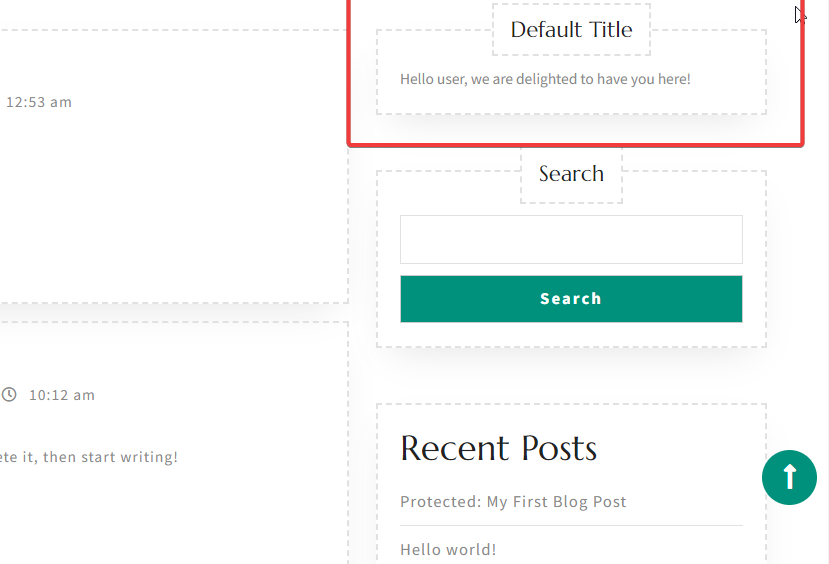
And that’s all. You’ve successfully created a custom WordPress widget.
More Helpful WordPress Tutorials:
- How to Create a WordPress Plugin: Whether you need a custom plugin for your website or want to create a WordPress plugin and monetise it, this detailed guide article should get you started.
- How to Build a Website With WordPress: WordPress is the world’s most popular content management system and website builder. Learn how to build a website with WordPress in little to no time.
- How to Create a WordPress Staging Site: Do you want to redesign your entire WordPress website without putting it in maintenance mode? Learn how to create a WordPress staging site in this details guide.
Wrapping up
While creating a custom WordPress widget might seem like a tall order, it’s not. You just need basic PHP coding knowledge and an understanding of how WordPress operates.
And thanks to WordPress codex, almost all the code you need is already written for you. You only need to tweak it for your purpose.
We hope you find this guide helpful. If you still need help on WordPress-related topics, let us know in the comments. We’ll try to help.


