
If you have a portfolio of WordPress websites, you’ll agree that managing them individually is far from being the best approach especially if your sites have a few common traits.
You may be wondering if there’s a more efficient and effective way to manage multiple WordPress from a single WordPress installation. And yes, there is. That’s where WordPress multisite comes to play.
With WordPress Multisite, you can create as many websites as you want and administer them as a network of websites with overlapping similarities. In this tutorial, we are going to show you how WordPress multisite works and walk you through the process of setting it up.
- What is WordPress Multisite?
- Do I Need WordPress Multisite?
- What Create a Multisite in WordPress?
- What You’ll Need to Enable WordPress Multisite
- How to Enable WordPress Multisite: The Basics
- How to Set up WordPress Multisite Step by Step
- Step #1: Enable WordPress Multisite Settings
- Step #2: Set up and Install WordPress Multisite Network
- Step #3: Update wp-config.php and .htaccess files
- Step #4: Configure Your Network Settings
- Step #5: Setting up Wildcard Subdomains
- Step #6: Add New Website to Your Network
- Step #7: Adding Plugins and Themes to WordPress Multisite
- Step #8: Add New users to WordPress multisite
- More Helpful WordPress Tutorials:
- Wrapping up
What is WordPress Multisite?
WordPress Multisite, formerly known as WordPress Multi-User (WPMU), is a feature that enables users to create and run multiple websites using the same WordPress installation on your host server.
In simple terms, Multisite allows you to run many websites from a single WordPress dashboard.
Do I Need WordPress Multisite?
Having multiple WordPress websites doesn’t automatically make WordPress multisite right for you.
WordPress multisite is only great when you have sites with similar functionality and features such as the same WordPress core files, themes, and plugins.
An example of a blogger with many blogs in the same niche or school or business with different departments. If your sites are unrelated, multisite might not be for you.
What Create a Multisite in WordPress?
Multisite in WordPress is a built-in feature. Once you install and set up any version of WordPress from 3.0 and above, you only need to enable multisite and add your network of sites using the steps in this guide.
What You’ll Need to Enable WordPress Multisite
To enable WordPress multisite, there are a handful of requirements to put in place.
- WordPress Backup: Enabling multisite on a WordPress website will automatically update WordPress to the latest version. You don’t want to lose any of your website data. So make sure you back up your website files and database.
- Web Hosting Account: You need to purchase a hosting plan that supports multisite. Most WordPress hosting providers have special plans for multisite. If you are not sure, opt for a Virtual Private Server (VPS) or dedicated hosting as shared hosting may not cut it for multiple websites.
- Confirm Pretty Permalinks: Before you set up multisite, make sure you have pretty permalinks activated on WordPress. You can confirm this by navigating to Settings>permalinks from your admin dashboard. Pretty permalinks should look like http://mywebsite.com/mypage and not like this http://mywebsite.com/?p=2345.
- An SFTP/FTP Client: You also need an SFTP/FTP tool to upload and edit files on your server. An FTP client is a third-party software that allows the exchange of data between your device and network. You’ll need the FTP credentials provided by your web host to connect FTP clients to your website server. Filezilla and Cyberduck are two excellent and free options.
- Your Web Host Cpanel: Instead of using an FTP program, you can enable WordPress multisite by editing your website file from File Manager. That’s if your hosting platform offers Cpanel. We’ll show you how in this guide.
- A New WordPress Installation: Make sure you have a new WordPress installation to enable multisite. If you’ll be using an existing WordPress website, you’ll need to deactivate all your WordPress plugins. You can follow this guide on how to disable WordPress plugins.
How to Enable WordPress Multisite: The Basics
To get a full hang of how WordPress multisite works, there are a few things you should understand. First is the difference between user roles. We’ll explain that briefly.
Understanding Super Admin and Site Admin in Multisite
When you enable the WordPress multisite, you become the super admin, also called network admin with authority over other websites added to that network.
So you’ll have access to the Network Admin settings where you can see and control all the websites within the entire network.
To add a new website to your WordPress multisite network, you’ll have to provide an admin email for the new site other than the email you are using for the multisite network.
Once you add the site, WordPress will automatically create a username and password and then send it to the email address you enter.
The user will receive an email with instructions to set new login details and access the added site. That user is called the Site Admin.
Typically, a site admin only has administrative authority over a single site within the network. They can have access to more sites if the super admin adds them as administrators to other sites.
Site admins have lower-level access. For instance, the super admin is in charge of the installation of themes and plugins throughout the network.
The site admin has no such power, they can only activate or deactivate them. And that’s even if the network admin enables them.
Website administrators can add users to the WordPress website they administer and not all the websites in the network.
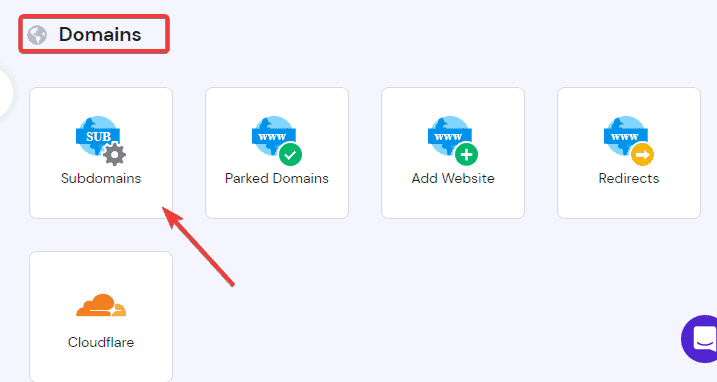
Understanding Subdomains and Subdirectories
Out of the box, WordPress multisite gives you two options to add sites to your network either as a subdomain or subdirectory. Meaning that all the websites on the network will have the same root URL.
So if your site is mywebsite.com, the URL structure for sites in the network will look like this
- For subdomains: https://site1.mywebsite.com
- For subdirectories: https://mywebsite.com/site1/
If you choose subdomains as the address of sites in your network, you need to configure wildcard subdomains on your server.
We’ll show you how to do that. You won’t need this extra step with subdirectories. Note that the choice you make here will apply to all sites in your network and It’s irreversible.
Alternatively, you can give each site on the network its domain so that they appear as if they are standalone websites to users.
This process of adding a custom domain to a multisite is called domain mapping.
Now that you understand some basics about how WordPress multisite works, let’s dive into how to install and set up multisite step by step.
How to Set up WordPress Multisite Step by Step
- Step #1: Enable WordPress Multisite Settings
- Step #2: Set up and Install WordPress Multisite Network
- Step #3: Update wp-config.php and .htaccess files
- Step #4: Configure Your Network Settings
- Step #5: Setting up Wildcard Subdomains
- Step #6: Add New Website to Your Network
- Step #7: Adding Plugins and Themes to WordPress Multisite
- Step #8: Add New users to WordPress multisite
Step #1: Enable WordPress Multisite Settings
For this tutorial, we’ll assume you already have a WordPress installation to enable multisite on. If not, you can quickly install and set up WordPress by following this tutorial.
Multisite network features is a built-in feature that comes with all the latest versions of WordPress since version 3.0. However, this feature is deactivated by default. You need to activate it.
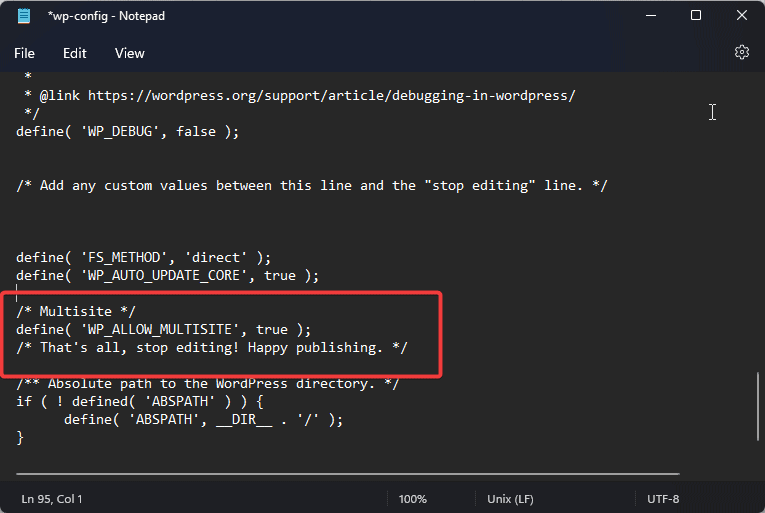
To do that, you’ll edit the WordPress configuration (wp-config.php) file. You will add the following code to your wp-config.php file to enable multisite.
/* Multisite */

define( 'WP_ALLOW_MULTISITE', true );
Again, enabling multisite will modify your database. So before you enable the multisite feature, make sure to back up WordPress.
You can edit this file from within your web host File Manager or use an FTP client. Both methods are simple.
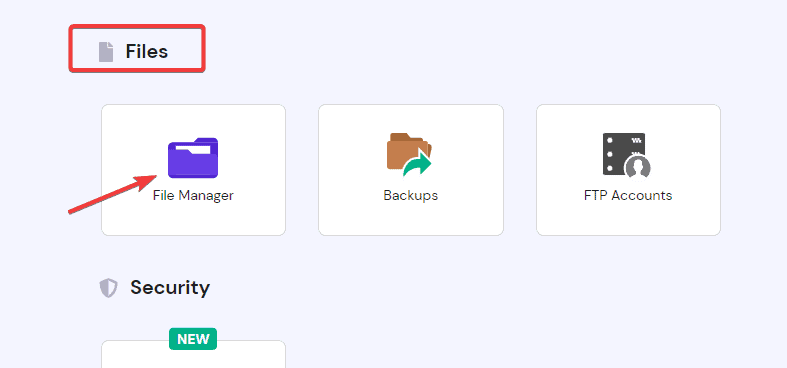
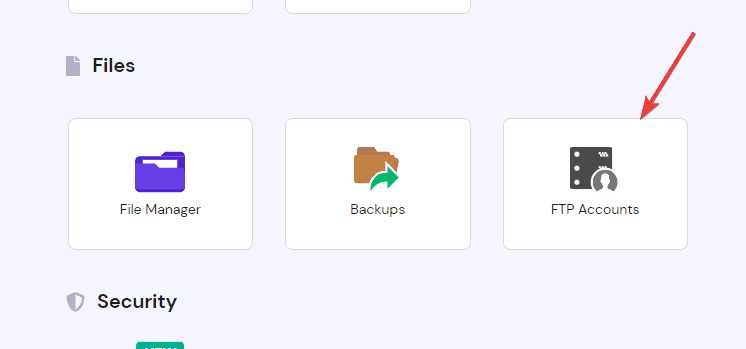
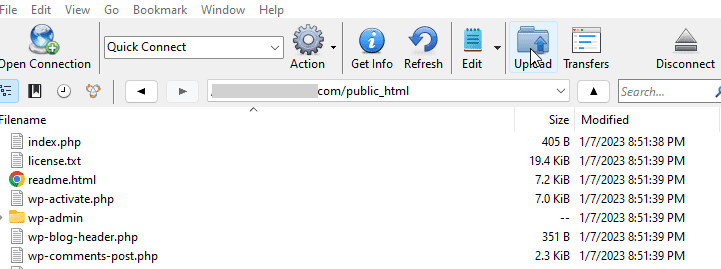
To use File Manager, simply login to your hosting dashboard, locate Cpanel and go to File Manager. You should find this under Files.
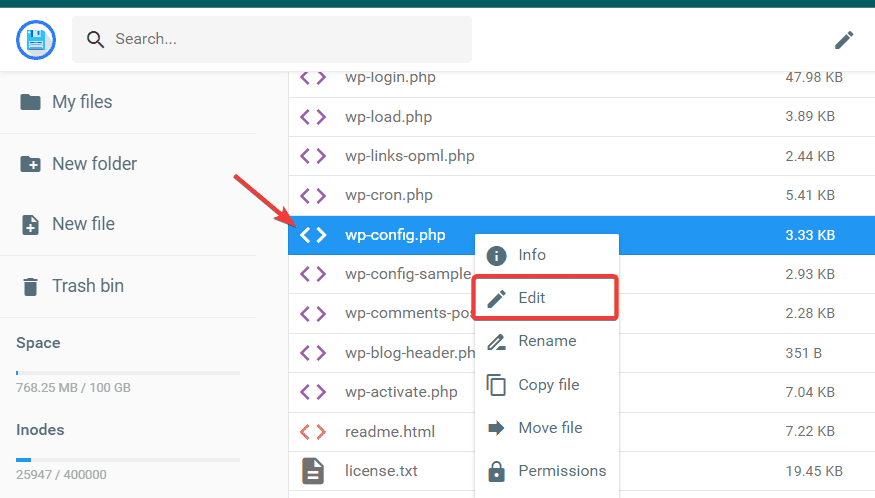
Once you click, you’ll be taken to your website’s root folder, public_html. Inside this folder, you’ll see the wp-config.php file, right-click and select Edit from the options.
Once it opens, paste the code above right before the like that reads:
/* That’s all, stop editing! Happy blogging. */ 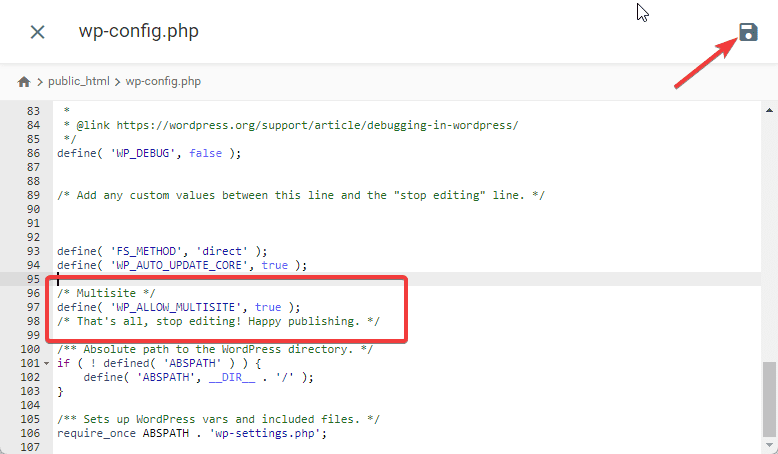
Click the Save icon at the top right corner to apply the changes. And that’s all, you’ve successfully enabled WordPress multisite.
If you don’t have access to your File Manager, you can use an FTP tool. We’ll use Cyberduck to show you how.
After downloading Cyberduck to your computer, launch it and click Open Connection at the top left.
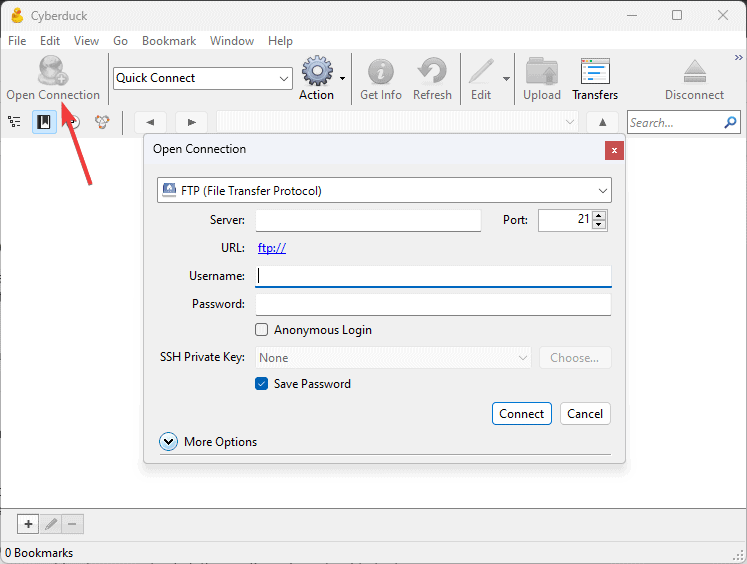
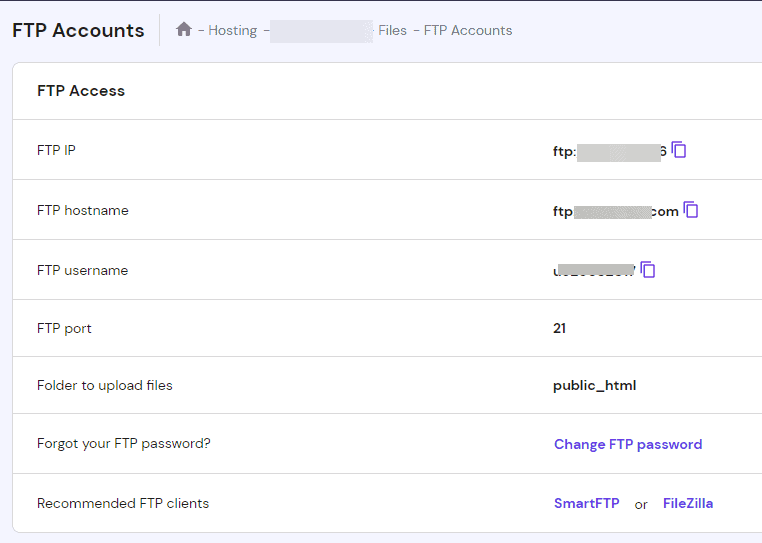
A new connection window will pop up, you are to supply your FTP credentials, Port, Username, and Password before you can continue. You should find this information on your web host account.
So log in to your web host account and locate FTP Accounts or FTP Details. You’ll find it under Files in most cases.
If you can’t find yours, you may need to contact your hosting provider and ask for it.
Next, enter the details into their respective fields on Cyberduck and click the Connect button.
Cyberduck will now establish a secure connection to your website server. Once connected, navigate to your website’s root folder, the public_html folder.
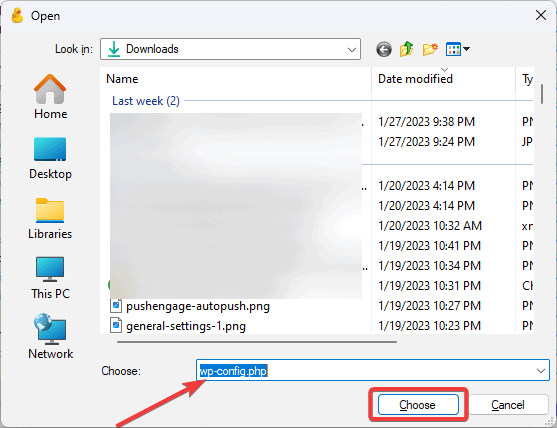
You’ll find wp-config.php inside the folder. Right-click on it and select Download from the options.
Once the download is complete, open the file with a text editor or code editor on your computer and insert the code in the same location as above.
Save the file. You need to upload it back to the public_html folder on your server. So go back to Cyberduck and click the Upload button from the top toolbar.
Your device storage will open. Locate the just-edited wp-config.php file on your computer and choose to upload it.
Once the upload is complete, you are done.
What the code does is tell WordPress to activate multisite settings. The next step is to set up your multisite network.
Step #2: Set up and Install WordPress Multisite Network
Once you’ve successfully activated multisite settings, It’s time to install the WordPress multisite network. Follow these steps.
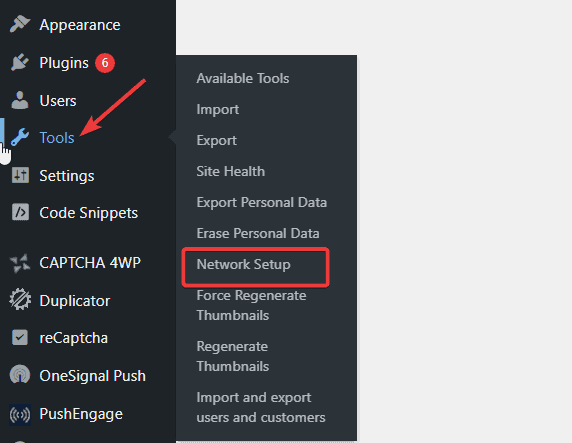
Log in to your WordPress admin dashboard, navigate to Tools on the left panel, and click on Network Setup from its menu.
This will take you to the Network setup screen. Here, you’ll configure your network.
If you are yet to deactivate all your plugins, you’ll see a warning message that reads; Please deactivate your plugins before enabling the Network feature.
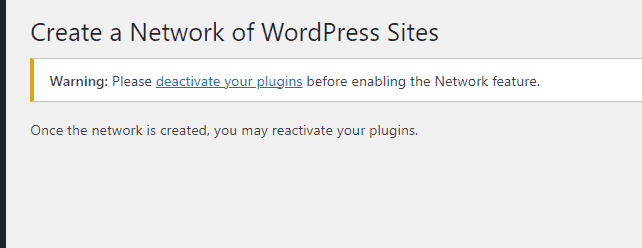
Go ahead and deactivate them to proceed. After that, Navigate back to Tools>Network Setup.
Under Addresses of Sites in your Network, you have the option to choose either subdomains or subdirectories as the URL structure.
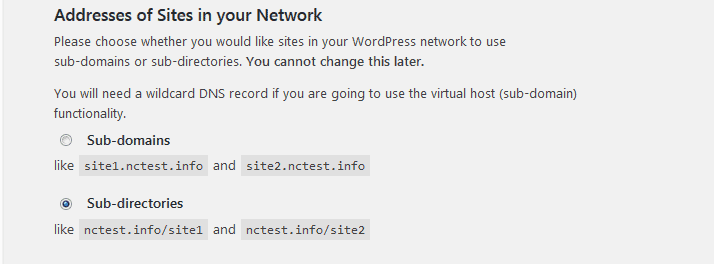
The settings you make here can’t be changed later. So you have to be careful with your options.
Using Subdomains is the widely-accepted option because they look more professional. And that’s what we’ll go with here. However, it involves an extra step where you need to configure wildcard domains. We’ll show you how to do that in the next steps.
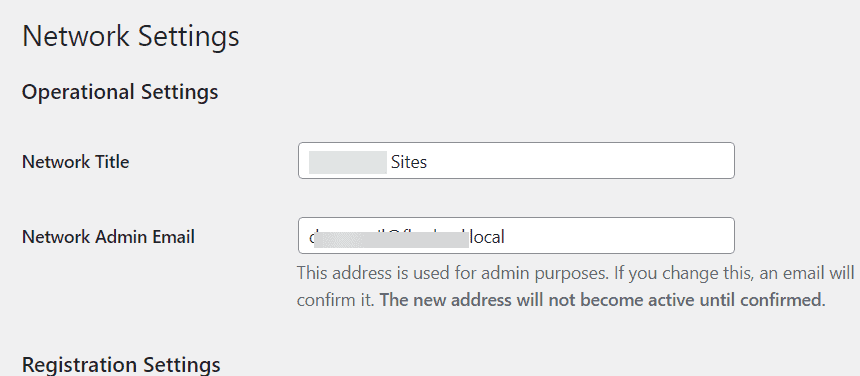
Next, under the Network Details section, enter your desired title for your multisite network inside the Network Title field. Then add the Network Admin Email address so you can receive notifications.
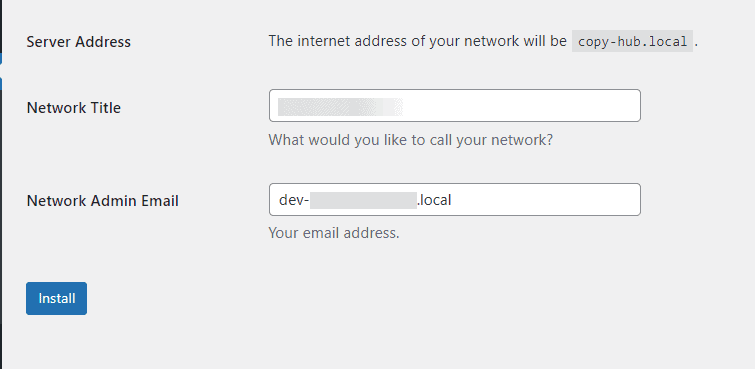
Once done, click on the Install button. WordPress will automatically redirect you to a screen with two code snippets.
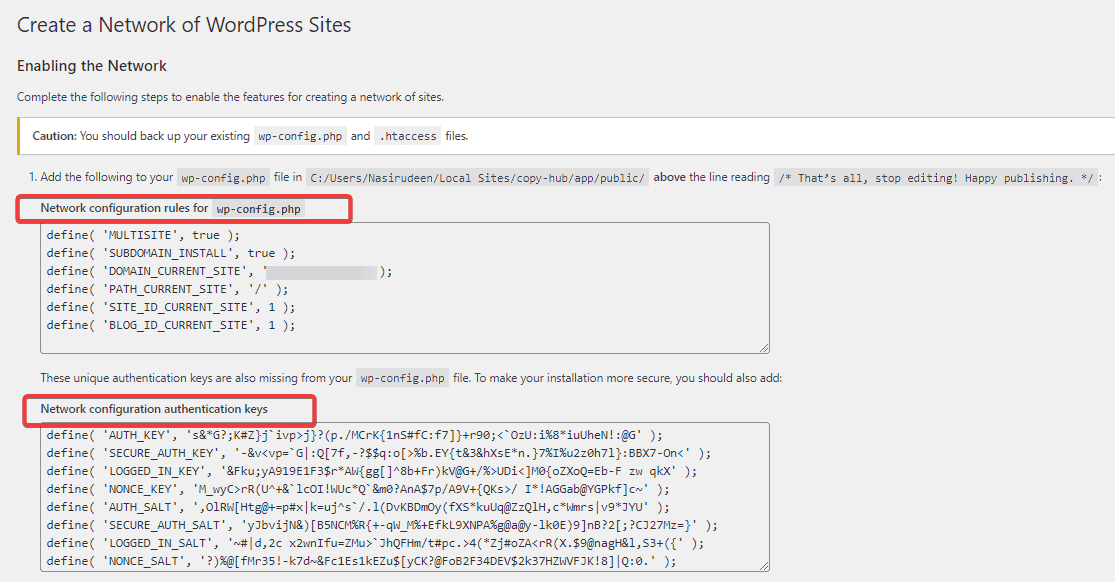
You are to add one of the codes to the wp-config.php file and the other to the .htaccess file. That’s our next step.
Step #3: Update wp-config.php and .htaccess files
Both the wp-config.php and .htaccess files are located in your WordPress root directory.
As with step #1 above, you can access both either with your File Manager or FTP clients. We’ll proceed with File Manager as It’s more straightforward. You’ll need to use an FTP tool if you are unable to access your Cpanel file manager. You already know the steps.
Once you open the wp-config.php file, paste the following code snippet above the line that says /* That’s all, stop editing! Happy blogging. */:
define(‘MULTISITE’, true);

define(‘SUBDOMAIN_INSTALL’, true);

define(‘DOMAIN_CURRENT_SITE’, ‘Your Domain’);

define(‘PATH_CURRENT_SITE’, ‘/’);

define(‘SITE_ID_CURRENT_SITE’, 1);

define(‘BLOG_ID_CURRENT_SITE’, 1);
The code snippet should look exactly like this, you only need to make sure you replace ‘Your Domain’ with your actual domain.
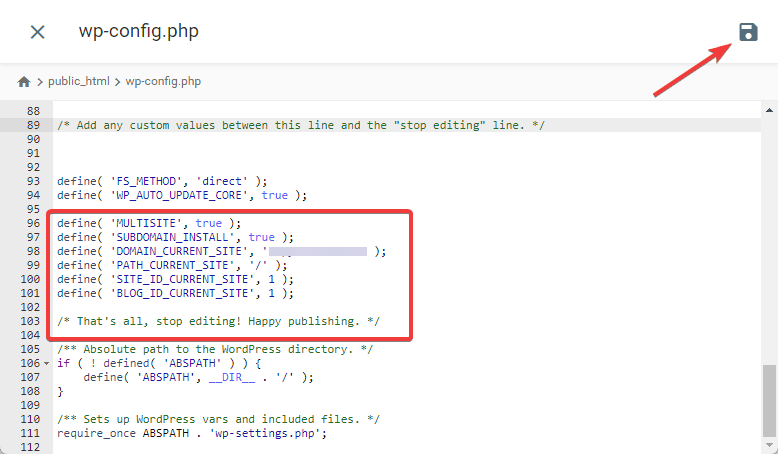
Save the changes by clicking the Save button at the top right.
Next, in the same public_html folder, locate and open the .htaccess file and add the second code snippet at the bottom.
RewriteEngine On

RewriteBase /

RewriteRule ^index.php$ – [L]

# add a trailing slash to /wp-admin

RewriteRule ^wp-admin$ wp-admin/ [R=301,L]

RewriteCond %{REQUEST_FILENAME} -f [OR]

RewriteCond %{REQUEST_FILENAME} -d

RewriteRule ^ – [L]

RewriteRule ^(wp-(content|admin|includes).*) $1 [L]

RewriteRule ^(.*.php)$ $1 [L]

RewriteRule . index.php [L]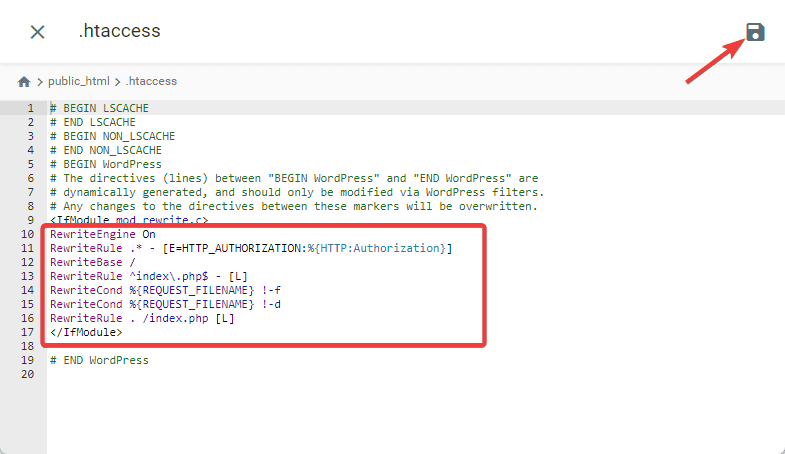
Click the Save icon at the top right and that’s all. You’ve completed the multisite setup. The next step now is to configure your network settings.
Step #4: Configure Your Network Settings
Now that your WordPress multisite is up, it’s time to configure the network settings. You first need to log out and log in back to your admin dashboard.
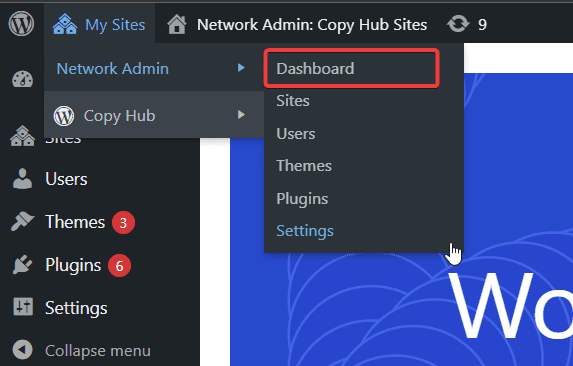
Upon login, you’ll notice a few changes to your dashboard. You’ll see new menus added to your toolbar, including My Sites and Network Admin.
This is where you’ll always access your multisite network dashboard.
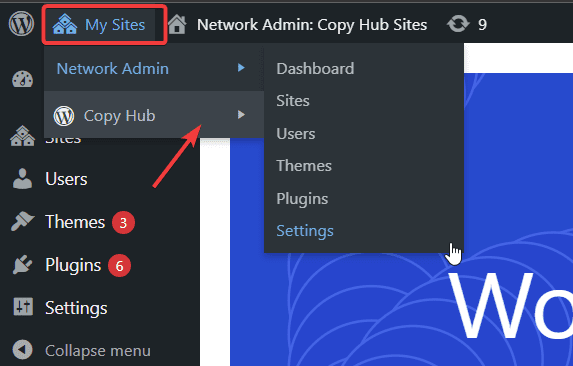
When you hover your mouse over My Sites, the Network Admin menu will pop up. You’ll see the name of your site under the Network Admin tab.
A new tab will be added under the Network Admin tab for every website you add to the network.
From there, you can click on the name of any website to access its backend.
To access the super admin dashboard, you have to click on Dashboard from the Network Admin options.
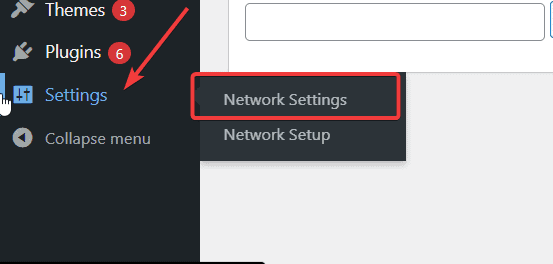
Once your multisite network dashboard opens, there are some configurations to make here. Let’s look at a few.
On the left panel of your Network admin dashboard, locate Settings and select Network Settings.
On the next screen, you’ll find that your Network Title and Admin Email Address fields are already filled out with the details you previously input. You can change it if you like.
Under that is the Registration settings, both users and site registration are disabled by default.
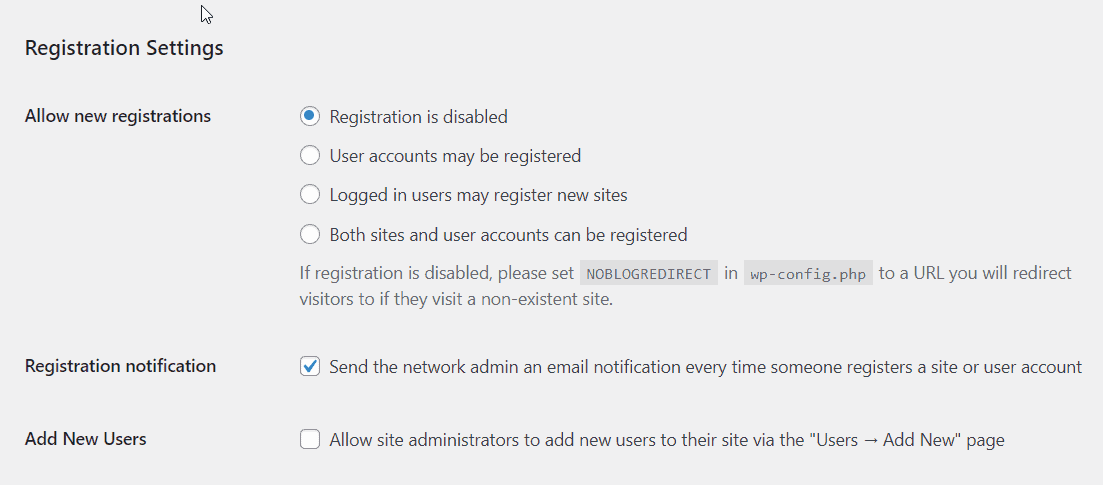
You can enable user registration on your site and also allow existing users to add new websites to your network. Just tick the box next to each setting.
Check the Registration notification box to receive email notifications every time a new site or user registers on your network.
To allow site administrators to add users to the site they administer, check the Add New Users box.
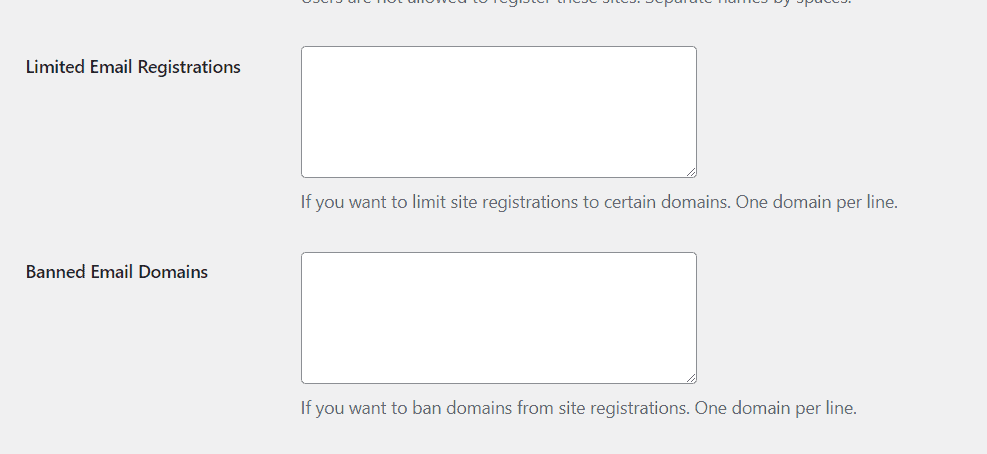
You can also restrict registration to a specific domain. The Limited Email Registration box is meant for that.
Next is the New Site Settings section. Here, you’ll be able to customize some default features that will apply to every site created or added to your WordPress multisite network.
For instance, you can personalize the content of the welcome emails as well as the default post, page, and comment settings.

Next is the Upload Settings section. You can allocate a space limit for each website on the network to use for upload.
The default setting is 100MB. You can increase or reduce this number as you deem fit.
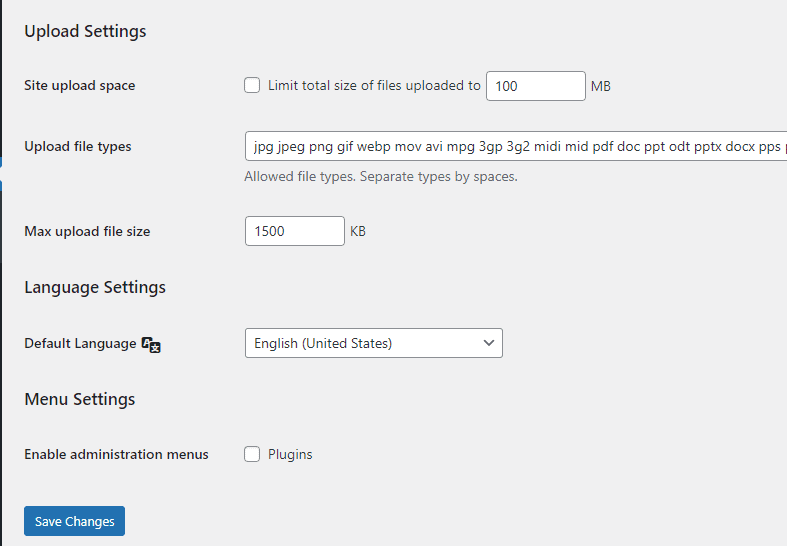
You can specify the type of files that users are allowed to upload to their site such as PDF, or JPEG, PND, DOC, DOCX, XLX, MP3, etc. To limit the size of individual files, specify it in the Max upload file size field.
Lastly on this page is the Enable administration menus for plugins.
Enabling this setting means the plugin menu will be shown to respective site admins. Thus, they’ll be able to activate or deactivate plugins on their site. However, they can install or uninstall plugs.
Once you are done, click the Save Changes button. You can always come back to update the settings.
Congratulations! Your multisite is almost ready. But there are still a few things to look at.
Step #5: Setting up Wildcard Subdomains
As said earlier, if you chose the subdomain URL structure for your multisite network, you have to set up wildcard subdomains. Here’s how
Sign in to your hosting Cpanel, scroll down to locate the Domain section, and click on Subdomains.
We’ll use Bluehost Cpanel to show you. But depending on your web host, the interface might look different. Don’t worry, the steps are the same.
On the create a new subdomain page, type in the * symbol into the new domain field and choose your root domain from the dropdown.
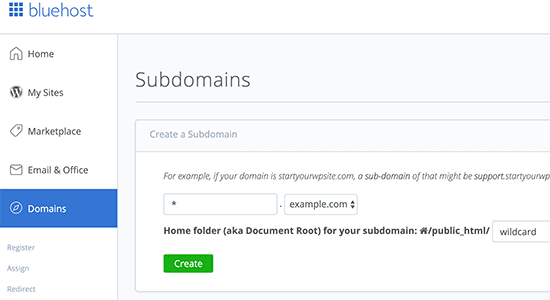
Cpanel will automatically locate the root document and will display it under the field. Click the Create button and you are done setting up wildcard subdomains. It’s simple as that.
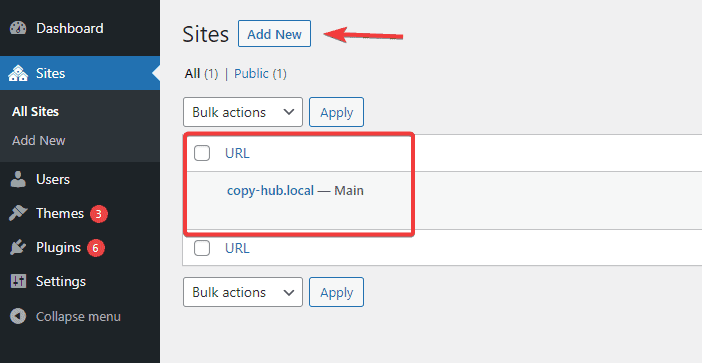
Step #6: Add New Website to Your Network
Now that your multisite setup is complete. Let’s add the first site to your WordPress multisite network. Here’s how.
On your Network Admin Dashboard, locate Sites on the left panel and click to open.
You’ll see only one site in your network, which is the current website you use to set up the multisite.
So click on the Add New button at the top to create your second website in the network.
For every website you add, you’ll be requested to provide 3 information. It’s better to have them beforehand.
- URL: The URL that will be added to the subdomain or subdirectories of the mother site.
- Title: It’s the website name that people will see when they visit your website.
- Admin Email: This is the email for the specific site admin who’ll administer the new site you add.
Enter the information in their respective fields. After that select Site Language from the drop-down.
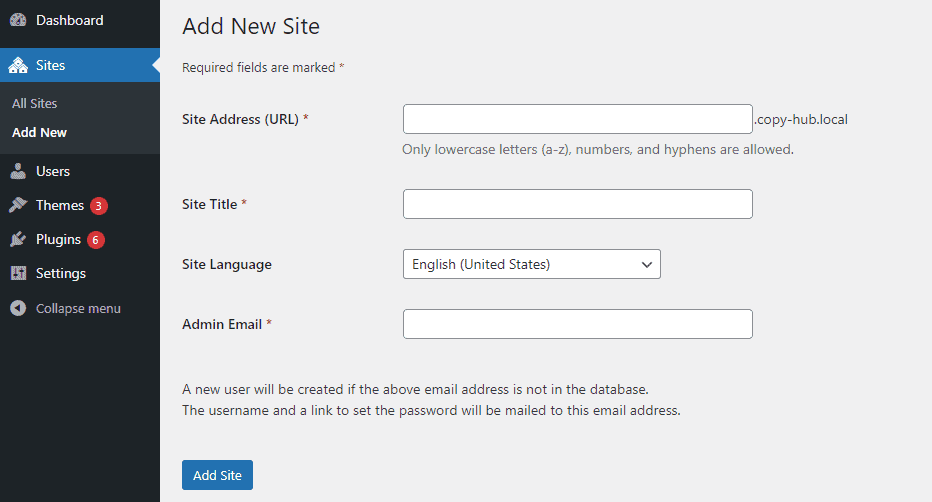
Once done with that configuration, click the Add Site button. The new site will be added to your network. It’s that simple.
Now if you go back to your sites page on the network in the dashboard, you’ll see you now have 2 websites.
You can repeat the process for as many websites as you want. Just make sure your server resources and hosting plan can accommodate the load.
Step #7: Adding Plugins and Themes to WordPress Multisite
Since only the super admin can install and uninstall plugins and themes on WordPress multisite, you’ll be the person to manage themes and plugins for all sites on the network.
You’ll do that from the network admin dashboard. Navigate to My site>Network Admin>plugins.
The process of installing plugins on a WordPress multisite is the same as on a standard WordPress site. But there’s a bit of a difference when it comes to activating the plugin.
Once you install the plugin, you’ll see the Network Activate options instead of the standard Activate on a regular WordPress website.
By clicking on this button, the plugin will be automatically activated on all websites within the network.
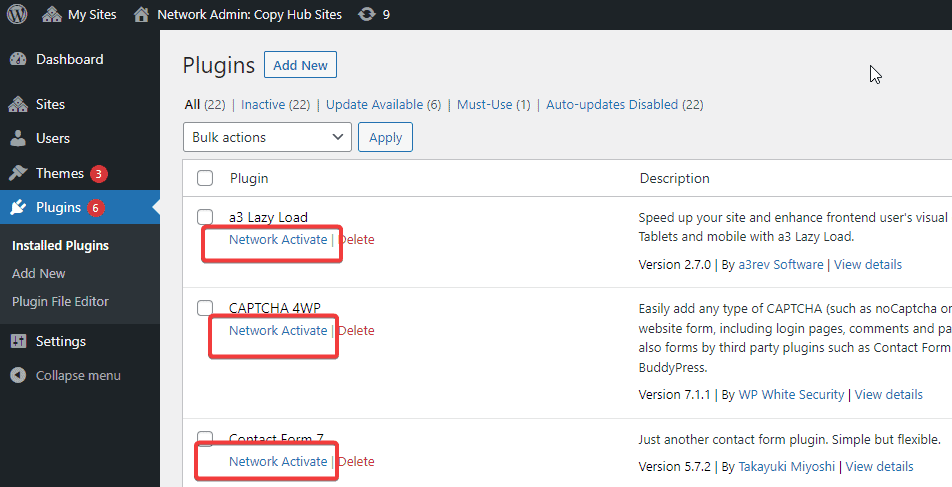
If granted permission, the only thing a site admin can do is activate or deactivate the plugin.
Provided you check the box to Enable administration menus in the network configuration settings.
To add a new theme, the process is not different from the normal WordPress theme installation, simply navigate to My Site>Network Admin>themes and click on the Add New button at the top of the page. Then you can follow the normal WordPress theme installation steps.
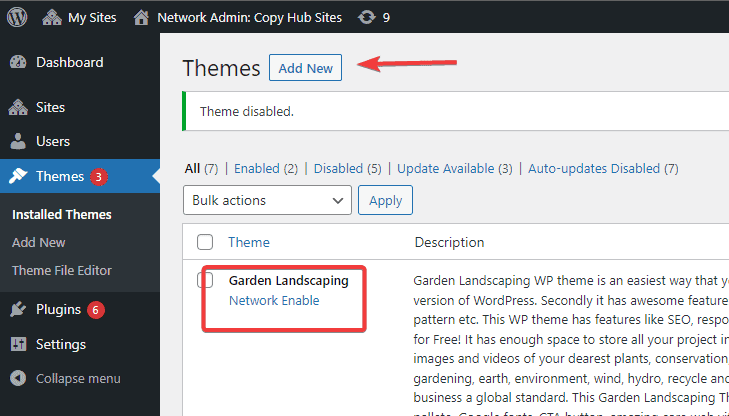
To make any of your installed themes available to other sites on the network, click the Network Enable link under the theme. The link will change to Network Disable once the theme has been enabled. You can use the same button to disable it.
Site Admin cannot remove or update themes on WordPress multisite, however, they can choose any of the available themes to use on their website.
Step #8: Add New users to WordPress multisite
There are 2 ways to add a new user to a WordPress multisite.
First, when you add a new site to your network, you have to specify an admin email that WordPress uses to send login details to the person as an admin to that individual site. We’ve explained how to do that above.
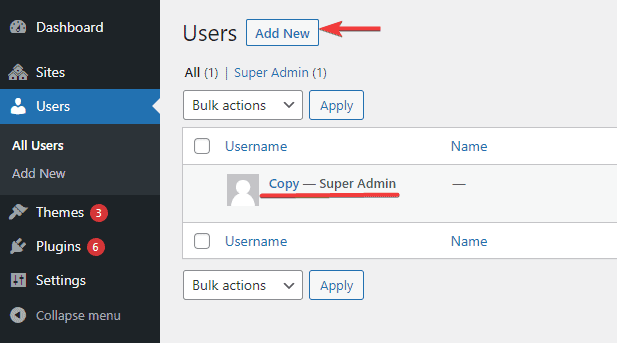
The second method is to go to your network admin dashboard, locate Users on the left panel and click on it. This will open a screen with a list of users in your network.
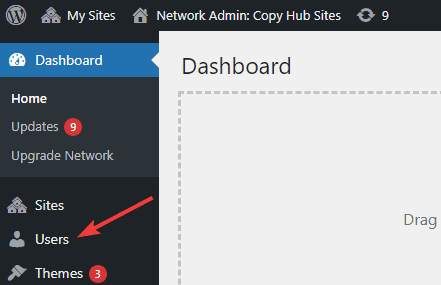
By default, you’ll have only one user in the list which is you, the Super Admin who created the network. So to add a new user, click the Add New button at the top.
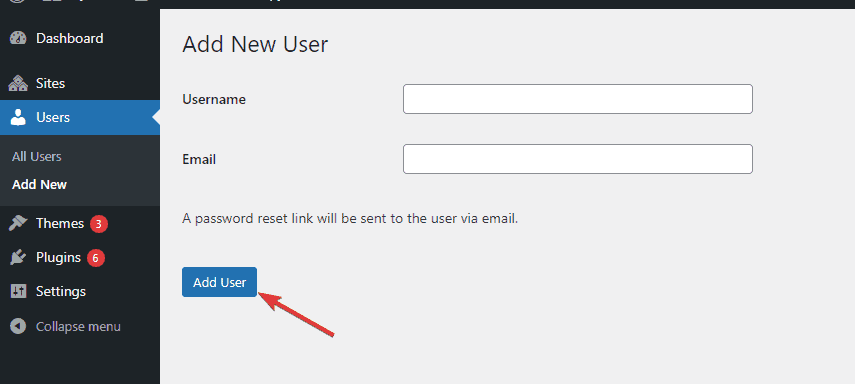
Next, you’ll be prompted to provide a Username and a corresponding Email.
After that, select a user role from the dropdown menu and click the Add User button. The user will be notified by email to set up their password.
You can repeat the process for as many users as you’d like to add.
If for any reason you want to edit a user profile in the future, you can navigate to the Users>All Users page and click the Edit button under the username.
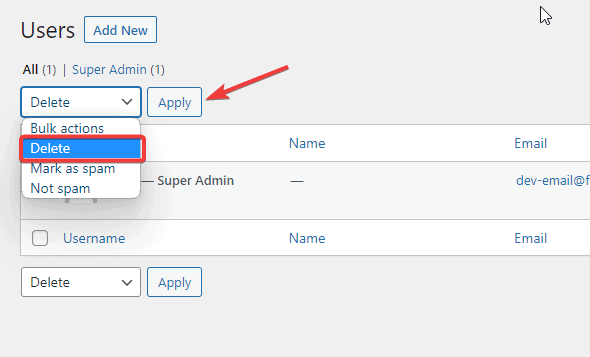
To remove a user completely from your network, check the box next to the user’s record, then go to the Bulk action menu at the top, select delete from the dropdown, and click the Apply button to complete the removal.
And that’s all. You now have a full-fledged WordPress multisite network. Individual site admins will be able to operate and manage their WordPress site as they would on a regular WordPress site.
Only that they don’t have control over plugins, themes, and other sites in the network. Other than that, they can publish posts, design pages and upload media.
More Helpful WordPress Tutorials:
- How To Install WordPress Locally: Experimenting on your live site is never a good practice. Learn how to install WordPress locally and start experimenting without any fear of breaking your site.
- How to Create a WordPress Staging Site: Want to redesign your entire WordPress website without putting it in maintenance mode? Learn how to create a WordPress staging site in this details guide.
- How to Build a Website With WordPress: Want to build a WordPress website but not sure how to start? Learn how to build your first WordPress website with this beginner-friendly tutorial.
Wrapping up
Getting started with WordPress multisite can be somewhat complicated and confusing.
We understand that. That’s why in this guide, we’ve broken down how to install and set up WordPress multisite into stepwise bits that even beginners can follow.
We hope this article helps you. If you have further questions on WordPress multisite, how it works, and how to set it up, don’t hesitate to use the comments section. We’ll be glad to help.


