
As a content creator, one of the most common issues that you encounter while creating content is that of small images.
You find a perfect picture for using in your blog post or website, but it turns out to be smaller than your needs.
And when you try to enlarge it, it looks more like a colorful chessboard than a picture of something.
Now, if you’re wondering how can you enlarge a picture without losing quality, don’t worry. In this article we’ll cover three different methods to enlarge images while maintaining their quality.
Frequently Asked Questions
Can the Quality of a Photo Be Maintained While Enlarging It?
The short answer is, Yes. With help of correct software and enlarging methods, we can maintain the picture quality while enlarging an image up to 10x of its original size.
However, just like anything, there’s a limit to how much we can enlarge an image even with those methods.
Why Do Images Lose Quality When Enlarged?
In Bitmap file formats (that’s what most image files like JPG and PNG are), a pixel is mapped to a particular location (hence the name Bitmap). When you enlarge the image, each pixel is stretched to fill up new locations depending on how much you are enlarging.
That makes all those pixels more visible, thus making the picture quality poor.
What You’ll Need to Enlarge A Picture Without Losing Quality
You’ll need the following tools, depending on which method you are going to use:
- Adobe Photoshop (download and install from here)
- GIMP (download and install from here)
- A web browser.
How to Enlarge A Picture Without Losing Quality: Step-by-Step Instructions
Method #1: Using Photoshop
If you use Photoshop 2018 or later, you can use its in-built feature to resize images without any loss of quality. Here are the steps to use it:
Launch Photoshop;
Open your image in it by going through the File >> Open dialogue box;
Navigate to Edit >> Preferences >> Technology Previews;
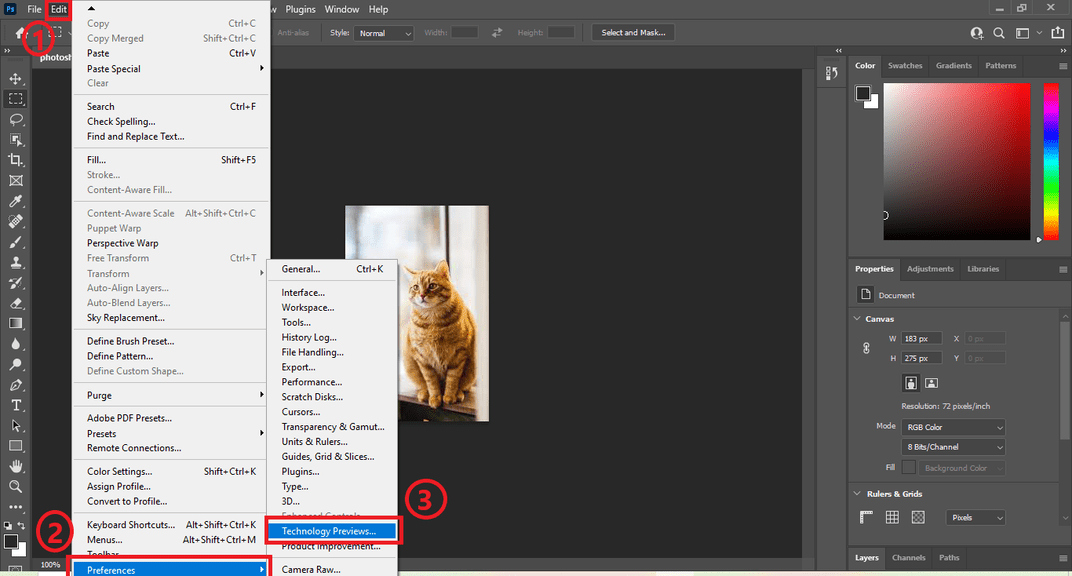
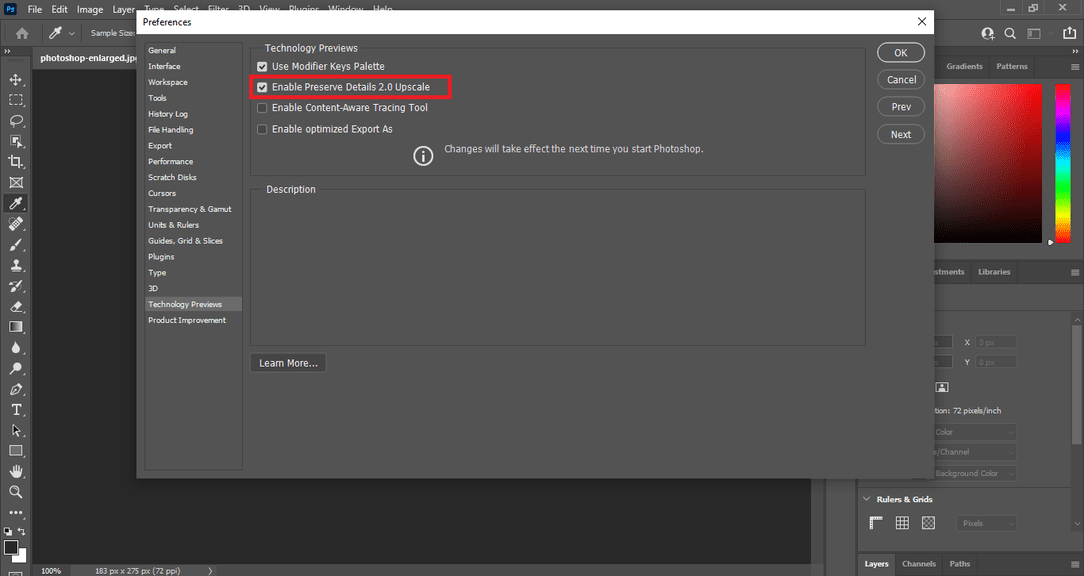
Check if “Preserve Details 2.0” is enabled or not. If not, then enable it manually;
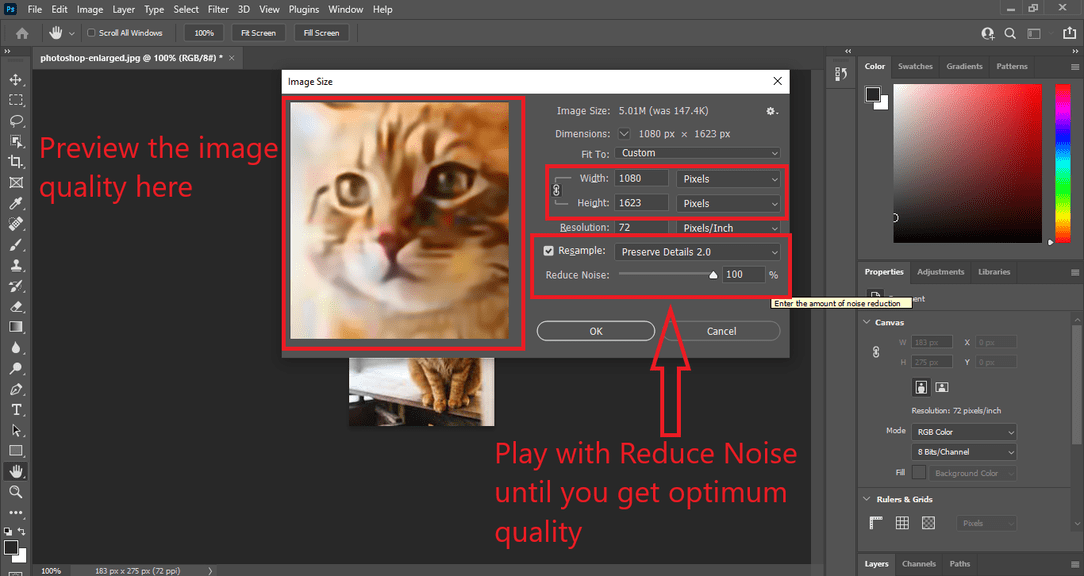
Now go back to your image, and navigate to Image >>> Image Size option;
Enter your desired image size;
Now for the “Resample” option, select “Preserve Details 2.0”.
Then adjust the Reduce Noise slider and check the live preview to see how your image is taking shape.
Once you’ve settled on the desired quality, hit “OK”.
Now check your image and see if you’re satisfied with the quality of the enlarged image. If not, undo the changes by hitting Ctrl+Z and then enlarge it again to a smaller resolution.
Pro Tip: If you want to enlarge an image more than 3x, never enlarge it in one go! Instead, make smaller increments, enlarging in the batches of 2x at a time. This will result in much better picture quality in the end.
Finally, once you’ve enlarged the image to a desired size, you can save it by navigating to File >> Save As option.
If you save as JPG, you can also select maximum image quality (as shown below) at the time of saving your image.
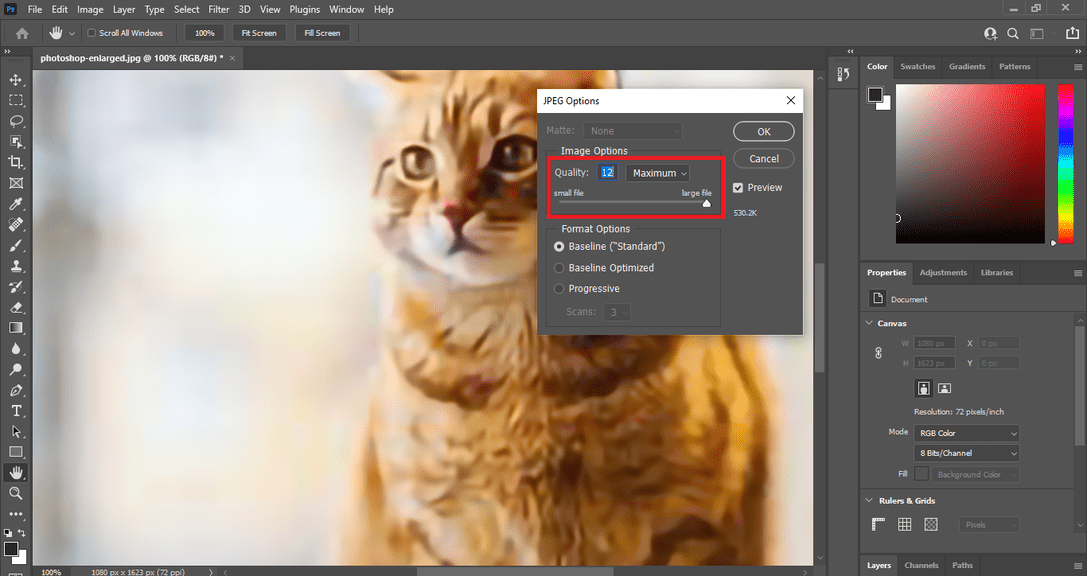
Once you hit the OK button, your enlarged image with higher picture quality will be saved to your desired location.
Pros and Cons of Using Photoshop Method
There are certain upsides and downsides to using Photoshop to enlarge your images, as explained below. Let’s see the upsides first:
- Photoshop is the gold standard of image editing. No matter what you want to do with images or graphics, there’s no better tool in the market than Photoshop. So the quality that can be maintained in your images with this method is unmatched.
- Photoshop is also more popular, so there’s a good chance that it may already be installed on your computer. Many laptops and desktops nowadays come with Photoshop pre-installed, so you won’t have to download anything.
- If you want to do any other editing or use an image in your graphics after enlarging it, that too will be much easier with Photoshop.
The only downside of this method is that Photoshop is a premium product, so you need to pay a monthly or annual subscription fee to use it.
The fee starts from $9.99 per month. But if you are comfortable with that, there can be no better method than using Photoshop for enlarging your images.
Method #2: Using GIMP
GNU Image Manipulation Program, popularly known as GIMP, is a free image editing tool that rivals the likes of Photoshop.
And interestingly, enlarging an image with GIMP is simpler than it is to enlarge with Photoshop.
Follow the steps explained below to learn how:
Launch GIMP on your computer;
Open the image that you want to enlarge by hitting Ctrl+O on your keyboard and selecting the image of your choice;
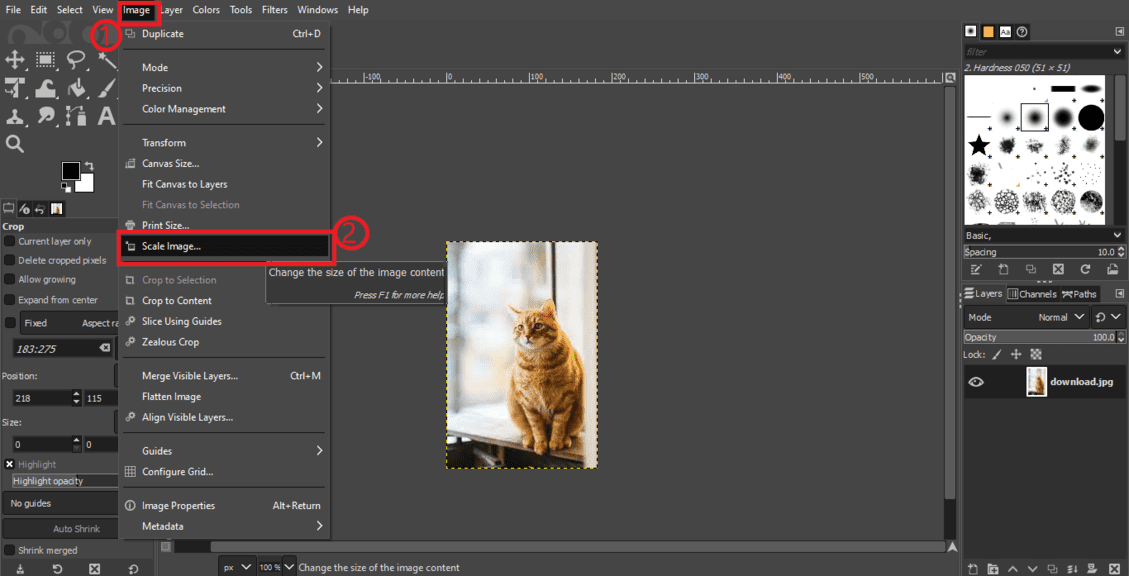
Choose the “Image” option from the menu bar;
Choose “Scale Image”;
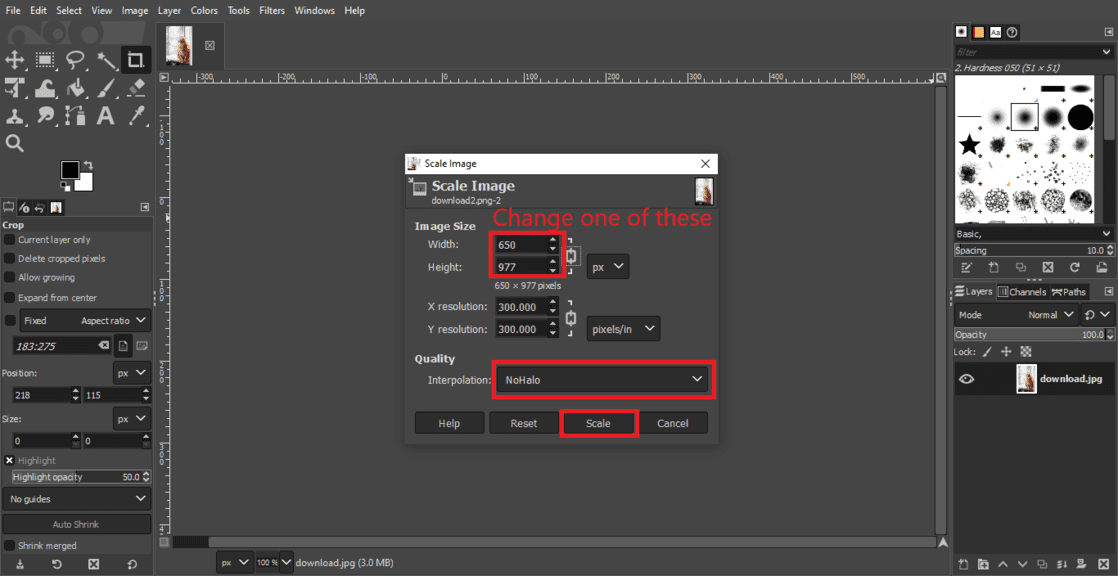
Enter the new width or height that you want your image to have.
Just enter one of them, and the other will be adjusted automatically to maintain the aspect ratio
From Interpolation, choose “NoHalo”;
Hit the “Scale” button;
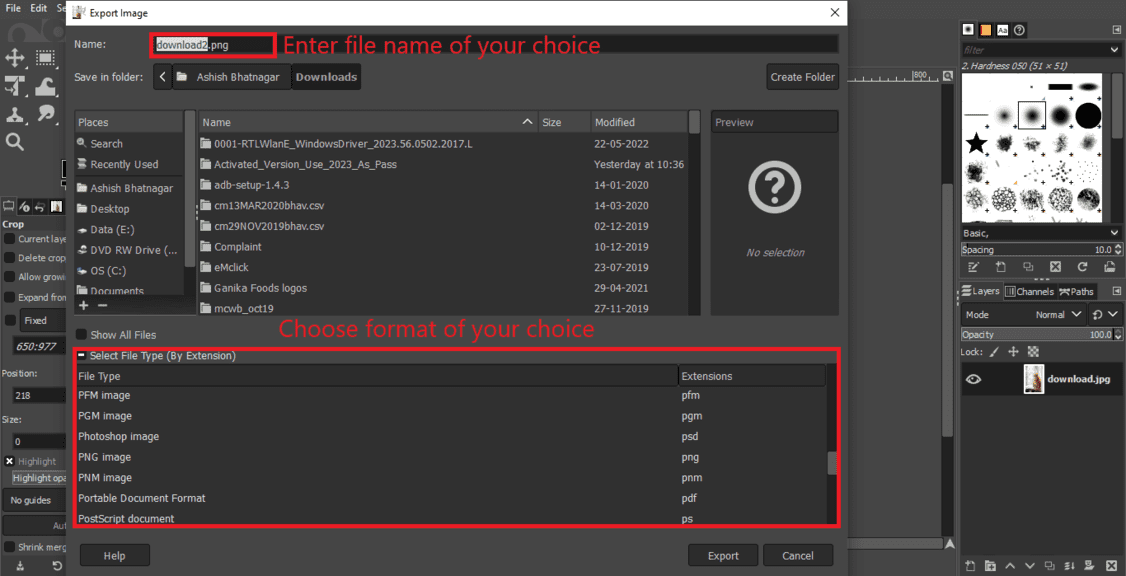
Navigate to File >> Export As option;
Enter the file name of your choice;
Select File Type (i.e. JPG or PNG);
Hit the “Export” button.
That’s it. Now check out your new image and see if you like it.
Pros and Cons of Using GIMP Method
GIMP is not as popular as Photoshop, but that doesn’t make it any less useful.
In fact, there are a few advantages of using GIMP over Photoshop to enlarge your images:
- First of all, GIMP is much more lightweight than Photoshop. It consumes a fraction of your storage space in comparison to the latest versions of Photoshop.
- Second, GIMP is a free tool while Photoshop costs $$$🤑. It takes at least $9.99 per month to use Photoshop beyond its 7-day free trial. So if you are looking for a free solution, GIMP is the choice for you.
A limitation of using GIMP, however, is that the quality generated by it is not as good as it is with Photoshop.
While it does a good job at maintaining sharpness while enlarging an image, everything looks much better when you do it with Photoshop because the Preserve Details feature is designed exactly for that purpose.
Method #3: Online (Using Image Enlarger)
If you don’t want to install software only for resizing an image, there’s also a method to do it another way.
You can use the online Image Enlarger tool to resize your images without losing quality. Here are the steps to do that:
Navigate to the Image Enlarger website;
Click on the “Browse” button to select your image, and browse the files on your PC/tablet/smartphone to choose your image;

After selecting the image, you can choose a Zoom factor to define how much you want to enlarge the image.
Or else, you can also define a target width and height of your choice. But keep in mind that you have to use either of the two things — either use the Zoom factor or use manual width and height information. Leave the option that you are not using blank;
Hit the “Start” button.
The tool will then generate 4 different formats of the same image in a larger size as per inputs provided by you.
Check them out, and download the one that you like.
Pros and Cons of Using Image Enlarger Over GIMP and Photoshop
Finally, with no offense to GIMP and Photoshop, there are a few advantages of using this online tool method as well:
- First of all, it works on all devices. You don’t necessarily need a computer for it.
- Second, it’s relatively simple than other methods.
- Third, it doesn’t consume any of your storage space and doesn’t require installation or any other kind of setup.
But there’s also a limitation: you can’t use it for generating images larger than 4,500×4,500 px in resolution.
If that works for you, then no doubt it’s a great method t enlarge your images without quality loss.
Similar Tutorials to Check Out
- How to Crop a Picture Into a Circle: Square-shaped or rectangular images are no longer the only needs of web designers. In many cases, circular images are also used, so if you want to learn how to crop a picture into a circle, this tutorial can come in handy.
- How to Resize an Image in Canva: One of the most popular image editing tools, Canva allows you to do a whole lot of things with your images. This tutorial covers how to use it for resizing your images.
- How to Flip an Image in Canva: Resizing alone is not enough. Sometimes, you may also need to flip an image, and this tutorial explains how to do that using Canva.
Wrapping Up
As you can see, there are multiple methods to enlarge an image.
We have covered the three most effective ones among them so you can maintain the highest quality while enlarging your images for any need.
Give these methods a try, and do let us know in the comments which method gave you the best output.
Also, share this guide on social media if you learned something useful from here. 🙂 All the best!


