
When you’re browsing the internet, your PC and browsers will store several types of content and data in the background.
This is stored in temporary storage called ‘cache.’
Over time, this data can inflate significantly, especially if you use your PC a lot or browse various sites.
In this short guide, we’ll show you how to clear the cache from all the popular web browsers and your PC.
How to Clear Google Chrome Cache
If websites do not open properly or have outdated information, it’s probably because they’re loading data from an old cache.
To remove the cache on Google Chrome, follow these steps:
- Press Ctrl + Shift + Delete all at once.
- This will open Chrome’s Settings tab. In there, you will see a new pop-up window called “Clear Browsing Data.”
- The dropdown menu on the top will allow you to choose the period for which you wish to remove data.
The options are between 24 hours, seven days, four weeks, one year, or all time. - If you want to remove the entire cache, select the “all-time” option.
- Check the box for “Cached images and files.”
Additional information below will notify you of how much data this will remove from your memory. - Press “Clear Data” on the bottom right corner to confirm your choice and clear your cache.
You can press “Cancel” if you want to stop this process. - Reload the website you’re trying to access.

Clearing the cache is irreversible, but the steps above won’t remove any login info or passwords.
If you do want to select more data to remove, you can follow the above steps 1-4, then select “Advanced” at the top of the window.
This will show you several options to choose from, and you can check the boxes in front of any type of data you want to remove.
When you’re done, follow step 6 onwards.
How to Clear Mozilla Firefox Cache
It is helpful to periodically remove this data to improve your PC.
At times, this will be the first step to solving any problems you might have with your internet connection.
To remove the cache from your Firefox browser, you can follow these simple steps:
- Press Ctrl + Shift + Delete simultaneously.
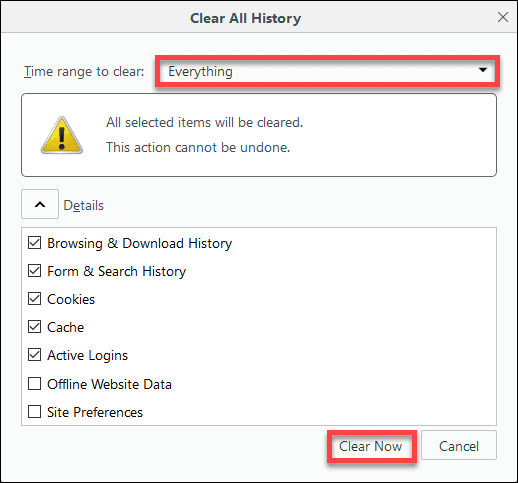
- This will open Firefox’s Settings tab. In there, you will see a new pop-up window called “Clear Recent History.”
- The dropdown menu on the top will allow you to choose the period for which you wish to remove data.
The options are last hour, last two hours, last four hours, today, and everything. - If you want to remove the entire cache, select the “everything” option.
- Check the box for “Cache.”
Additional boxes can be checked if you want to remove anything else, such as your browsing history or cookies. - Press “Ok” on the bottom right corner to confirm your choice and clear your cache.
You can press “Cancel” if you want to stop this process. - Reload the websites you’re trying to access.
How to Clear Microsoft Edge Cache
If you’re using Microsoft Edge, here is how to remove its cache:
- Press Ctrl + Shift + Delete.
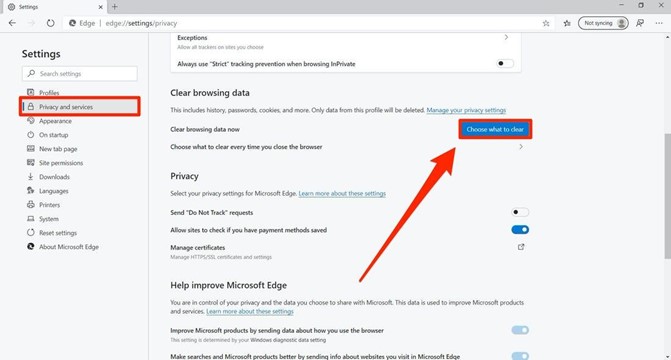
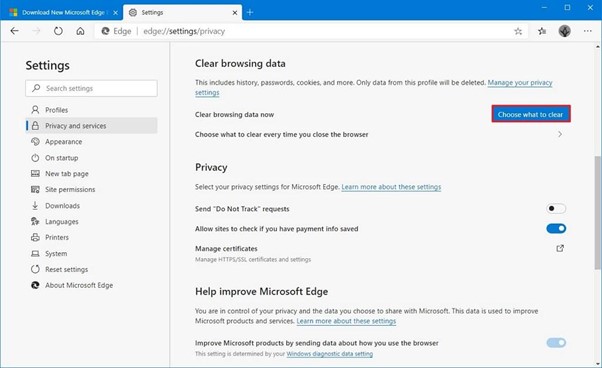
- This will open a new Settings tab.
In there, you will see a new pop-up window called “Clear Browsing Data.” - The dropdown menu on the top will allow you to choose the time range.
The options are last hour, last 24 hours, last 7 days, last four weeks, or all time. - If you want to remove the entire cache, select the “All Time” option.
- Check the box for “Cached Images and Files.”
Additional boxes can be checked if you want to remove anything else, such as your browsing history or cookies. - Press “Clear now” on the bottom right corner to confirm your choice and clear your cache.
You can press “Cancel” if you want to stop this process. - Reload the websites you’re trying to access.
How to Delete Internet Explorer Cache
If you’re using Internet Explorer 11 (the most recent version, and the one that’s still receiving updates and support from Microsoft), here’s how to clear its cache:
- Press Ctrl + Shift + Delete keys together.
- This will open a new Settings tab.
In there, you will see a new pop-up window called “Delete Browsing History.” - Check the box for “Temporary Internet Files and Website Files.”
Additional boxes can be checked if you want to remove anything else, such as your browsing history or cookies.
If you’re just removing your cache, make sure no other boxes are checked. - Press “Delete” on the bottom right corner to confirm your choice and clear your cache.
You can press “Cancel” if you want to abandon this and close the window without removing anything. - Reload the websites you’re trying to access.
Do note that Internet Explorer doesn’t allow you to selectively remove data within a period.
If you want to remove part of the cache, there are no options to do so.
How to Clear Safari Cache
If you’re using a Mac, clearing your Safari’s cache is made extremely easy by Apple.
Simply press CMD + ALT + E.
This will remove Safari’s cache easily and without a need to go through any developer menus.
Once you clear Safari’s cache, you can reload the website you’re trying to access, and the site will load with new data.
How to Remove Temporary Files from My PC
You may also want to remove any temporary files or downloads from your PC.
This is helpful if you want to free up some memory from your hard drive, as downloaded files can pile up over time.
For this, you can use the Disk Clean-up application, which is installed by default on your Windows PC.
To do so, follow these steps:
- Click on Start. On Windows 10, you can directly click on the search icon next to the Windows icon on the toolbar.
- In the search menu, search for Cleanmgr.
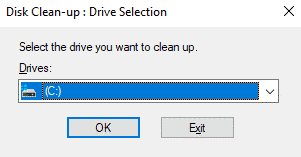
- An app named Disk Clean-up should pop up in the search results. Left-click on it to open it.
- From the dropdown menu that opens up, select the drive you wish to clean.
Usually, this is drive C. - After a quick check, the program will open a new window.
- Check any options for the data you wish to delete.
Numbers on the right indicate the amount of data that will be removed. - To clear the cache, select “Temporary Internet Files.”
This should be checked by default, but make sure it is. - Select “Clean Up System Files.”
- Press Ok.
- You can reload the program and select the next drive you wish to clean up by following the above steps.
All Clear
Using these simple instructions, you should be able to clear your browsers’ and PC’s cache and solve any problems you might encounter when loading websites with obsolete data.
Let us know what other tutorials you want to see on our blog.


