
Stop asking how to create a webinar. Start Doing.
Webinars are incredible ways for business lead generation and user engagement.
Done right, they are powerful marketing tools that bring new loyal customers on board and build brand trust.
But maybe you’ve heard that the cost, time, and technicality of creating a webinar are sky-high.
Nothing can be further from the truth.
Creating a webinar in 2022 is unbelievably easy.
Once you find a topic that interests your audience and craft your value-packed content, this guide is all you need.
- Frequently Asked Questions
- What You’ll Need to Create A Webinar
- How to Create a Webinar Step by Step
- Step 1: Generate Your Webinar Idea
- Step 2: Choose a Webinar Topic:
- Step 3: Ensure It’s Not a Sales Pitch
- Step 4: Choose a Webinar Format
- Step 5: Structure Your Webinar
- Step 6: Choose a Webinar Hosting Platform
- Step 7: Create a Webinar Registration Page.
- Step 8: Create a Webinar registration page.
- More Helpful Video Marketing Tutorials:
- Wrapping up
Frequently Asked Questions
Do Webinars Make Money?
Yes, but not directly.
There’s no limitation to the number of potential customers you can reach through a single webinar.
So if you know onion and deliver exceptional content that gets your audience nodding, you’ll open your floodgate to fortune.
How Do I Create a Webinar?
There are many ways to create a webinar.
You can host a live webinar or pre-recorded webinar.
Once you have your content and a webinar platform to use, creating a webinar is simple, as we’ll show in this guide.
You don’t even have to spend big.
What You’ll Need to Create A Webinar
- A Camera: You want to come across to your audience as a professional. A blurry camera can dent your webinar. Save yourself the headache by investing in a decent streaming camera.
- A Webinar Hosting Platform: The best webinar hosting platform has everything you need to create a webinar. From registration to scheduling and emailing and analytics, you don’t need multiple tools.
- A Google Account: The Webinar hosting platform we use in this guide is Google Meet. You’ll need a Google account to use it.
- A Microphone: If your audience has to strain their ears before hearing you, you’ll lose them. When hosting a webinar, never rely on PC microphones.
It’s not in their habit to send a warning before putting you in trouble.
How to Create a Webinar Step by Step
- Step 1: Generate Your Webinar Idea
- Step 2: Choose a Webinar Topic
- Step 3: Ensure It’s Not a Sales Pitch
- Step 4: Choose a Webinar Format
- Step 5: Structure Your Webinar
- Step 6: Choose a Webinar Hosting Platform
- Step 7: Create a Webinar Registration Page.
- Step 8: Create a Webinar registration page.
Step 1: Generate Your Webinar Idea
Before you create a webinar, your first step is to generate a topic idea for your webinar.
This is not picking a webinar topic yet.
It’s just some initial digging to uncover what sort of content best interests your target audience.
You have to be niche-strict here.
As you won’t sit keenly to listen to an engineer discussing tooth bacteria, don.t assume the same of your audience.
Here are some tips.
4 Easy Ways to Generate Webinar Ideas
Keywords and Search query: Find the keywords that people are using to find your website.
If you have Google Analytics on your website, use it to identify recurring keywords that bring users to your website.
You can also use SEO Tools like Answerthepublic to locate the keywords and search queries that are trending in your niche.
This will give you an idea of what type of topic you should go with.
- Top-performing Content: Check your blog for content that gets the most attention and engagement. If it performs well as a blog, it’s likely to perform better as a webinar. But you don’t want your webinar to be a read-out version of your blog, so you have to be creative to make it interesting and presentable.
- Social Media: Sites like Quora and Reddit are some of the best places to listen to your audience. Go there and find questions.
- Frequently Asked Questions: Whether your business has a customer-facing department or you are the one running it solo, FAQs repurposed as webinars always do well. The goal here is simple. Never pick a topic by brainstorming. You need to find out what your audience wants to know.
Then building your topic to give them answers.
Step 2: Choose a Webinar Topic:
Picking your topic is much easier once you generate a high-level idea for your webinar.
You’ve set a solid foundation for your webinar already.
It’s time to get specific.
Your webinar topic should communicate a solid promise to your audience.
And the promise must be what you can deliver on.
To nail a great topic that your target audience will love, go through your topic and these questions:
- What’s the webinar about?
- Why should they care about it?
- What problem will the webinar solve for my audience?
- What will they gain from the webinar?
If you can’t find convincing and super-specific answers for yourself, then your topic search is yet to attain fruition.
Pick another topic and go repeat the cycle.
Step 3: Ensure It’s Not a Sales Pitch
It’s normal to have business motives.
That’s the underlying goal of any marketing effort.
But don’t make your webinar a garbed sales pitch.
Don’t overfocus on the business side of it.
If your webinar won’t add value to your audience’s life.
It had better not go live.
When you gather people in the name of webinar and start hard selling them, you’ll not only sprinkle some muddy water on your reputation.
Step 4: Choose a Webinar Format
You have to decide on the format before creating your webinar script or content.
The format you choose will determine how to structure your webinar.
There are four webinar formats you can opt for are:
Types of Webinar
- Single-speaker Presentations: A single-presenter webinar is the most common type of webinar. As the name implies, the presenter delivers on the topic and answers attendees’ questions afterward. If you own a personal brand or small business, this webinar format is for you.
- Panelist Webinar: Similar to a panel discussion, this type of webinar has experts give their submissions with a moderator driving the conversation around a predetermined topic.
- Interview: An interview webinar is a form of interactive conversation between the hosts and the attendees. A subject matter expert answers the host’s questions while the audience listens.
- Question and Answer Webinar: A Q& A webinar is highly interactive and audience-oriented. You or your guest must be well-prepared to face a Q&A webinar, as things might get boring when you get shot by successive questions with no answer.
Step 5: Structure Your Webinar
After choosing a webinar format, the next step is to structure your webinar, which revolves around three things:
- Webinar Duration
- Webinar Slide Deck
- Webinar Content
Think of it like a three-legged stool. Every leg is important and interdependent.
Let’s brush through them.
Webinar Duration:
On average, a webinar is 40 – 60 minutes long.
You have to plan your time to avoid spending much on the less important stuff and less on the crucial ones.
Let’s use a 45-minute single-presenter webinar as an example.
The best practice is to divide your webinar into three parts.
Like this:
- Part 1: Introduction – 5 minutes
- Part 2: Presentation – 30 minutes
- Part 3: Question and Answer – 10 minutes
Part 1 is where you introduce yourself and the topic of the webinar to your audience.
You can spend the last minute here hitting on the benefits of attending the webinar.
Part 2 is the main presentation.
Get into the heart of what your audience came for.
In part 3, attendees ask questions, and you answer.
Pro Tips:
- Always end your webinar by keeping your audience on their toes. Suggest they take action based on what they learned in your webinar and give you feedback.
- Don’t be shy to ask them to subscribe to your mailing list or even share an offer on your product or service.
- Before you dabble into the presentation, start the introductory part with your camera on. Your audience what to see who they are learning from. This creates a better connection than when you leave them just reading on screen.
Webinar Slide Deck:
Your presentation is the core of your webinar. You have to ace it.
To create a webinar presentation, you’ll need presentation software.
You don’t need a paid tool to do it.
Microsoft Powerpoint, Google slides, Keynote, and Canva presentations will do the job.
You already know you have 30 minutes for your presentation.
Suppose you decide to spend 2 minutes on each slide.
That means you can only have 15 slides.
That’s how you make your presentation frictionless.
Here are some tips:
- Never present with a text heavy-slides.
- Use headlines and subheadlines for your slides
- Highlight important points in bullets
- Use visuals and statistics to make your presentation less boring
- Use illustrations, maps, graphs, and charts if you can.
Webinar Script:
But why do you need a webinar script?
You already have your slides.
Answer: So that you won’t get stuck.
So that during your presentation, you always know what to say, when, where exactly and how to say it.
Don’t be deceived by your expertise.
Every successful presenter uses it.
There’s no second reason why their presentations are flawless.
So prepare your webinar script.
Step 6: Choose a Webinar Hosting Platform
There are many paid and free webinar hosting platforms to create a webinar.
Zoom and Google Meet are household names in this sphere.
Other industry-leading webinar platforms include GoTowebinar and Webinarjam, Wnymeeting, and Everwebinar.
When choosing a webinar tool, consider your needs.
Do you need a tool that can record your webinar?
- What about branding?
- The number of expected attendees?
- And, of course, the cost.
These are all factors to consider. You can compare tools later.
For now, let’s go with Google Meet.
It’s a good tool to host your first webinar.
Google Meet support all basic webinar needs.
You can host a webinar for unlimited minutes and take in up to 100 attendees for free.
So how do you create a webinar with Google Meet?
It’s simple.
Follow these steps.
Using Google Meet to Host Your Webinar Step by Step
Visit the Google Meet website and log in.
If you don’t have an account, click on sign up to set up your account.
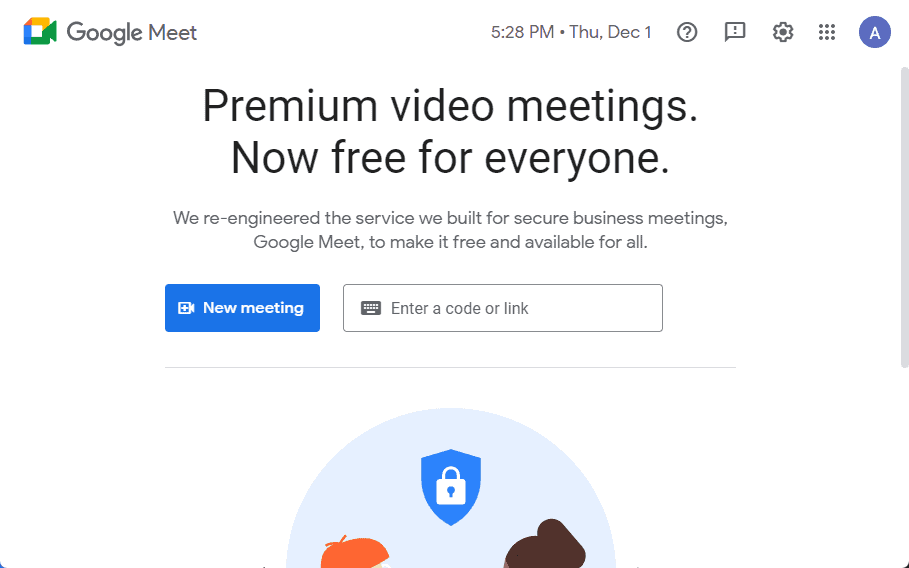
If you already have a Google account, you’ll be automatically logged in to Google Meet.
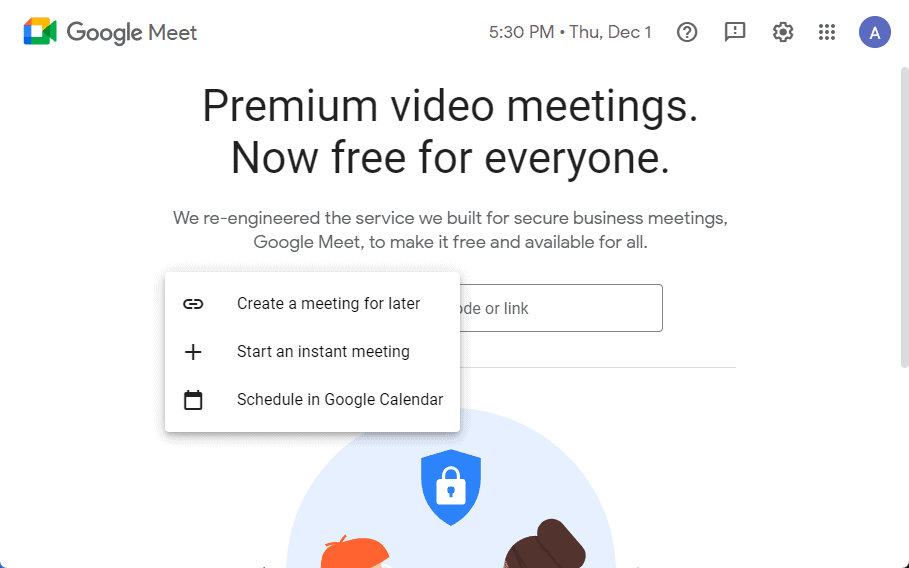
Click on the New Meeting button and select Schedule in Google Calendar.
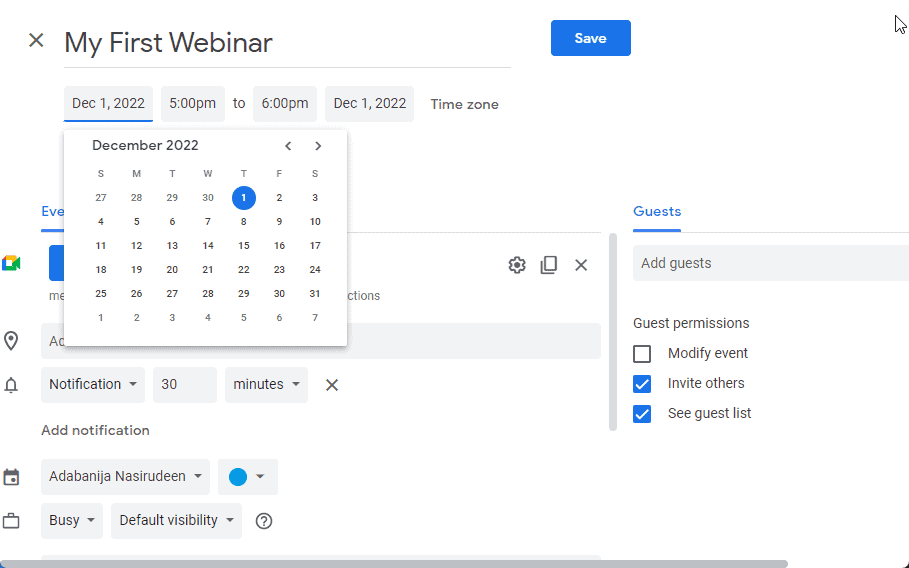
Next, Add a title to your webinar.
Specify the date of your webinar.
Next, use the time button to specify the duration of your webinar.
After that, click the save button at the top.
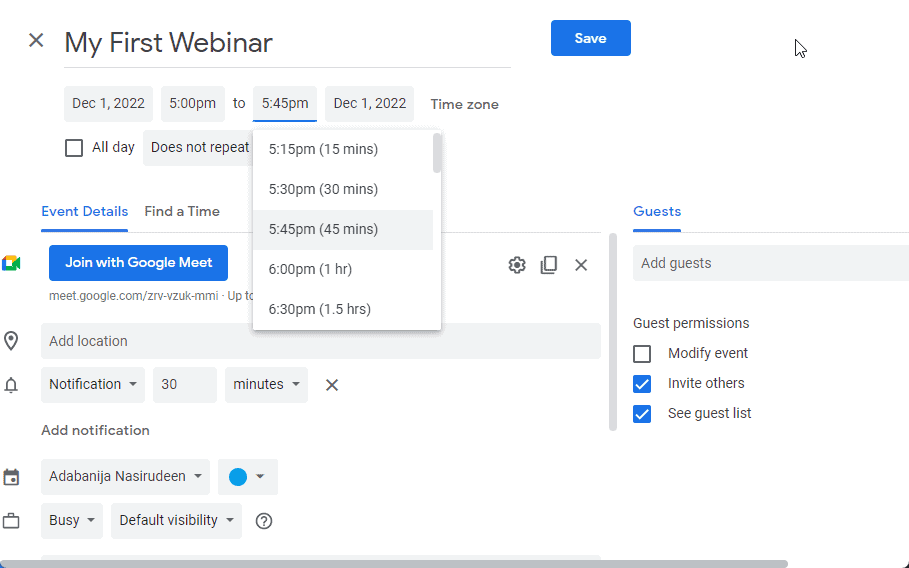
Now copy the webinar link and save it somewhere.
We’ll be sending it out to participants in the next step.

You can now see the scheduled webinar in your calendar with the details and duration.
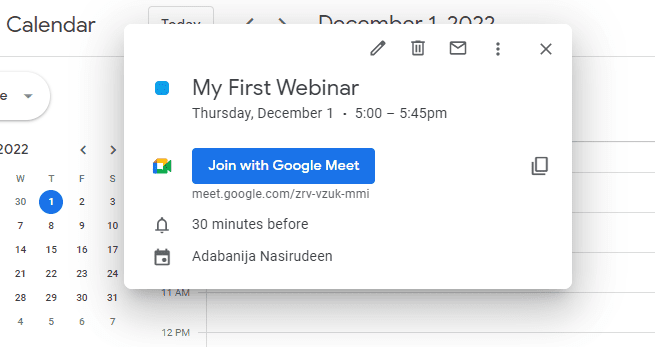
Your webinar is hosted.
But don’t invite people yet.
Practice Your Webinar With Google Meet
Suppose you’ll be using Google Meet for the first time.
You must come to grips with the tool before your webinar day.
Don’t wait till the eleventh hour.
Google Meet is pretty intuitive to use.
Playing around on the platform, you’ll master it in no time.
But practicing with the tool alone is not enough.
It pays to test run with your friend or colleague.
Set up an instant meeting in Google Meet and ask two of your friends to join as attendees.
Present to them.
Get feedback to improve upon before your webinar.
Step 7: Create a Webinar Registration Page.
So far, you’ve created a webinar, planned your presentation, and hosted your webinar.
It’s time to set up a webinar registration page.
This is essentially a landing page where users can get the full gist of what’s in and then exchange their email for receiving the registration webinar link.
Your webinar registration page should have the following details
- The topic of the webinar
- A compelling short copy
- A bullet list of
- Short Bio of the host
- An opt-in form
- The date and duration of the webinar
There are a lot of free tools you can use to create a landing page for your webinar.
You can try Mailchimp and Convertkit.
Once people sign up on this page, your email marketing tools will deliver your webinar link (Scheduled Google Meet Link).
The registration page is already integrated if you use a paid webinar hosting tool.
You just need to edit and customize.
After your registration page is good to go live, the next step is to promote your webinar to reach your target audience.
Step 8: Create a Webinar registration page.
So far, you’ve created a webinar, planned your presentation, and hosted your webinar.
It’s time to set up a webinar registration page.
This is essentially a landing page where users can get the full gist of what’s in and then exchange their email for receiving the registration webinar link.
Your webinar registration page should have the following details
- The topic of the webinar
- A compelling short copy
- A bullet list of
- Short Bio of the host
- An opt-in form
- The date and duration of the webinar
There are a lot of free tools you can use to create a landing page for your webinar.
You can try Mailchimp and Convertkit.
Once people sign up on this page, your email marketing tools will deliver your webinar link (Scheduled Google Meet Link).
The registration page is already integrated if you use a paid webinar hosting tool.
You just need to edit and customize.
After your registration page is good to go live, the next step is to promote your webinar to reach your target audience.
Here’s a great example of one.
Promote Your Webinar
Creating a webinar is one thing.
Getting people to register and attend is another ball game entirely.
Your goal is to get as many people as possible to register for your webinar.
Here are some ways to do it.
- Share the webinar banner and details with your connection and followers on social media
- Run social ads on YouTube, Facebook, and Instagram
- Google Search ads are also available if you have the budget
- Send the Webinar registration link to your email list or existing subscribers.
More Helpful Video Marketing Tutorials:
- How to Download YouTube Videos: Youtube Doesn’t allow users to download videos. If you have an important YouTube video to download, the methods in this guide have been proven to work.
- How to Create a Deepfake:Want to create realistic-looking fake media? Our Deepfake tutorial won’t let you down. Check it out.
- How to Send Large Video Files: Want to send large video files? Learn the tools and tricks to do it in this guide.
Wrapping up
Congratulations.
You have successfully created a webinar.
Once people register for your webinar, the first use of their email is to send reminders leading up to the webinar.
A day to and an hour to is okay.
After your webinar, send them a thank you email and request feedback.
For registrants who weren’t able to attend, using a webinar recording software allows you to send them some in-case-you-miss-it emails.
Now you can follow up with nurturing your leads with email marketing.


