
Videos are among the best-performing content types on the web.
There’s a reason why we have dedicated video platforms to publish and promote video content (i.e. YouTube, Vimeo, TikTok, etc).
Therefore, if you’ve decided to create video content for any purpose, you’ve made a good choice.
But now you may be wondering how to create a professional quality video without using advanced software, right?
Well, don’t worry. We’re going to tell you how to make a video in Canva, which is one of the best free graphic design tools out there. Let’s go!
Frequently Asked Questions
Can I Create a Video in Canva?
Yes, you can. The Canva application includes many templates and tools that can be used to create short videos for any purpose.
Can You Make Videos in Canva for Free?
Yes, that’s also possible. However, you can’t use any premium templates and graphics in the Canva library for your free video. If you want to have access to all the resources (both free as well as premium ones) then you’ll have to subscribe to Canva Premium.
What is the Maximum Video Size for Canva?
There’s no limit to the length or size of a Canva video. You can create a video of a few seconds or even a video of more than several minutes.
Your video can be only a few megabytes or hundreds of megabytes in size. No limits on anything.
What You’ll Need to Make A Video in Canva
You’ll need the following things in order to make a video in Canva:
- A computer: This tutorial explains the process using the web version of Canva. So you’ll have to do it on a computer — not the Canva mobile app.
- Canva account: A Canva user account. Free account if you want to use only free templates and assets in your video, and a Pro account if you want to use Pro templates, features, and assets.
- Content and media files: You’ll need your content and media files (i.e. images, audio, video, etc.) that you want to add to the video.
How to Make A Video in Canva: Step-by-Step Instructions
This may seem like a long process, but it’s only because we’ve tried to explain everything in detail.
You’ll learn each step of this process even before you realize it, mainly because Canva is extremely easy to use. Having said that, let’s see how to make a video in Canva:
Step #1: Choose Your Template
The first step is to choose your template. While it’s possible to start with a blank page, we advise that you choose a template because it makes the whole process a lot easier.
So you can start by going to Canva.com and signing up or signing in with a user account, and choosing the Video tab from the homepage as shown below.
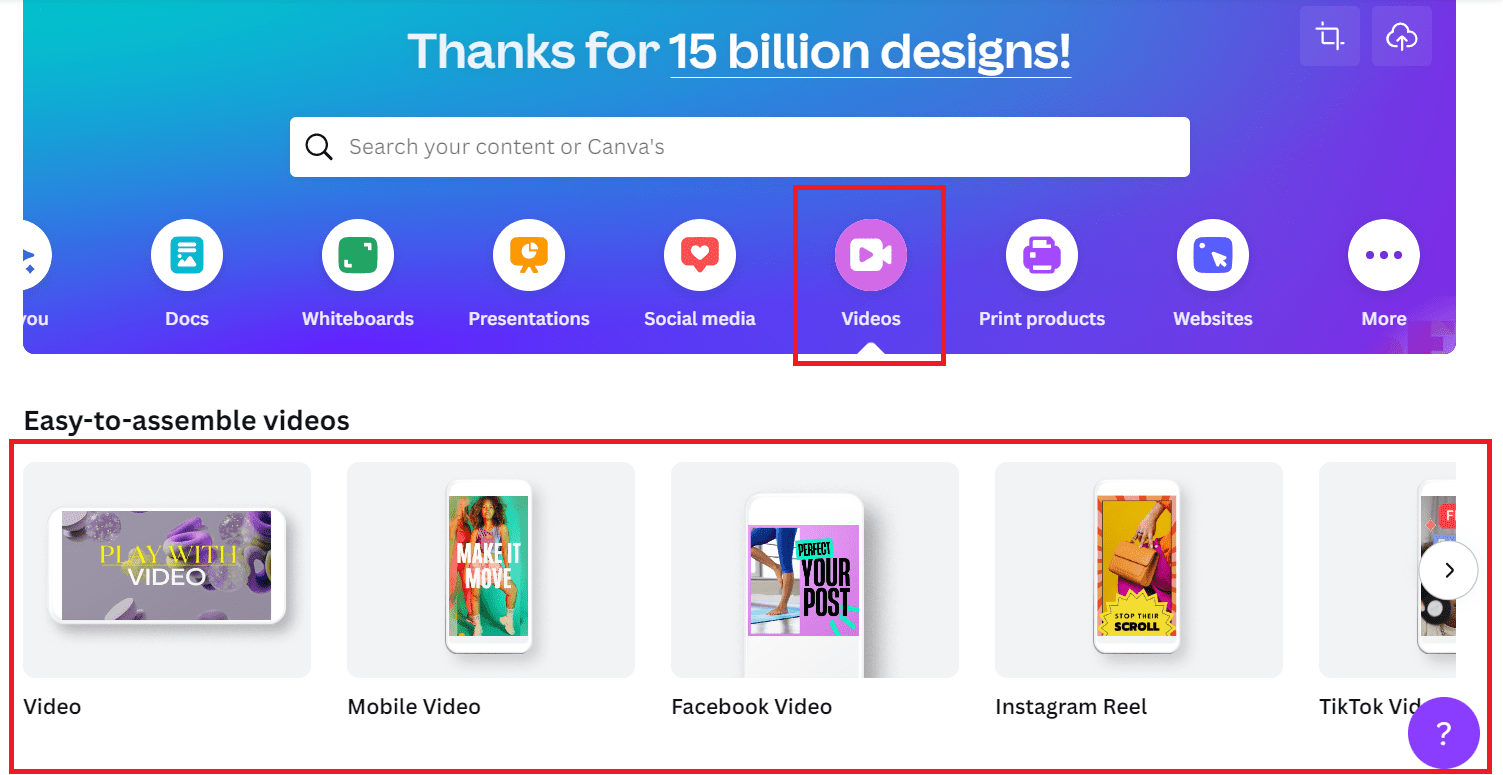
When you select the Video tab, you’ll also be shown the options for various types of videos (i.e. Facebook video, LinkedIn video ad, Instagram Reel, etc.) that you can create.
All these video templates come in different sizes and durations to suit the purpose for which they have been designed. You can choose your desired option.
Choosing your video type will open a blank document of your preferred video size.
You’ll also see a video template library in the side panel from where you can choose a template for the kind of video that you’re looking to create.
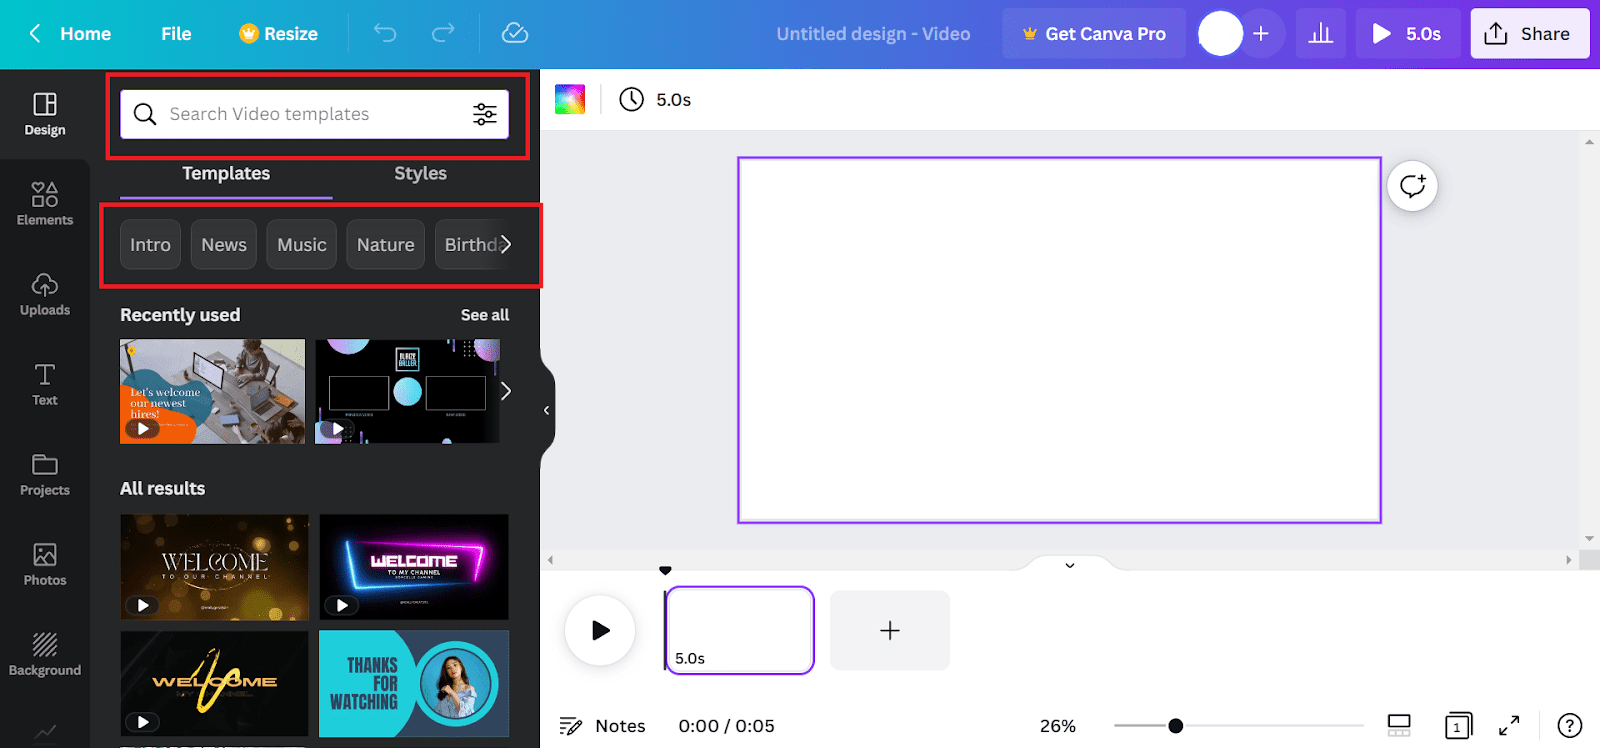
You can search the template library using a keyword of your choice to find relevant templates more quickly (i.e. if you search Happy Birthday videos, it will show you video templates related to birthdays).
Moreover, you can also filter your templates according to various themes and needs from the menu bar below the search bar.
Once you’ve chosen a template, click on it to open it in the Canva video editor.
Step #2: Add Your Content
The next step is to add your content to the video template that you just opened to make it yours.
By default, there will be some placeholder content in it (i.e. some text, some images, graphics, etc.) and you’ll have to replace it with your content.
This content may include:
- Graphics
- Images
- Text
- Your own video
But before you add any of that, let’s understand the editor interface to make things easy.
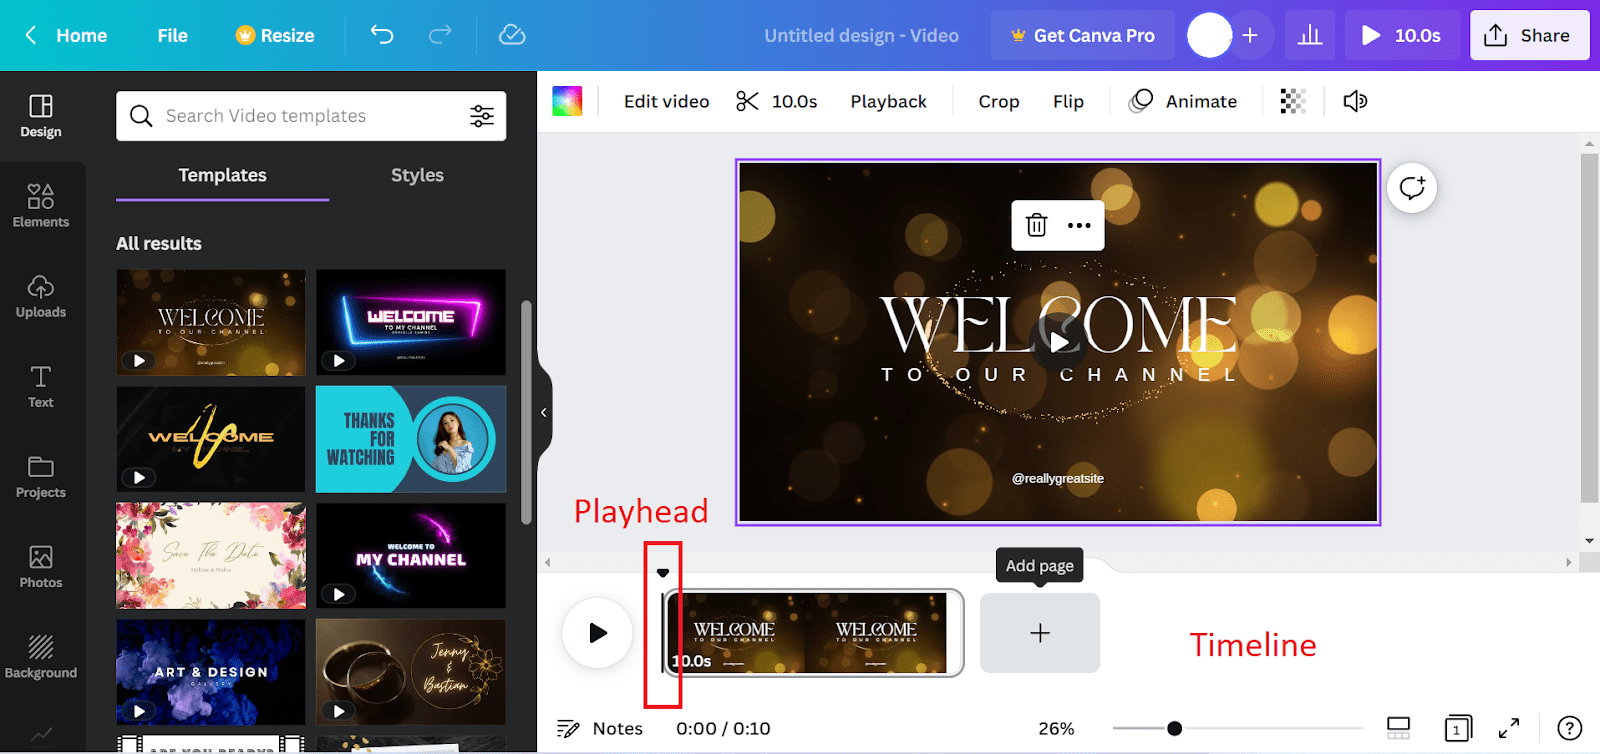
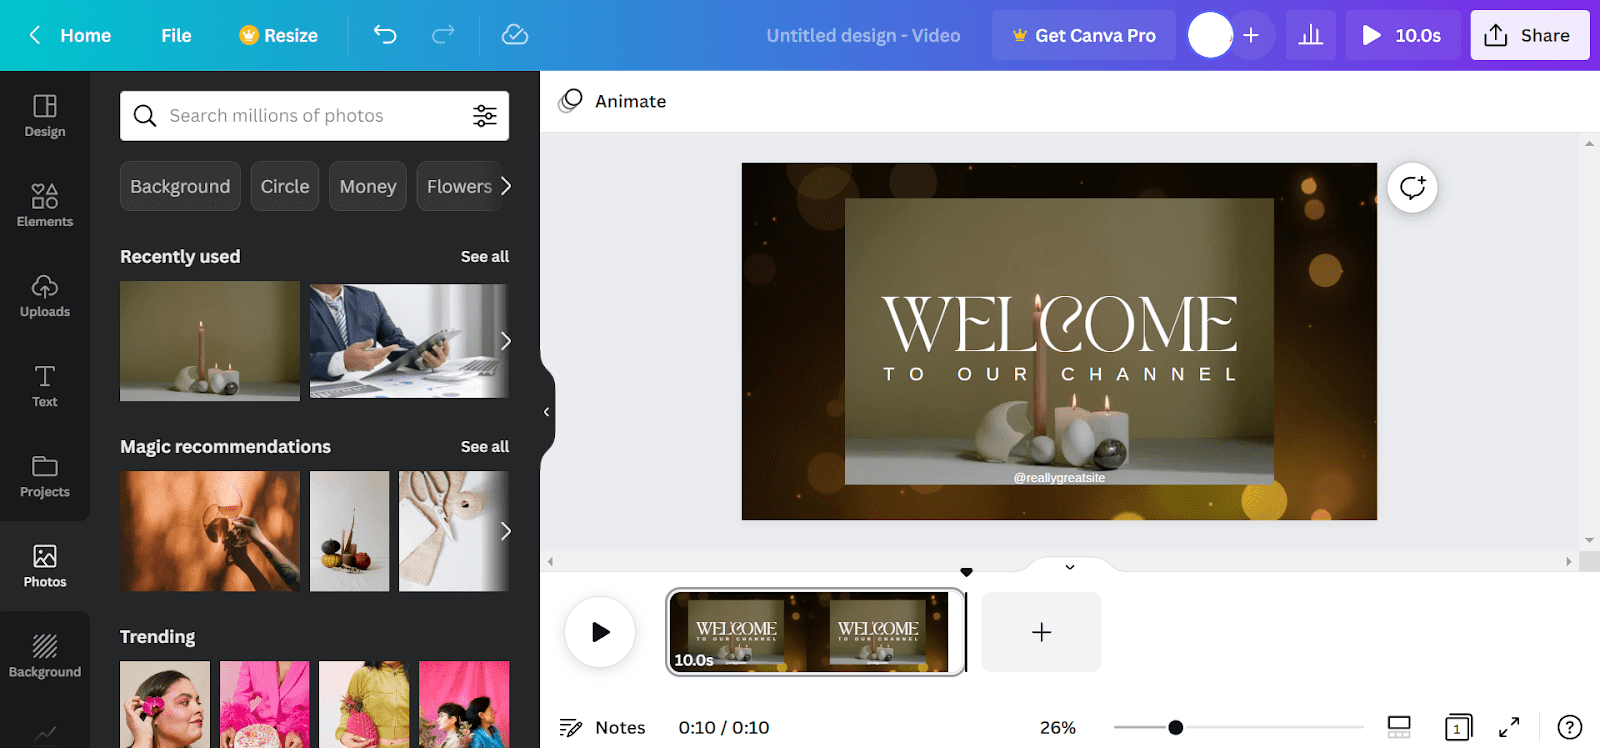
So here’s the thing — your selected template and its content take center stage, while below it you see a timeline with a Playhead that can be used to jump to a specific part of the video.
You also see various pages of the video added to your timeline, and you can jump to any particular page for editing its content using the timeline.
There’s also a Play button to play or pause your video whenever you want it.
Now you can start replacing the default placeholder content of the template with your content, one step at a time. Here’s how to do that:
Add images
If there are images in the video template that you want to remove and replace with your own images, you can do that easily.
And if there are no images in the template but you want to add one, you can do that as well.
Let’s see how to do the latter first.
Click on the Photos tab in the sidebar
Scroll down to select an image, or you can also search for an image in the Canva library. For instance, if you want to add an image of candles, you can search that.
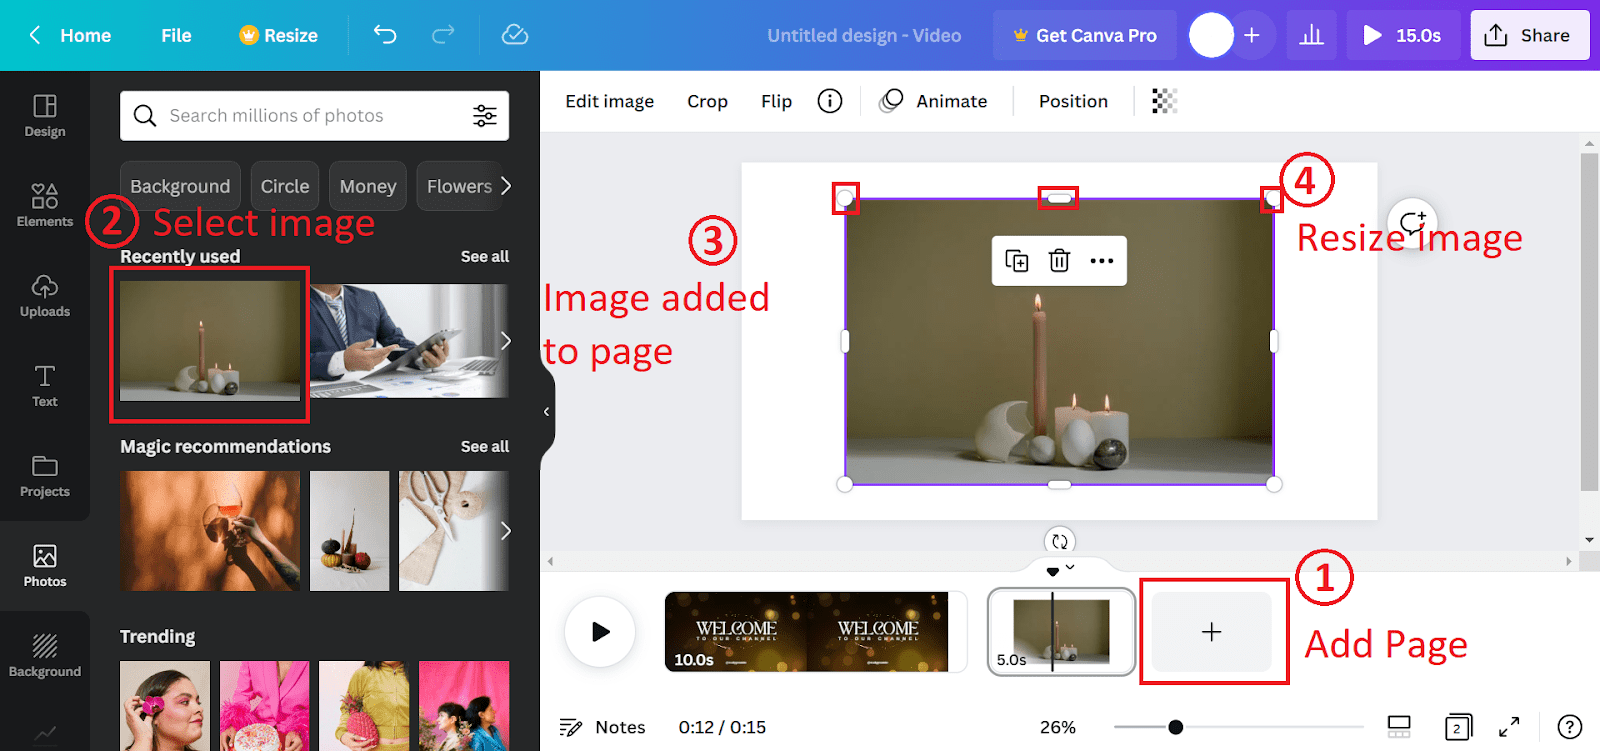
From the search results, click on the image that you want to add and it will be added to the page in the video editor.
You can also add your image to a new page if you want to.
Just click the Add page button, and then select the image from the side panel to add it.
Then you can also drag and drop the page behind or ahead of an element on your timeline to rearrange the location of the image in your video.
You can also resize the image if you want to.
Now, if you want to replace an image included in the template with your own, you can do that too.
Just find your image from the Photos tab (you can also upload your own image if you want to and it shows under Uploads), and then drag and drop it over the image which you want to replace.
Editing your image(s)
You can also edit your added images if you want to. Just select the image, then click on the Edit image button in the bar above it.
This will open a new side panel from where you can easily perform any of the following:

Remove background (this is a Canva Pro feature)
Apply different filters (some are free, some Pro)
Adjust brightness, contrast, and saturation
Apply advanced effects like autofocus, auto-enhance, etc.
Put your image into different kinds of mockups and frames
Apply shadows, etc.
Add video background
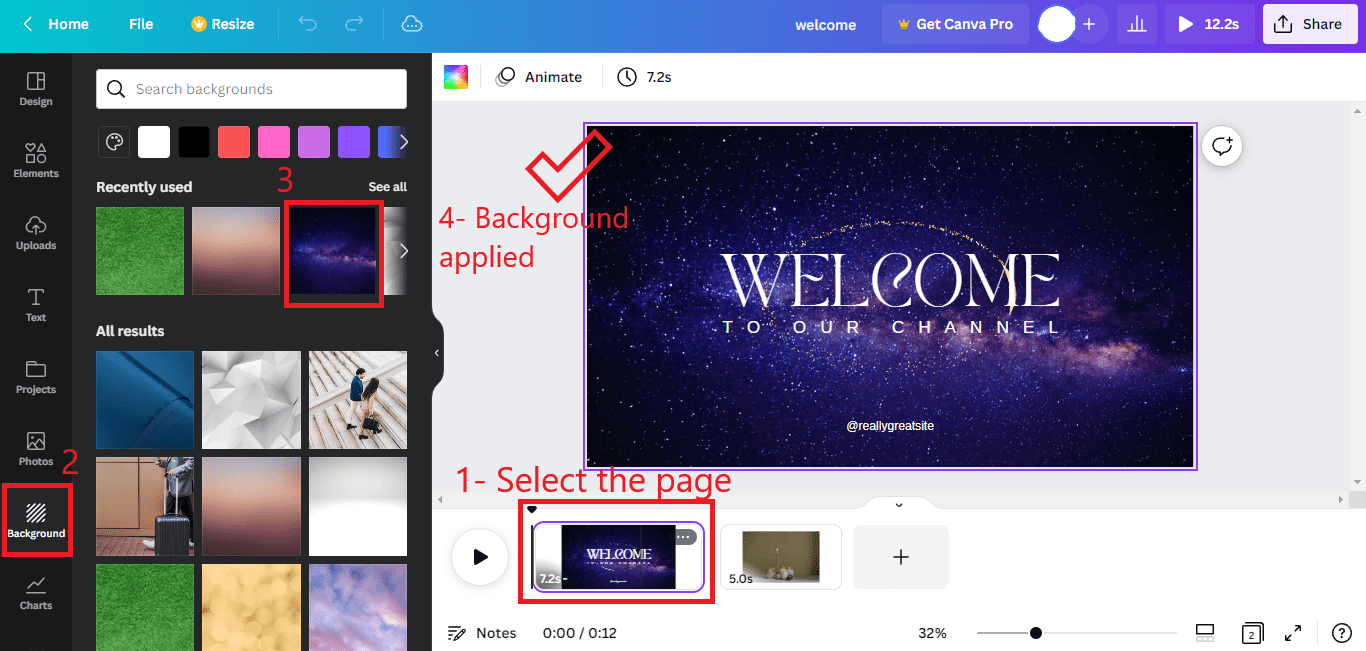
If you want to change the background of your video, you can do that too.
Just go to the background tab from the side panel, click on the page whose background you want to change, and then select the background you want to apply from the side panel.
Your chosen background will be applied to the selected page of the video.
Add your own video
You can also add your own videos to the video that you’re creating in Canva.
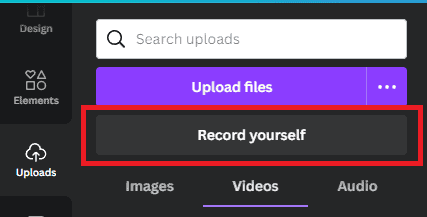
Just add a new page on the timeline, go to the Uploads tab in the side panel, click the “Upload Files” button, and then navigate to the Video tab to upload your video.
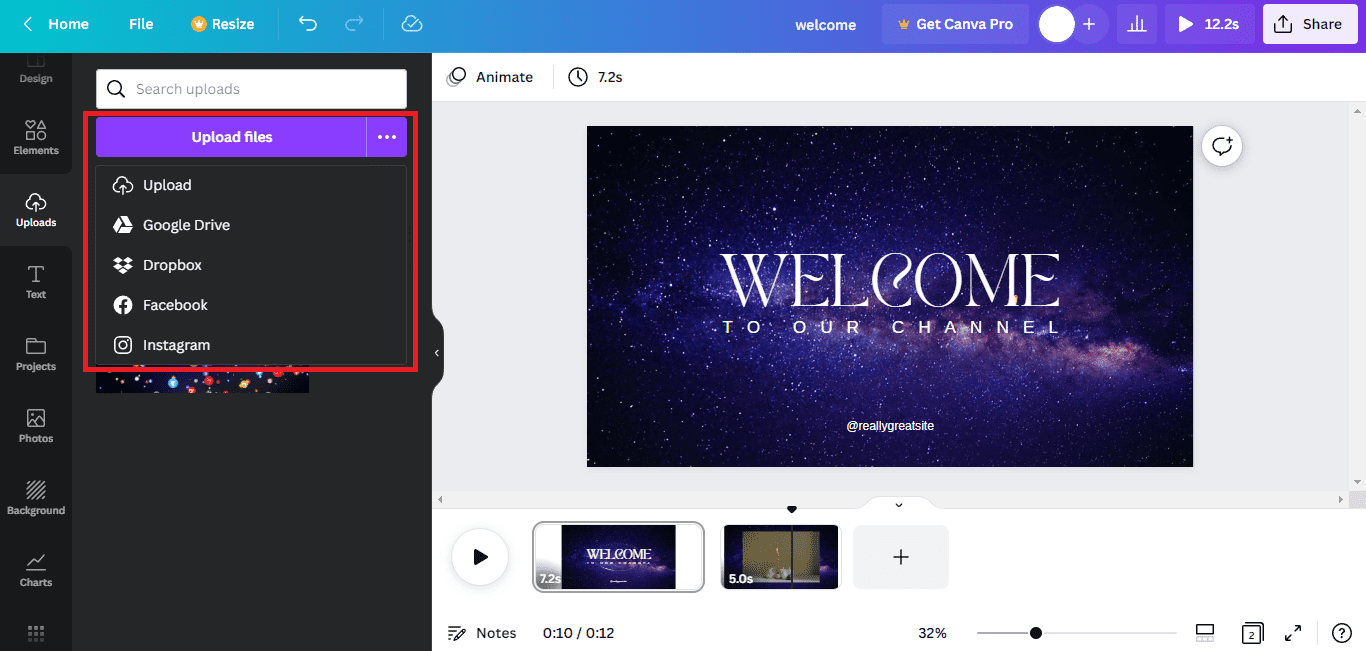
You can also add your video from Google Drive or various other social media platforms, such as Facebook and Instagram.
Or if you wish, you can also record your own video from the Record Yourself button.
The video, once added, can also be rearranged between the various pages on the timeline depending on where you want it to be by dragging and dropping.
Add your text
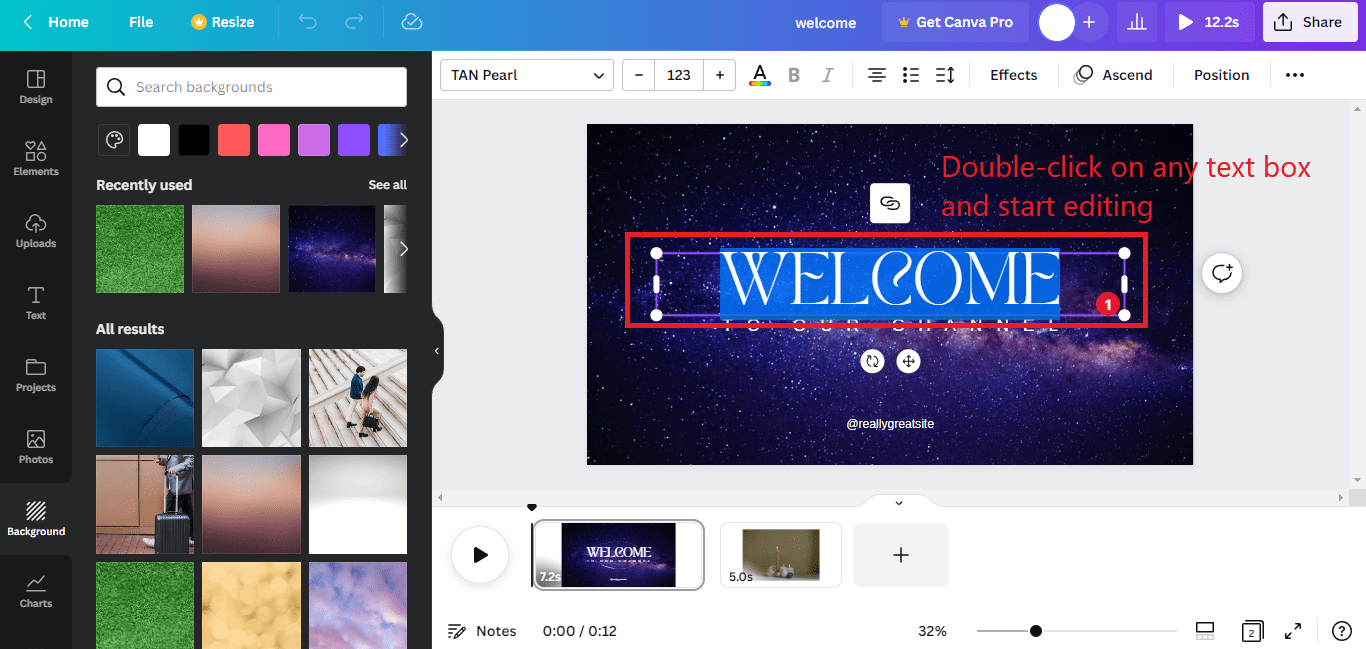
Adding your text is easy. If you want to replace any text part included in the video, just click on it twice and you can start typing your own text.
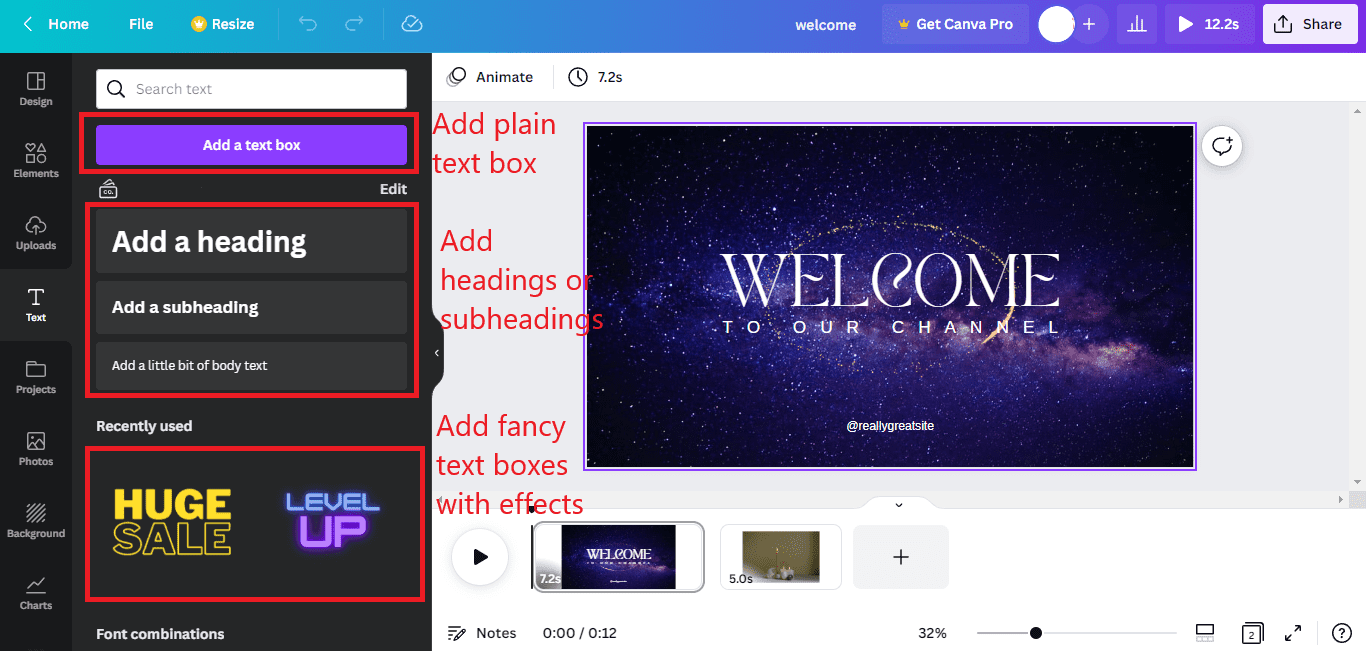
Alternatively, you can also add your own text anywhere in the video by clicking the Text tab in the side panel.
From there, you can select a text box of your choice depending on whether you want to add a heading, subheading, body text, or some other fancy text box.
Step #3: Animate the Elements
After you’re done adding your content to the video, it’s time to animate the different parts of it by adding transitions and animations as per your preferences.
Follow the steps below to do that:
Select the element which you want to animate
Click on the “Animate” option from the toolbar above
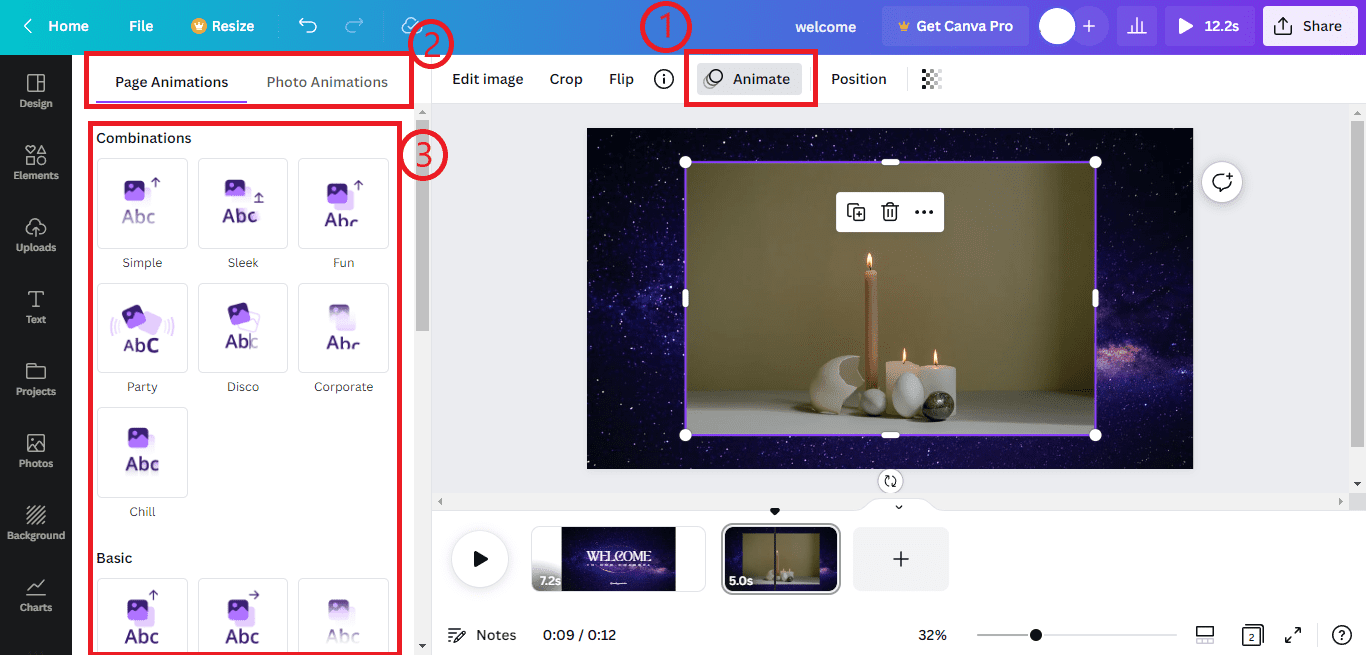
Now you’ll see the animations panel open up in the sidebar.
This panel will have two tabs — one will be the Page animations tab that applies your selected animation to the whole page, and another will be related to the element which you have selected (i.e. Text animations tab when you want to apply the animation to a text box and Photo animations tab when you want to apply it to a photo).
Follow the steps below to apply the animation of your choice:
- Navigate to the relevant tab (i.e. Page animations tab when you want to apply the animation to the whole page and the Text/Photo animations tab when you want to apply the animation only to a certain element)
- Select the animation you want to apply
- Check the preview using the Play button
- Change the animation if you don’t like it
- Repeat until you’ve applied an animation that you like.
Also, pay attention to the location of Playhead while applying the animation.
Because your animation will start only from the location where Playhead was when it was applied.
Step #4: Add or Replace Tracks
If you’re using a template, there’s a good chance it might already have come with some soundtracks added to it that you may want to keep or replace depending on whether you like them or not.
But if that’s not the case and you’ve created the video from scratch, then it’s upon you to add the soundtracks of your choice to the video.
Fortunately, Canva makes it easy. Follow the steps given below to add or replace your tracks:
- Go to the Uploads tab in the side panel
- Switch to the Audio tab
- Upload your soundtrack from your PC or import it from Google Drive, Facebook, Instagram, etc. just like a video.
Once uploaded, you can select it to add it to your video.
And just like animations, pay attention to the location of your Playhead while adding a soundtrack because the track will be applied to video from the location where your Playhead is. Nevertheless, you can rearrange it in the next step.
Step #5: Trim, Realign, Preview
With your content, animations, and soundtracks in place now it’s time to give the final touches to your video by trimming, realigning, and optimizing the various parts included in it.
The timeline has an important role to play here — you can rearrange any page or soundtrack in your video by dragging and dropping it in the timeline.

Want to move an element you added behind a certain part of the video?
Drag and drop its page behind the desired part. The same thing goes for soundtracks — move them as forward or backward as you want on the timeline.
You can also trim the durations of various individual parts in the video by selecting and dragging their handles from the edges, as shown below.

Once you’ve done all the rearrangements and trimming, you can preview your video by pressing the Play button.
Step #6: Save!
Finally, when you’ve satisfied with your video, you can save it to your PC by navigating to File >> Download.
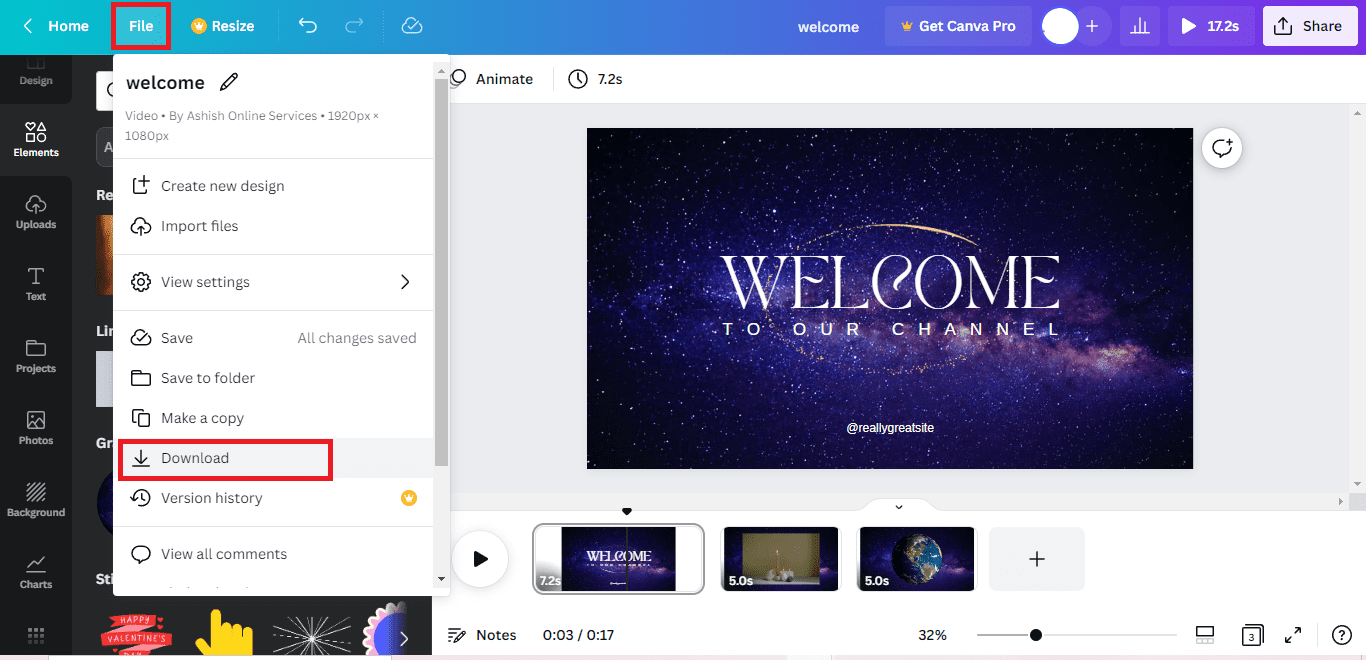
When you click the Download option, you can also select the File Type and convert the video Quality from the menu that appears next.
However, note that changing the quality feature is a Pro feature.
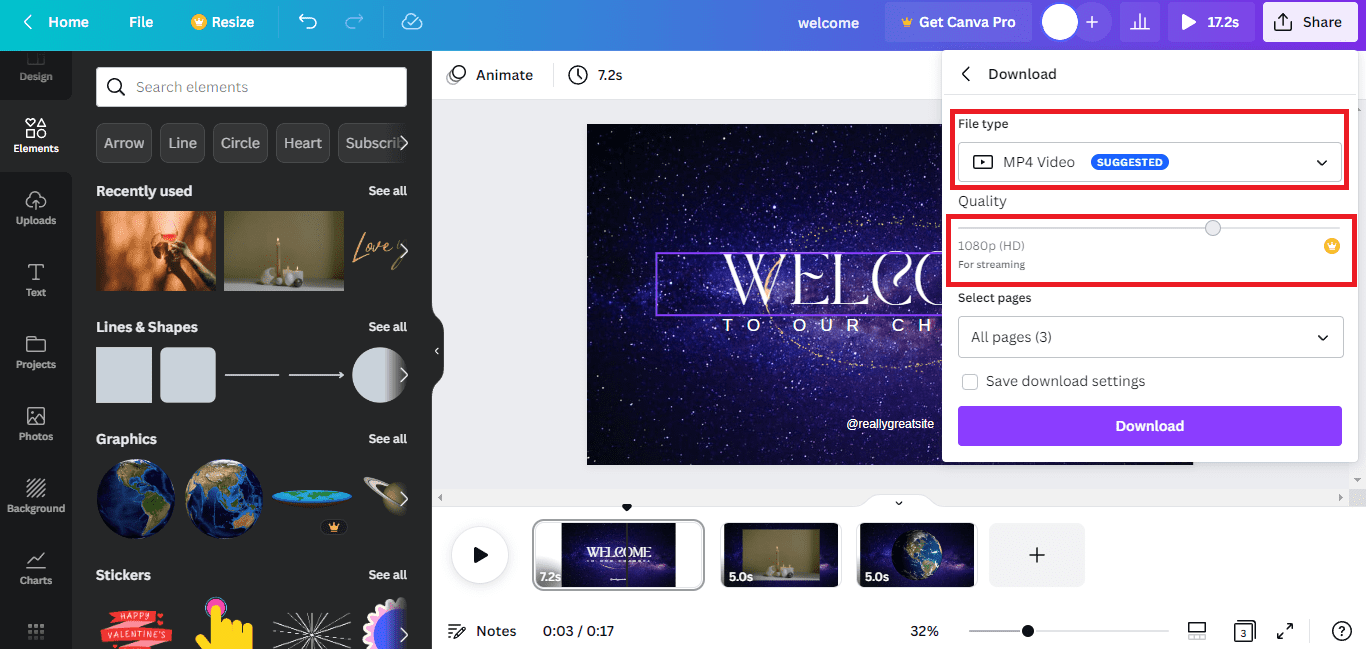
Once you’ve done all the settings, click the Download button and that’s it! You’ve created and saved your first video from Canva.
Similar Tutorials to Check Out
- How to Edit Photos in Canva: Creating videos and editing photos are two totally different things. We’ve covered the scope of videos in this tutorial, and the tutorial linked here covers how you can edit your photos using Canva.
- How To Send Large Video Files: Videos created by Canva can be quite large sometimes, mainly because of the quality it tries to maintain. Now, if you have to send the video somewhere, it can be problematic because there are file size restrictions in email. This tutorial explains how you can send large video files without any issues.
- How To Embed Video In Emails: Finally, if you must send a video using your email, this tutorial can come in handy because it explains all the technicalities involved with it.
Wrapping Up
So that was our tutorial explaining how to make a video in Canva.
We’ve tried to explain everything in as much detail as possible so you can understand it properly. If you still have any questions about it, drop them in your comments.
We’ll definitely try to answer them at the earliest. Also, share this guide on your social media handles if you learned something useful from here.


