
Taking screenshots is an important part of blogging.
Many times we’re required to share certain things in our content through a screenshot.
Sometimes, screenshots are also needed to help diagnose any technical issues in our blogs/websites.
Thus, it’s important to know how to take a screenshot on Windows.
And interestingly, there are not one but four different methods to capture screenshots on your Windows computer.
In this article, we shall explore all four methods so you can use the one that best suits your need at any given time.
- Frequently Asked Questions
- What you’ll need to take a screenshot on Windows
- 3 Methods for Taking a Screenshot on Windows
- Method#1: The Print Screen method
- Method #2: The Snipping Tool method
- Method #3: The Windows key + Print Screen method
- Method #4: Using third-party tools
- Similar tutorials to check out
- Wrapping up
Frequently Asked Questions
What is a screenshot?
A screenshot is an image of whatever is being displayed on your computer screen at a given time.
It captures everything that you can see on the screen or a specific part of the screen.
Does Windows include a tool to capture screenshots?
Yes, Windows includes a tool aimed at capturing screenshots. It also provides many other methods to do the same, as you’ll discover soon.
When is a screenshot required?
A screenshot is required in any of the following circumstances:
1) Explaining any technical concept to someone, 2) Storing a record of something showing up on your screen, or 3) Sharing a piece of information with someone.
There are many other situations too in which you may want to capture a screenshot, but these three are most common among them.
What you’ll need to take a screenshot on Windows
It varies depending on the method you choose to capture your screenshot.
Some methods require nothing, while others may require you to have MS Paint, MS Word, Photoshop, or other 3rd party software.
3 Methods for Taking a Screenshot on Windows
- Method 1: The Print Screen Method
- Method 2: The Snipping Tool Method
- Method 3: The Windows Key + Print Screen Method
- Method 4: Using Third-Party Tools
Method#1: The Print Screen method
This method is one of the easiest ways to take a screenshot on Windows, but offers the less flexibility.
First of all, hit the PrtScn button on your keyboard to copy a screenshot of your screen to the clipboard.
2. Paste and edit your screenshot
Next, you need to paste your screenshot into an app to edit or save it.
We’d suggest you use the Paint app included in Windows for this purpose.
But you can also use more sophisticated tools like Word or Photoshop.
Launch your desired program, create a new document by hitting Ctrl+N and paste your screenshot in it by hitting the Ctrl+V paste shortcut.
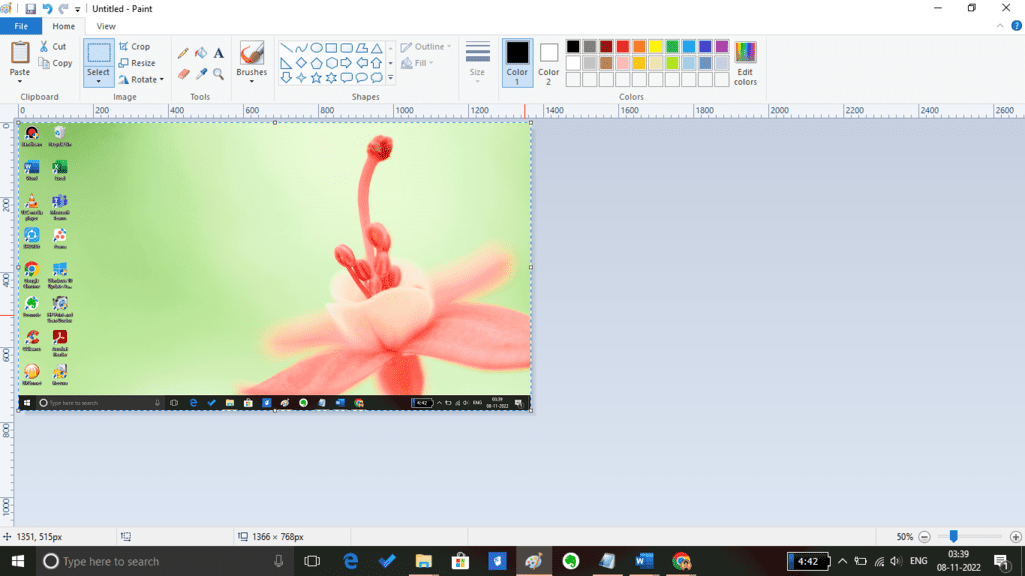
Once pasted, you can do your desired editing in the screenshot.
Photoshop allows the most advanced level editing (i.e. blurring, masking, trimming, or even mirroring of screenshots), while Paint allows only basic level editing (i.e. annotations, cropping, etc).
MS Word and other similar programs may or may not provide even the basic level of editing.
But they can make it easier for you to include your screenshot in any document.
3. Save your screenshot
Finally, save your screenshot by hitting the Ctrl+S keys on your keyboard.
Or, you can navigate to the File menu and click on the Save option to save your screenshot in png or jpg format.
Method #2: The Snipping Tool method
This is my favorite method to take screenshots, as it offers a lot of flexibility without having to crop later.
1. Open Snipping Tool
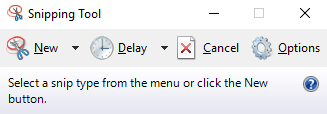
Hit the Windows key on your keyboard, and in the search bar type ‘Snipping Tool’ to search for it.
When the tool appears in search results, open it by clicking or hitting Enter.
2. Capture a snip
Hit the ‘New’ button inside the Snipping tool.
Your screen will become a bit grayish and the shape of the mouse cursor will also change to that of a selector.
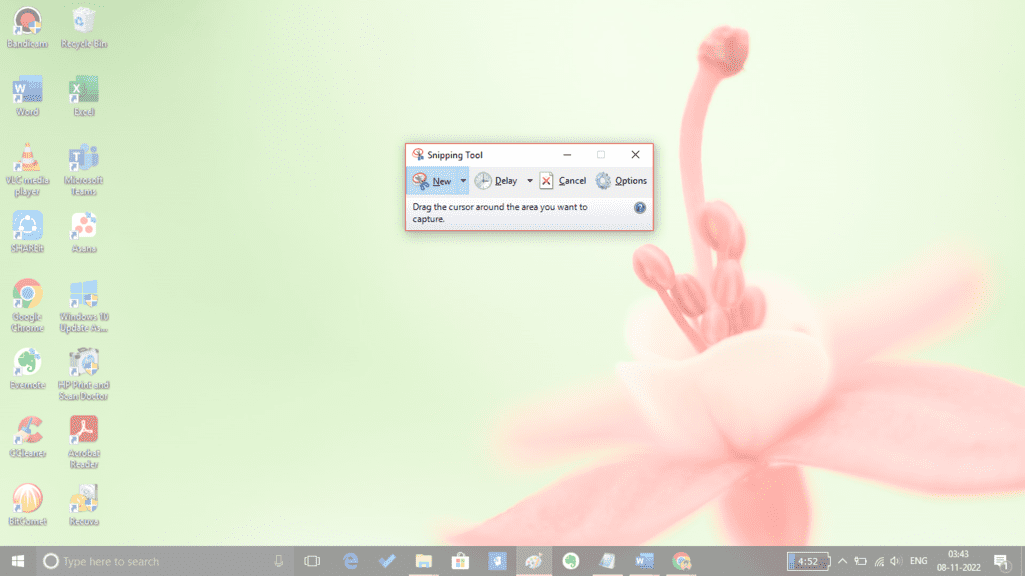
Drag the cursor on your screen to select the area you want to capture in your screenshot/snip.
4. Annotate the snip
The selected area is snipped and pasted automatically inside the Snipping tool as soon as you release your mouse click.
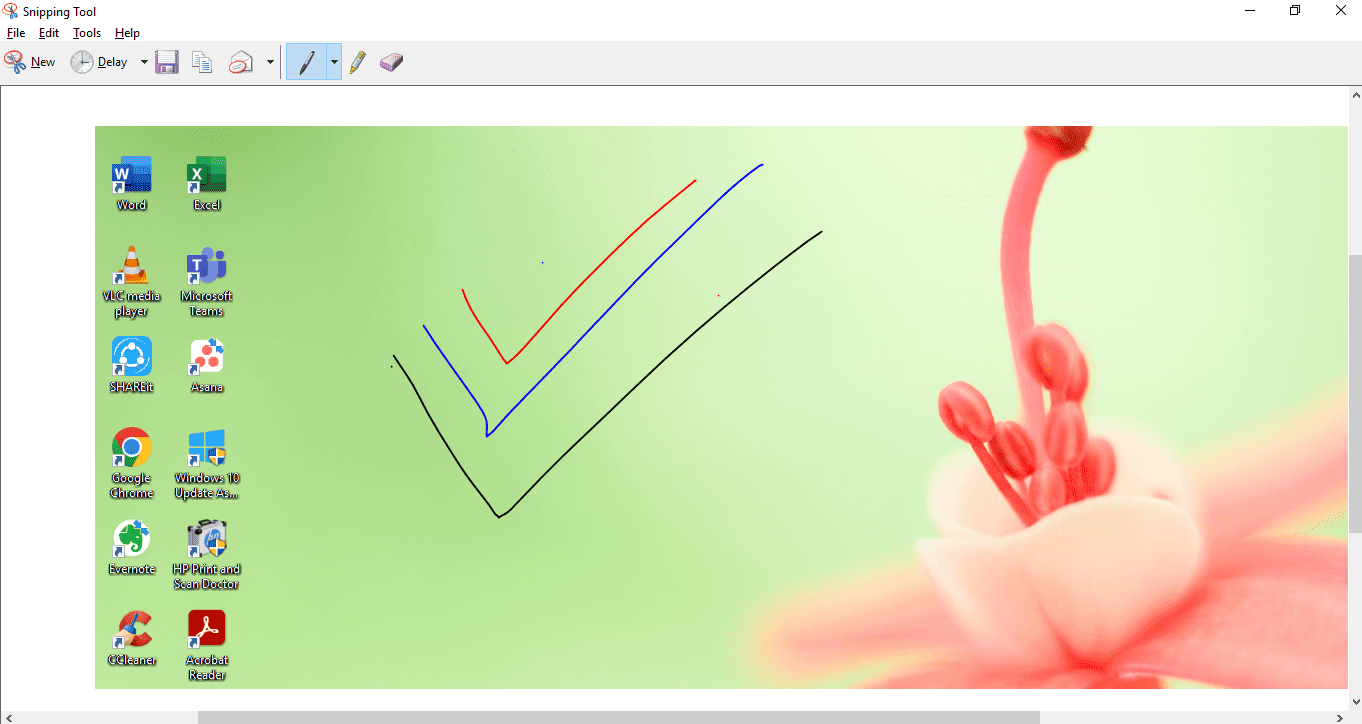
You can now annotate your screenshot using 3 tools that are provided at your disposal: a pen, a highlighter, and an eraser.
Use them as per your needs to annotate the screenshot, and ensure the image is optimized for intended purposes.
5. Save the snip
Once annotated, you can save the screenshot in your preferred types of image formats by hitting Ctrl+S on your keyboard.
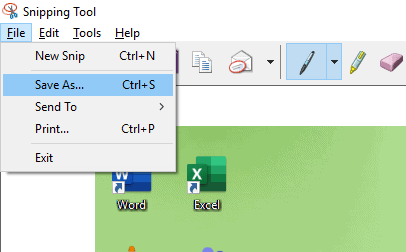
Alternatively, you can also click-open the File menu inside the Snipping tool and click on the ‘Save As’ option to save it to your desired location.
Method #3: The Windows key + Print Screen method
This method is the simplest way of capturing a screenshot on your Windows computer.
Press and hold the Windows logo key on your keyboard and simultaneously press the Prtscn button.
Your screen will flicker and the screenshot will be saved automatically in the Pictures >> Screenshots folder.
The captured screenshot is also copied to your clipboard, so you can directly paste it anywhere by simply hitting the Ctrl+V shortcut. Simple, isn’t it?
Method #4: Using third-party tools
Finally, if none of the above-given methods are your cup of tea, you can try 3rd-party tools to capture your screenshots.
Many of these tools also allow you to annotate your screenshot, edit it using an image enhancer, or share it directly with others.
We shall explore 3 of them here:
- Lightshot: In line with its name, this is a very lightweight screenshot tool that works from your taskbar. Once you capture a screenshot with it, you can annotate it and upload it to their website for online sharing.
- Greenshot: This one is a simple-yet-powerful screen capturing tool that allows you to configure custom shortcuts for taking screenshots on Windows. It can also upload them directly to Imgur if you want that.
- Snagit: This tool allows you to capture all your screenshots with up to 12 different methods. It also allows accessing them easily with the help of a Gallery or uploading them directly to many websites.
That’s not all — photo management software can sometimes screenshot even better than any of these tools.
If you already have a 3rd party app on your computer to manage and organize your images, try to find out if it allows capturing screenshots too.
Similar tutorials to check out
- How to Take a Screenshot on Mac: This tutorial explains how to capture screenshots on a Mac. Because if you also have a Mac, there’s no way you’re going to switch back and forth between your Windows PC and Mac only for capturing a screenshot.
- How to Make Photo Collages: This one explains how to make photo collages easily. It can come in handy when you have multiple screenshots and want to combine them into a single image to make your point.
- How to Find Copyright-Free Images: Many times we’re required to edit a screenshot and combine it with some images taken from the internet. In such a scenario, we mustn’t use copyright-protected images. That’s why this tutorial explains how to find copyright-free images in all such situations.
Wrapping up
So this was our tutorial explaining four different methods of taking a screenshot on a Windows PC.
If you still have any questions about these methods, feel free to share them in the comments.
We and the readers of our community will try to answer them for you at the earliest.
Also, share this tutorial on your social media profiles or with your friends.
Even if they know how to take a screenshot, they can still learn at least one–two new methods of doing the same from here.


