
Building any kind of website with WordPress is exceptionally simple.
WordPress has everything you need to build a compelling website out of the box, from plugins and themes to custom CSS. However, there are times when you’ll need to upload HTML files to WordPress.
For example, you may have an old website with a great HTML page and want that page on your WordPress website. Or your theme doesn’t support creating a specific page layout.
Instead of designing from scratch, uploading HTML files to WordPress can save time and effort.
This tutorial presents different methods to upload HTML files to WordPress.
- Frequently Asked Questions
- What You’ll Need How to Upload HTML Files to WordPress
- How to Upload HTML Files to WordPress: 3 Easy Methods
- Method #1: Upload HTML Files to WordPress via the Admin Dashboard
- Method #2: Using FTP to Upload Multiple HTML Files to WordPress
- Method #3: Upload HTML Files to WordPress via Cpanel
- More Helpful WordPress Tutorials:
- Wrapping up
Frequently Asked Questions
Can I Upload an HTML File to WordPress?
Yes, you can upload HTML files to WordPress using 3 different methods, from within the block editor, web host Cpanel, and FTP client software.
We’ll show you how to use these methods step by step in the coming sections of this guide.
How Do I Open an HTML File in WordPress?
In the previous version of WordPress, you could easily open an HTML file by switching from the visual editor to the HTML editor.
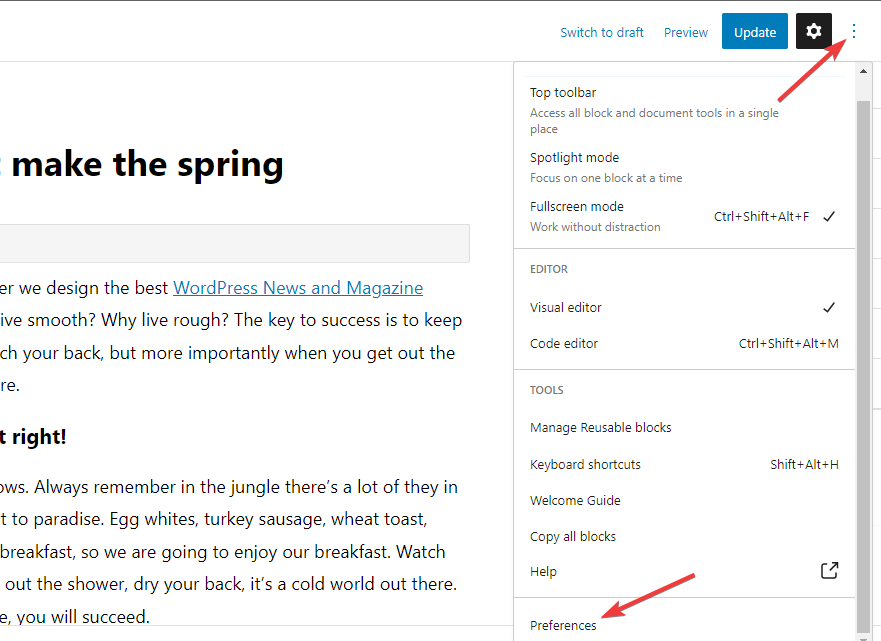
However, in the new Gutenberg editor, you’ll have to click on the three-dot menu at the top of the page to open the HTML file.
And to open an HTML file for a particular block, you need to click on the three-dot menu on that specific block.
What You’ll Need How to Upload HTML Files to WordPress
- WordPress Admin Access: To upload an HTML file to any WordPress site, you need access to the admin dashboard. You can only get this access if you have an admin or super admin role on the WordPress website.
- Web Host Cpanel: You’ll need access to your WordPress hosting account Cpanel for two reasons. First, directly upload an HTML file from within your Cpanel file manager. Second, to retrieve your FTP details.
- FTP Credentials: You can also upload HTML files to WordPress with either an FTP or SFTP software. You’ll need the FTP credential to connect the software to your website server.
- An FTP or SFTP Software: There are several FTP and SFTP software, free and paid, out there. FileZilla and Cyberduck are 2 free options. We’ll use Cyberduck for this tutorial. If FTP and SFTP sound new, check out this FTP vs. SFTP guide.
How to Upload HTML Files to WordPress: 3 Easy Methods
- Method #1: Upload HTML Files to WordPress via the Admin Dashboard
- Method #2: Using FTP to Upload Multiple HTML Files to WordPress
- Method #3: Upload HTML Files to WordPress via Cpanel
Method #1: Upload HTML Files to WordPress via the Admin Dashboard
The first method we’ll show you to upload HTM in this guide is via your admin dashboard.
Once you log in to your WordPress admin dashboard, there are three ways to upload your HTML file.
- Using the File Block in the Gutenberg Block Editor
- Using the Custom HTML block on a Page or Post.
- Using the Media Library
Now, let’s take a look at each one at a time.
Using the File Block in the Gutenberg Block Editor
On the left panel of your admin dashboard, locate the pages tab and click on it.
That should load a page with the list of all pages on your WordPress website.
Here you can choose where to upload your HTML file.
Add to an existing page by clicking the Edit link under that particular page.
On the other hand, if you want to add your HTML on a standalone page, you’ll have to click the Add New button next to the Pages title at the top left.
Either way, the WordPress visual text editor will open.
Click the Plus + (add block) icon at the top left to show the dropdown of available blocks.
Type File into the search box and add the block to the page.
Now that you have it on the page, you can upload your HTML file by clicking the Upload button. It will take you to your device storage.
Next, locate the HTML file you want to upload and click Open to load it.
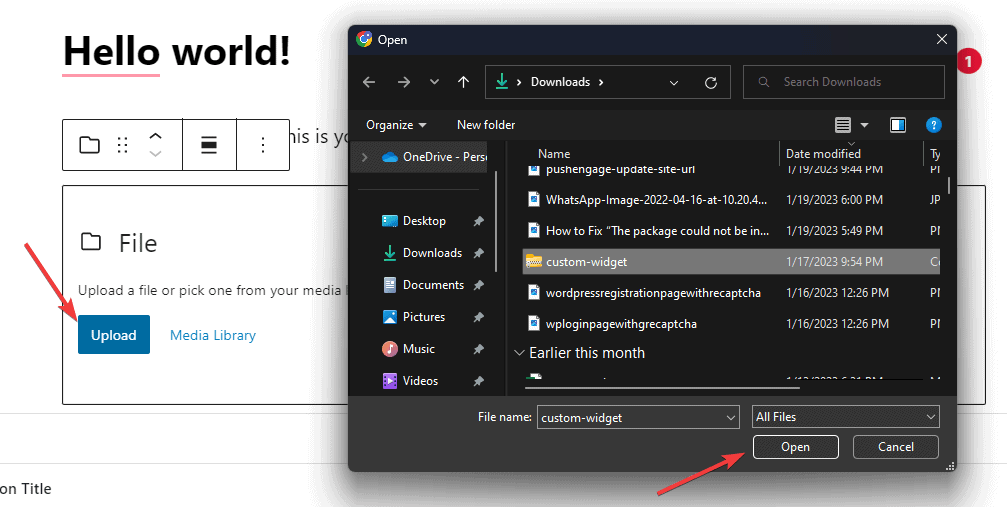
Once done, Click the Update button at the top right, and that’s all. You’ve successfully uploaded your HTML file to WordPress.
Alternatively, you can use the custom HTML block. That’s way #2.
Using the Custom HTML block on a Page or Post.
To use a Custom HTML to upload HTML files to a WordPress post or page, simply search HTML in the same search bar as above and select Custom HTML.
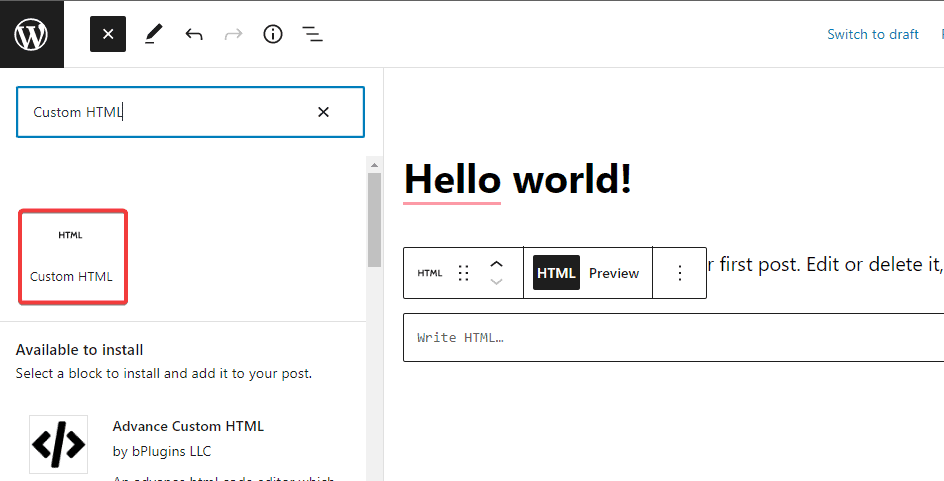
Once the block is added to the page, you’ll have to copy and paste your entire HTML code inside the Write HTML box.
This method is ideal if you upload a short HTML code snippet to WordPress.
However, using the media file option is more efficient when dealing with complex HTML uploads. We’ll look at that next.
Using the Media Library
Using the WordPress Built-in Media Library is ideal for uploading larger HTML files to WordPress
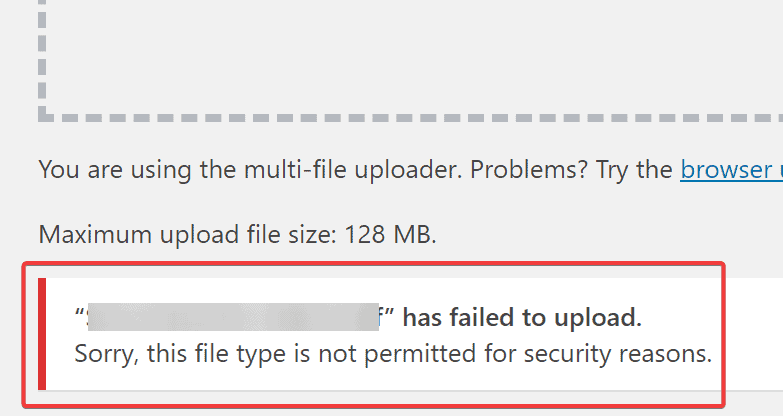
Remember that before using this option, you must make changes to the WordPress file configuration. Because, by default, WordPress does not support HTML file upload.
WordPress only allows you to upload files with specific extensions such as JPG, PNG, GIF, and PDF.
Attempting to upload Code extensions like HTML, JSON, and PHP to WordPress without modifying the configuration file will result in this error; “Sorry, this file type is not permitted for security reasons.”
To avoid this, you need to modify your wp-config.php file to accommodate the update temporarily.
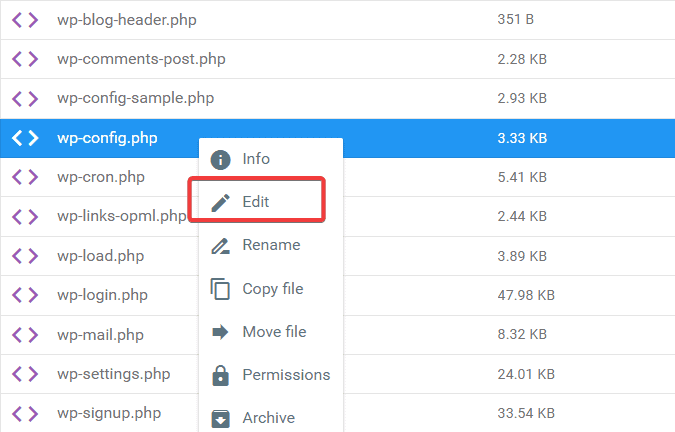
To do this, open your website root folder with an FTP client or Cpanel File Manager.

Next, Navigate to public_html>wp-config.php file.
You should find it in the same folder where your wp-content and wp-admin folder are located.
Right-click and select Edit from the options.
Next, add the following code snippet at the bottom.
define(‘ALLOW_UNFILTERED_UPLOADS’, true);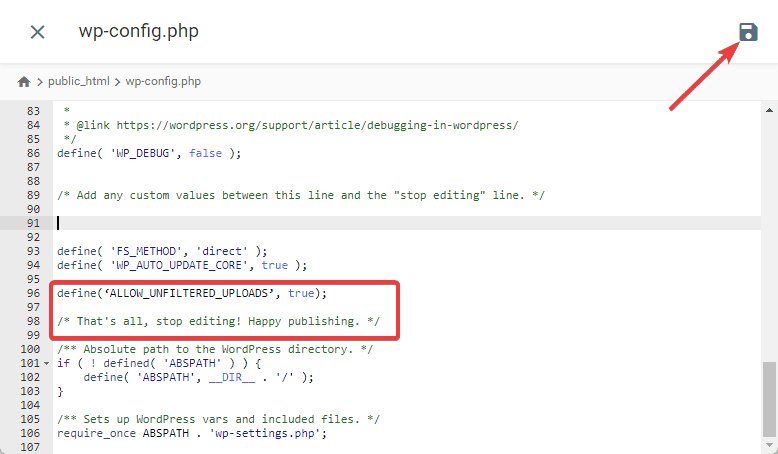
Once done, click the Save icon to apply your changes. Now you should be able to upload HTML files to WordPress without any error.
Note this is a temporary change that must be reverted immediately after uploading your file to avoid security issues on your site. Also, we recommend backing up your WordPress site before you proceed with it.
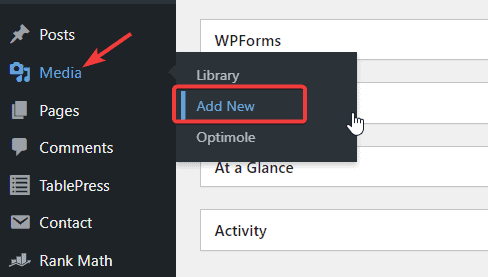
Now to upload your file, go back to your admin dashboard, hover over Media on the left panel, and select Add New from the options.
You should see a screen that looks like this.
Next, click the Select File button to upload the HTML file from your local storage.
Once your file has been uploaded, go back to your WordPress block editor.
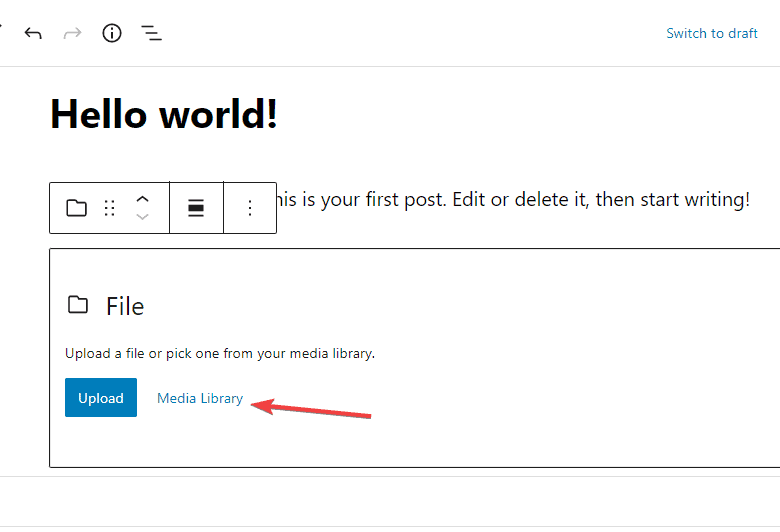
Search and add the File block to the page.
Once you have it there, click on the Media library.
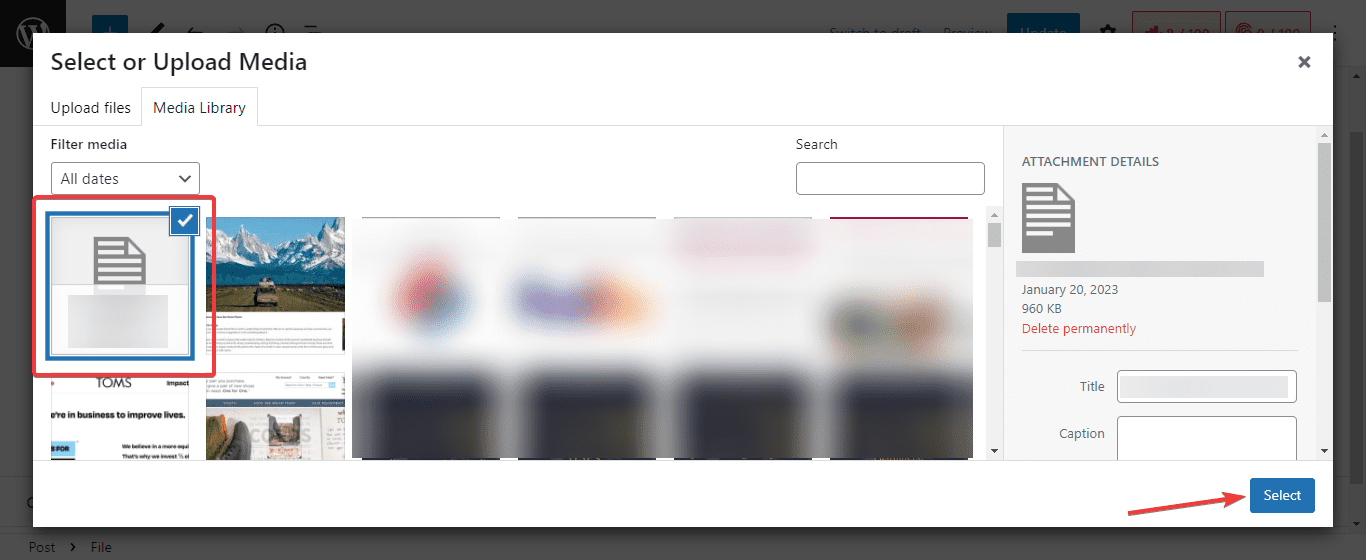
Now choose the HTML file you just uploaded and click the Select button.
And that’s all. You’ve successfully uploaded HTML to WordPress using the media library.
The advantage of this method is that you can reuse this HTML file again on other pages on your website.
Method #2: Using FTP to Upload Multiple HTML Files to WordPress
While uploading an HTML file to WordPress via the admin dashboard is the simplest method, It’s only suitable for single-page HTML upload.
Using FTP software is best when dealing with multiple HTML files and pages in WordPress.
We’ll use Cyberduck as our FTP client for this example. You can download it here.
Once you have Cyberduck installed on your computer, launch it and click Open Connection at the top left.
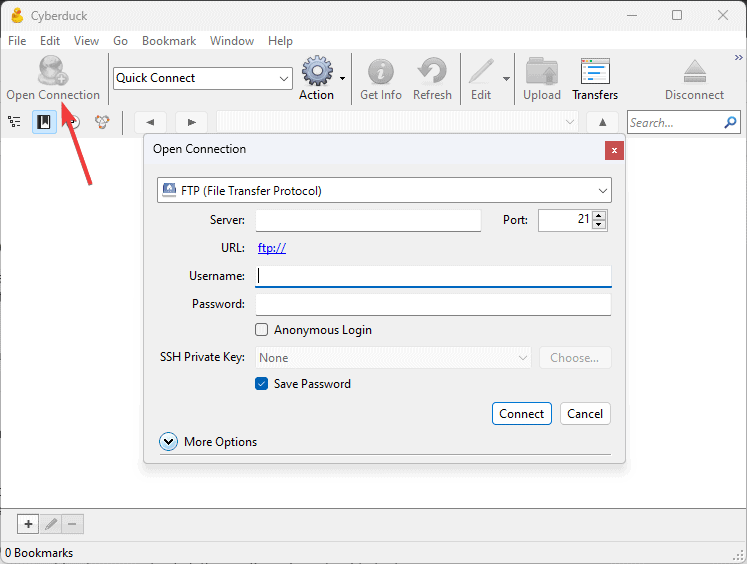
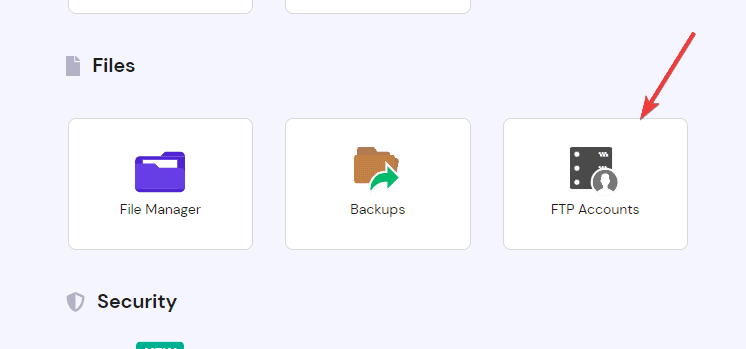
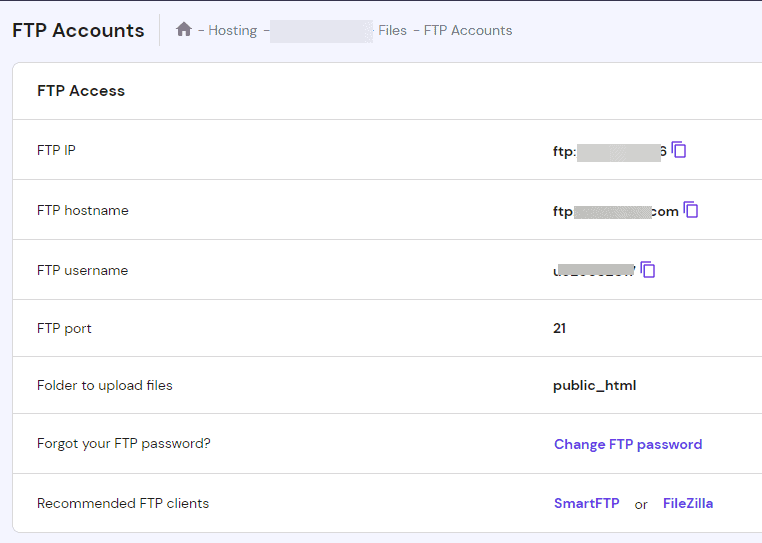
You need to provide your FTP credentials to proceed. You can find this information in your web hosting dashboard.
So sign in to your hosting dashboard and locate FTP Accounts or FTP Details.
You’ll find it under Files on most hosting providers’ platforms.
If you need help finding yours, you can contact your web host support for assistance.
Now, you must enter your FTP credentials, Port, Username, and Password into their respective fields on Cyberduck.
Once done, click the Connect button.
Cyberduck will now establish a secure connection to your website server. Then, it’s time to upload your HTML files from your computer.
Open your website root folder where the HTML file resides, also called the public_html folder.
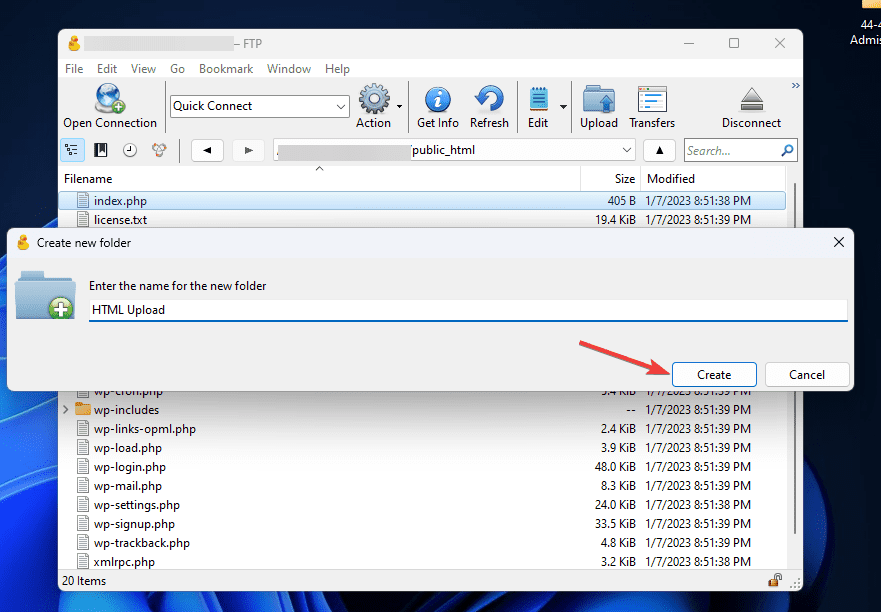
Now create a subfolder inside it by right-clicking on a blank section of the page and then selecting New Folder from the options.
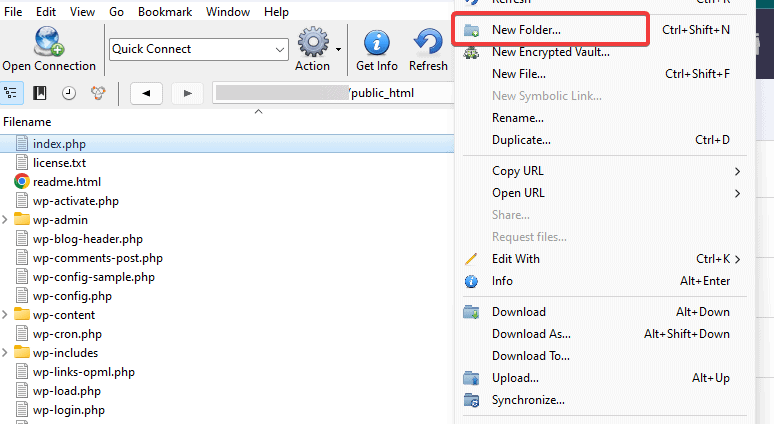
Name your folder and click the Create button.
Next, you can drag and drop your HTML file or simply click the Upload icon to select the file from your computer.
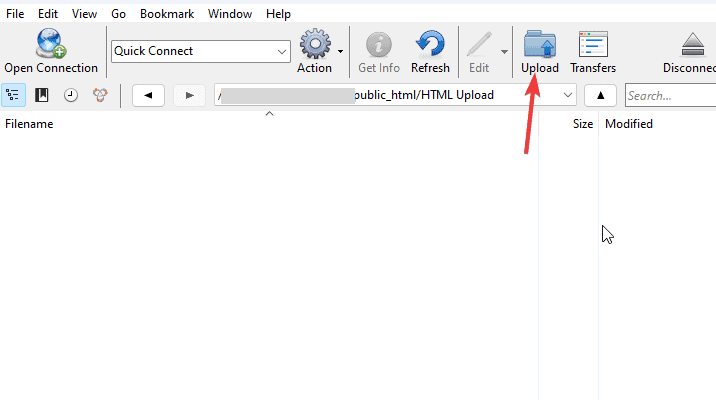
The upload will take a second. Once done, you’ll see your uploaded file inside the subfolder you just created.
Congratulations! You’ve successfully uploaded HTML files to WordPress via FTP.
To check if everything is working fine, enter your website URL into your browser and add the name of the uploaded HTML file after a forward slash, as in https://www.mysite.com/uploadedhtmlfile.
This should take you to the webpage created by the HTML file.
Method #3: Upload HTML Files to WordPress via Cpanel
The third method you’ll learn is using the File Manager within your hosting Cpanel to upload HTML files to WordPress.
Log into your hosting account Cpanel and locate File Manager.
The location may differ from host to host, but all other steps are the same.
Once you find the File Manager, click to open, and you’ll be redirected to your website root folder.
Here, you’ll find a folder titled public_html.
Once here, you have 2 options, upload your HTML file directly to the root folder or add a subfolder inside which you’ll upload your HTML file.
We’ll go with the former.
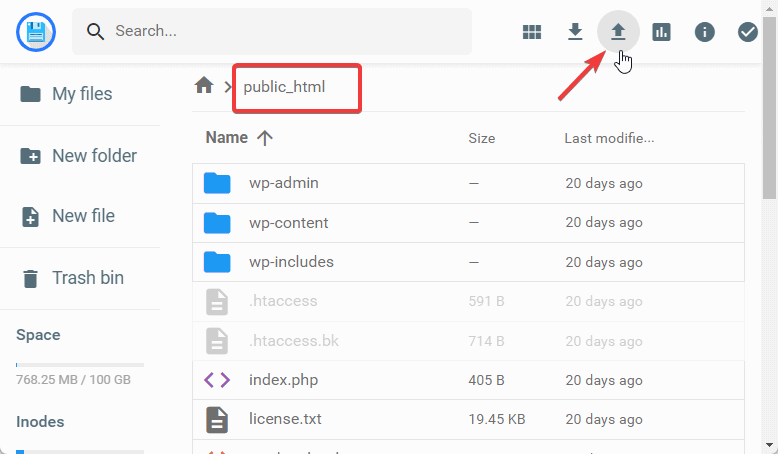
Next, simply drag and drop your HTML file inside this folder or use the Upload icon at the top of the screen.
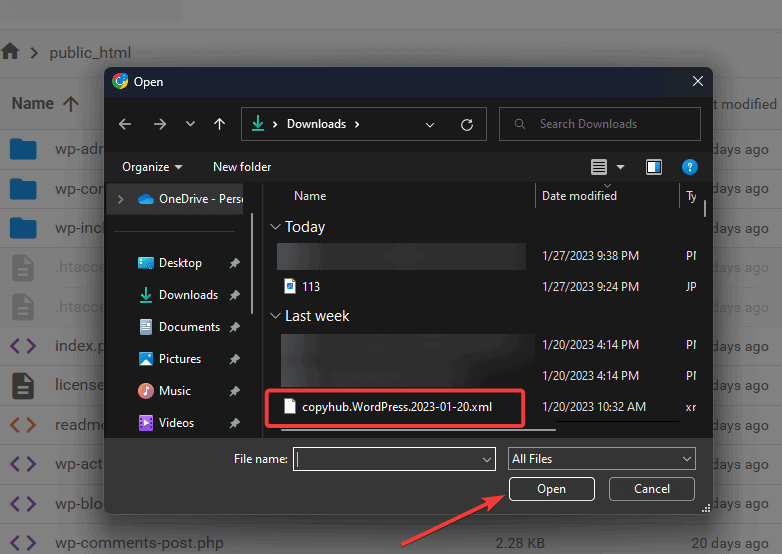
Your device storage will pop up. Select the HTML file you want to upload and click Open.
Once the upload is complete, you’ll see your HTML file in the root folder. And that’s all there is to upload HTML files to WordPress using Cpanel.
Now you can preview your page by using this path; https//:www.yourdomian.com/uploadedHTMLfilename.
More Helpful WordPress Tutorials:
- How to Upload a Theme to WordPress: Knowing how to upload themes to WordPress is a crucial skill if your website uses a theme not listed in the official directory. Learn how to upload your custom and premium theme to WordPress here.
- How to Increase WordPress Upload Size: Have larger files to upload to WordPress? Don’t let the maximum upload limit hold you back. Learn how to quickly increase WordPress upload size to make room for your larger files
- How to Reinstall WordPress: If your site has any issues, a potential fix is to reinstall WordPress. This guide will teach you different ways to reinstall WordPress easily.
Wrapping up
WordPress, the world-leading CMS and website builder, gives users unmatched flexibility to design purpose-befitting web pages.
One feature that lends credence to this is the ability to upload HTML files to WordPress.
When you have a custom web page from an old website, and your theme can’t give you anything close to its replica, uploading the HTML file to WordPress is simply the way to go.
Using any methods in this guide, you shouldn’t have trouble uploading custom or premade HTML pages and templates to WordPress.
Do you think you’ll need this guide any time soon? Then, bookmark this page and let us know your thought.


