
Debug mode is an essential tool for WordPress developers and site administrators.
When enabled, it captures detailed logs about any errors that occur on your site.
This can be incredibly helpful when it comes to identifying and fixing issues on your site, as it provides information about what went wrong and how to fix it.
In this post, we’ll show you how to enable debug mode in WordPress and how to use it for WordPress bug fixes.
No matter how experienced or inexperienced you’re as a WordPress developer, we promise that we’ll keep it simple.
Let’s start!
Frequently Asked Questions
What is WordPress Debug Mode?
WordPress debug mode is a functionality that logs detailed information about all the errors that occur on your site during the execution of any code or script.
This information is stored in a debug log file.
What is the Purpose of Debugging?
Debugging helps a developer understand what went wrong while performing a certain action on the site.
On WordPress, you can use the information logged in debug file about various errors to identify the source of errors so you can fix them.
Where is the Debug File in WordPress?
You can’t access the debug file unless you enable debug mode in WordPress.
Once you enable it, however, you can access the file at http://yourwebsite.com/wp-content/debug.log.
What You’ll Need to Enable WordPress Debug Mode?
Not too many things.
You just need the WP Debugging plugin in order to enable WordPress debug mode on your site.
How to Enable and Use WordPress Debug Mode: Step-by-Step Instructions
While there are manual methods to enable WordPress debug mode by altering the files of your WordPress installation, those are risky methods.
So we won’t suggest you follow them.
Instead, we’ll suggest that you follow the safe approach, which is by installing a plugin.
WordPress has plugins for almost every single task, and enabling debug mode is no different.
Here’s how you can enable debug mode on your WordPress site with the help of a simple plugin:
Navigate to Plugins >> Add New.
Search for “WP Debugging”, and then install the following plugin from Andy Fragen.
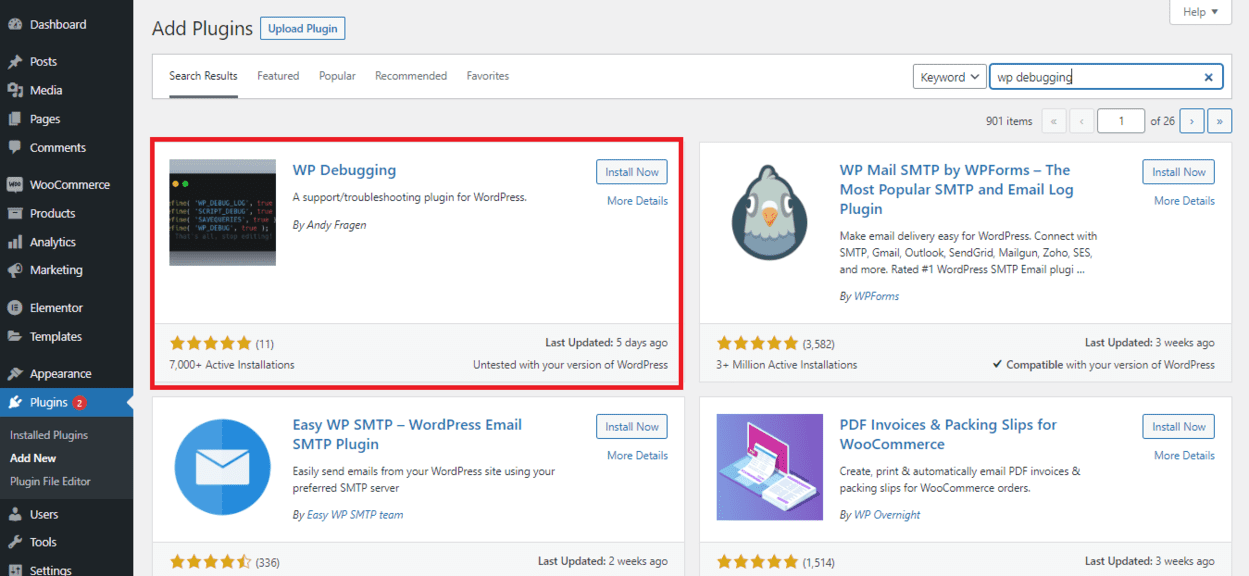
Once the plugin is installed, activate it.
Navigate to Tools >> WP Debugging.
Make sure that the “Set WP_DEBUG to true” option is checked.
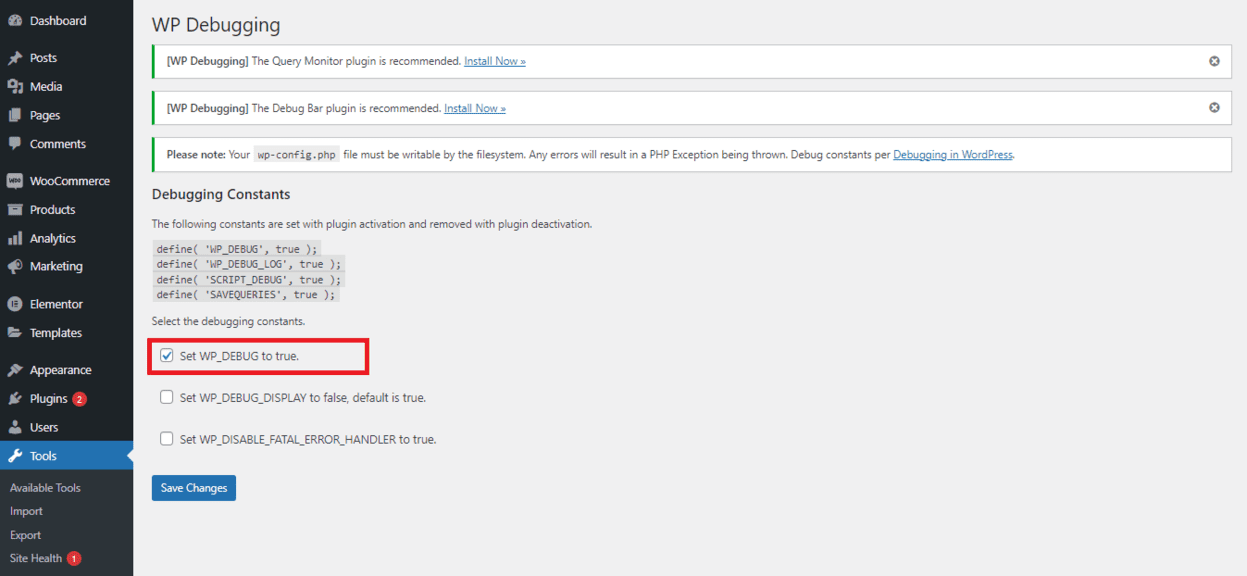
Save changes.
This enables the WordPress debug mode on your site.
Now whenever you face an error on your site, it’ll be logged in the debug file.
You can access your debug file by following this URL:http://yourwebsite.com/wp-content/debug.log.
Analyzing the log file can help you easily identify the source of an error, and then you can work on fixing it.
Finally, once you’ve fixed an error, make sure to disable the debug mode for the security of your site.
To do so, follow the 4th–6th steps in the procedure given above, but this time uncheck the “Set WP_Debug to true” checkbox.
And finally, deactivate the plugin by navigating to the Plugins page in your WordPress dashboard.
Similar Tutorials to Check Out
- How To Fix “Briefly Unavailable For Scheduled Maintenance”: This tutorial will help you learn how to troubleshoot and fix the “Briefly Unavailable For Scheduled Maintenance” error in WordPress.
- How to Fix WordPress Maintenance Mode Stuck: Get step-by-step instructions for fixing the WordPress maintenance mode stuck issue that causes your site to remain in the maintenance mode even when you want to disable it.
- How To Back Up WordPress: Finally, this tutorial explains the best ways to back up your WordPress site to ensure that your data is safe and secure.
Wrapping Up
Debugging is an essential part of the development for WordPress.
By learning how to enable debug mode and using it to capture detailed logs about errors on your site you can quickly identify and fix issues as they arise.
Whether you’re a seasoned WordPress developer or a beginner, this is a valuable skill to have in your toolkit.
So give it a try, and let us know your thoughts in the comments.
Also, if you found this short guide helpful, do share it on your social media because that’s what encourages us to create more such content.


