
If you help Google understand your web content better, you will be rewarded with a high search ranking And that’s exactly what schema markup does.
Since search crawlers are not human, they use natural language processing to comprehend the contextual meaning of web pages.
Schema markup is one of the great ways to provide search engines with crucial information about your webpage to improve your listing on SERPs. The enhanced search result is called rich results or rich snippets.
With WordPress schema markup done right, your on-page optimization will earn a boost as Google presents your content in rich snippets, thus increasing your website traffic and click-through rate, CTR.
There are two ways to add schema markup to WordPress. This guide will walk you through WordPress schema markup using the two methods.
- Frequently Asked Questions
- What You’ll Need to Add Schema Markup to WordPress
- How to Add WordPress Schema markup: 2 Methods
- Method #1: Adding WordPress Shema Markup Without a Plugin
- Method #2: Adding WordPress Shema Markup with a Plugin
- Using Rank Math for WordPress Schema Markup Step by Step
- More Helpful WordPress Tutorials:
- Wrapping up
Frequently Asked Questions
What is Schema Markup in WordPress?
Schema markup is a critical part of on-page SEO. It’s a special kind of metadata (HTML code) that you can add to your WordPress website to inform search engines precisely what your content is trying to convey.
For example, schema markups tell Google and other search engines that a particular page is a blog post, FAQ, product page, recipe, and so on.
What is the Purpose of Schema Markup in SEO?
The ultimate purpose of schema markup in SEO is to provide the most accurate information to users and search engines about the content on a particular web page.
Schema markup adds granular data to your content. Google then uses these data to create more accurate knowledge panels displayed in search results.
What is the Best Way to Add Schema Markup to WordPress?
The best way to add schema markup to WordPress is with a plugin.
Adding schema markup without a plugin requires a little bit of coding, so using a plugin is faster and easier. And there’s no risk of mistakes when writing the schema markup code.
We’ll show you both methods.
What You’ll Need to Add Schema Markup to WordPress
You only need 2 things to add Schema Markup to WordPress;
- WordPress Admin Access: Whatever method you want to use, you’ll need access to the admin dashboard. So need to have an admin or super admin role on the WordPress website where you add schema markup.
- A WordPress SEO Plugin: To add schema markup using a plugin, you’ll need a powerful SEO plugin. While all SEO plugins are not meant for this purpose, some of the most powerful SEO plugins allow you to add a markup to the entire or individual elements on your site. You’ll learn more about this soon.
How to Add WordPress Schema markup: 2 Methods
- Method #1: Adding WordPress Shema Markup Without a Plugin
- Method #2: Adding WordPress Shema Markup with a Plugin
Method #1: Adding WordPress Shema Markup Without a Plugin
The first method we will show you is how to add schema markup to WordPress without a plugin.
For this tutorial, we’ll be adding schema markup to a WordPress post.
This involves the following steps.
- Step #1: Generating Schema Code
- Step #2: Enable Custom Field in WordPress
- Step #3: Insert Schema Code to Post
- Step #4: Update Theme Header File
Step #1: Generating Schema Code
There are three different code languages for schema markup, Microdata, RDFa, and JSON LD.
The most effective way of all is JSON-LD which is a Javascript code.
Google recommends this method as it poses no threat of breaking your site and is easier to generate using Google’s Structured Data Helper.
Here’s the JSON-LD article structured data from Google;
<html>

  <head>

    <title>Title of a News Article</title>

    <script type=”application/ld+json”>

    {

      “@context”: “https://schema.org”,

      “@type”: “NewsArticle”,

      “headline”: “Title of a News Article”,

      “image”: [

        “https://example.com/photos/1×1/photo.jpg”,

        “https://example.com/photos/4×3/photo.jpg”,

        “https://example.com/photos/16×9/photo.jpg”

       ],


      “datePublished”: “2015-02-05T08:00:00+08:00”,

      “dateModified”: “2015-02-05T09:20:00+08:00”,

      “author”: [{

          “@type”: “Person”,

          “name”: “Jane Doe”,

          “url”: “https://example.com/profile/janedoe123”

        },{

          “@type”: “Person”,

          “name”: “John Doe”,

          “url”: “https://example.com/profile/johndoe123”

      }]

    }

    </script>

  </head>

  <body>


  </body>

</html>
You can generate your own markup code, especially for individual elements on your page.
Here how;
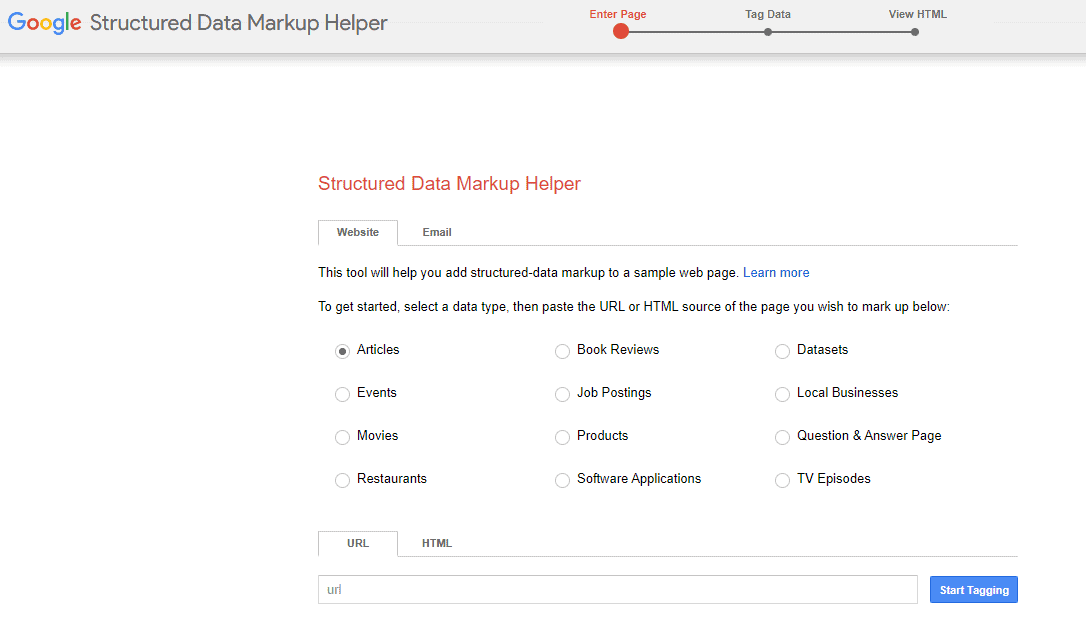
Go to the Google Structured Data Markup Helper page.
Select the type of content you want to markup, input the URL of the page where you want to add the markup and click the Start Tagging button.
Google will load the page. Now you can right-click on any element on the page, assign markup for them and click the CREATE HTML button at the top right corner once you are done.
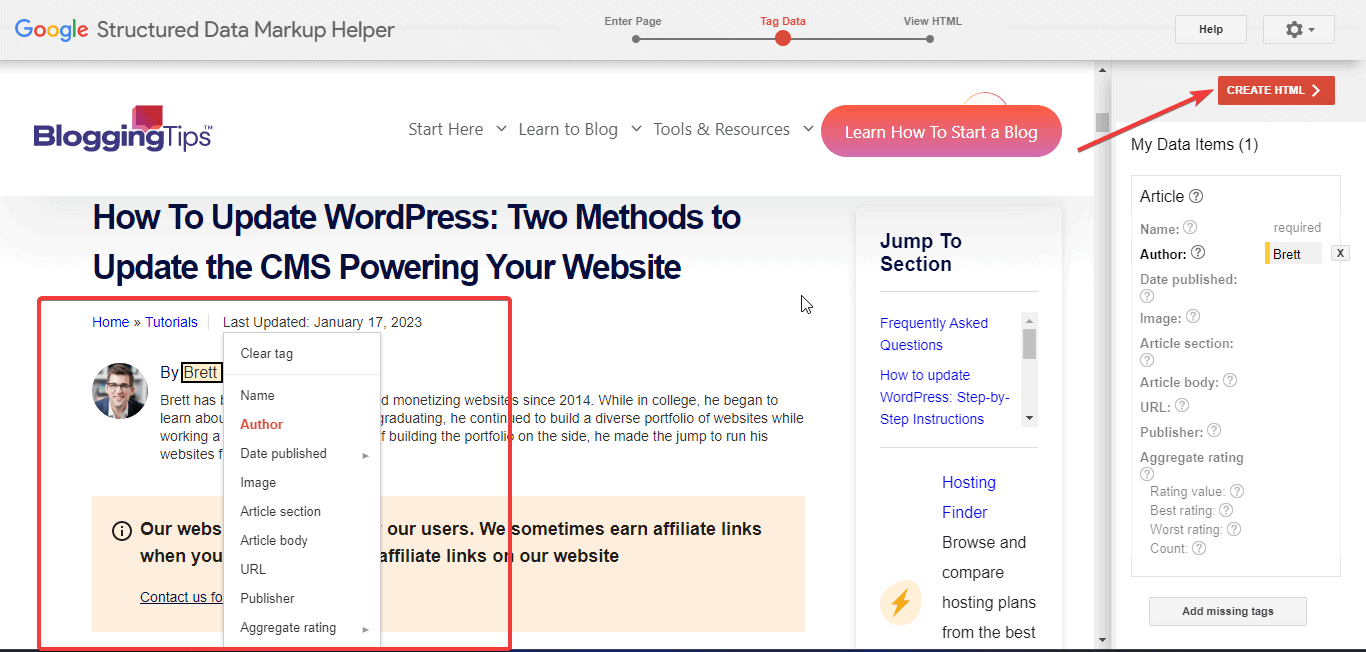
Google will create your schema markup for you, and you can insert it by following the steps below. We’ll continue with the Article’s structured data above for this example.
Step #2: Enable Custom Field in WordPress
To add the code above to any post or page on WordPress, you need to enable a custom field.
Here’s how.
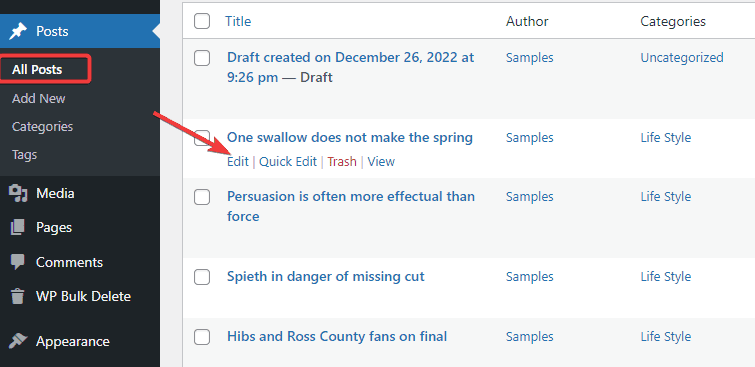
Log in to your WordPress admin dashboard. Then, on the left panel, go to Posts and All Posts.
Once the posts page opens, locate the post where you want to add the markup and click Edit under it.
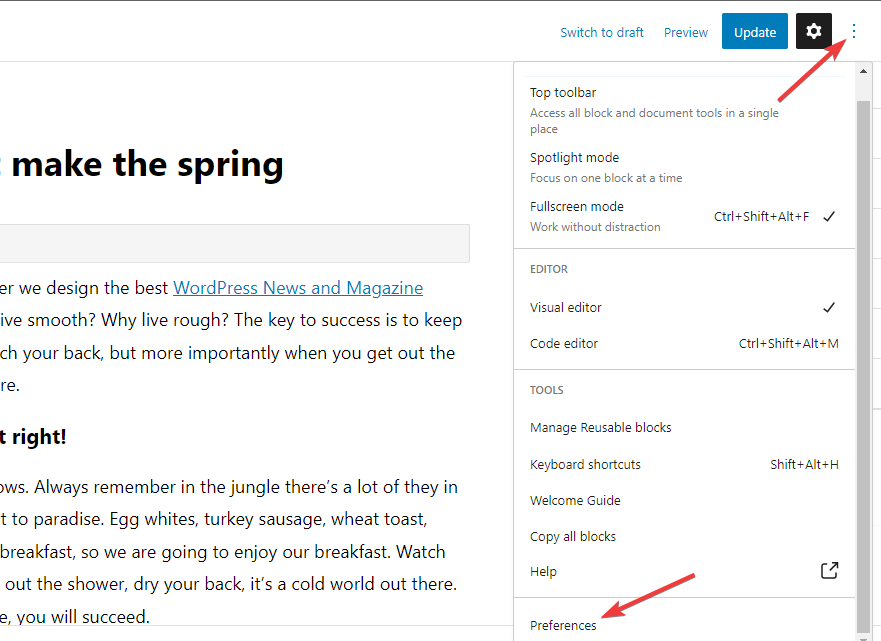
Your post will open in the block editor opens.
Click the three-dot icon at the top right corner. On the resulting menu, scroll to the bottom and select Preference.
A new window will pop up. Switch to the Panel tab and toggle on the radio button next to the Custom fields.
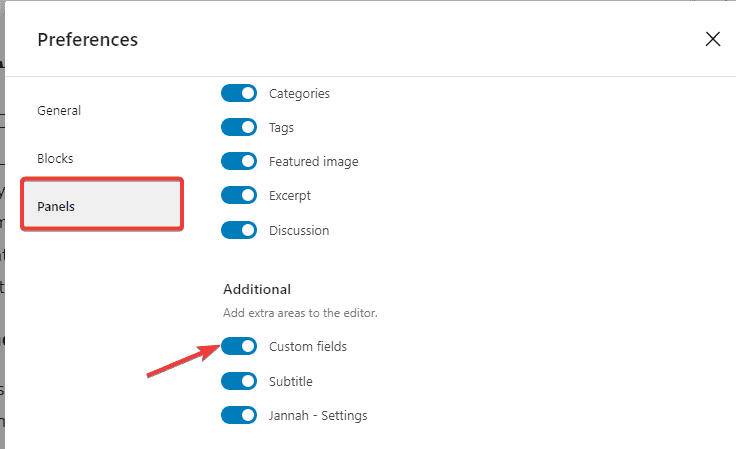
And that’s it. You’ve enabled custom fields.
Now, if you go back to the post editor page, you should see the custom field section at the bottom. The next step is to add your schema markup code.
Step #3: Insert Schema Code to Post
You’ll see Add New Custom Field in the custom field section you’ve just enabled.
Click the Enter New button under it.
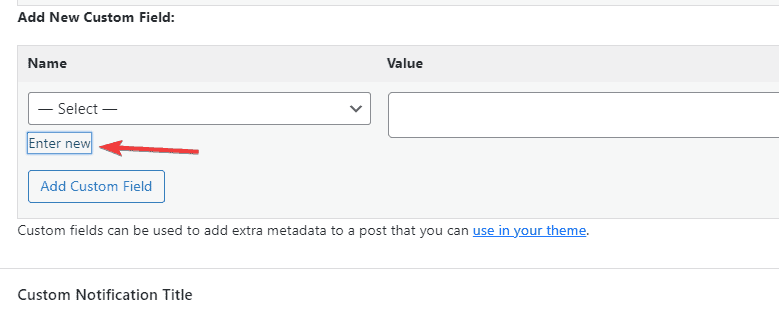
In the Name field, enter your schema markup name. You can use any name.
We’ll use Article Markup since we want to add the markup to a blog post.
Next, paste the code snippets above in the Value field above, then click the Add Custom Field button.
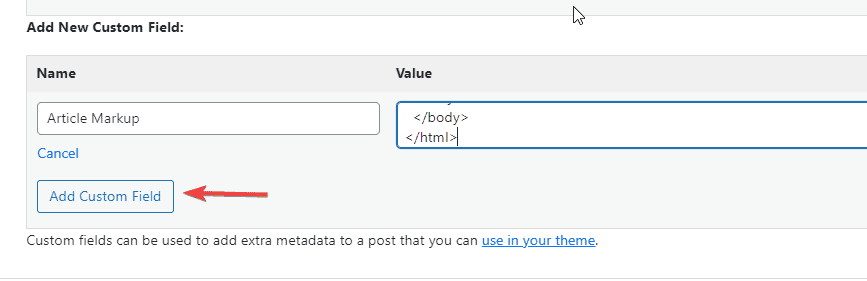
Once done, go to the top of the page and click the Update button to save your settings.
And that’s all. You’ve successfully inserted the schema markup code for the article.
But there’s one last step to complete the process.
Step #4: Update Theme Header File
To ensure that your schema markup code is loaded alongside your post metadata, you need to add the code below to your theme header file.
<?php

$schemamarkup = get_post_meta(get_the_ID(), ‘schemamarkup’, true);

if(!empty($schemamarkup)) {

  echo $schemamarkup;

}


?>
On your admin dashboard, go to Appearance and select the Theme File Editor from the options.
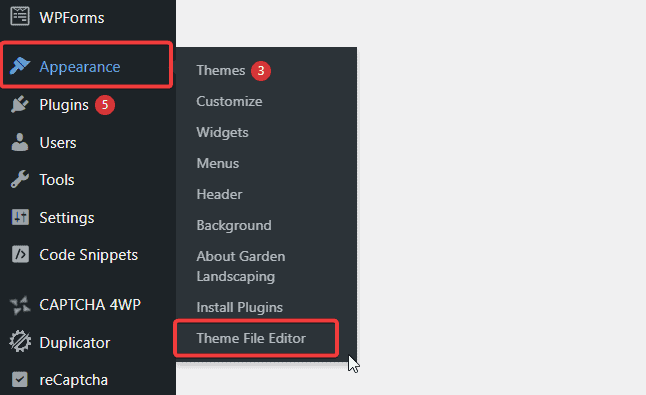
On the next screen, go to Theme Files on the right.
Locate Theme Header (or header.php) under it and click to open.
Now paste the code right before the closing head </head> tag, as in the screenshot below.
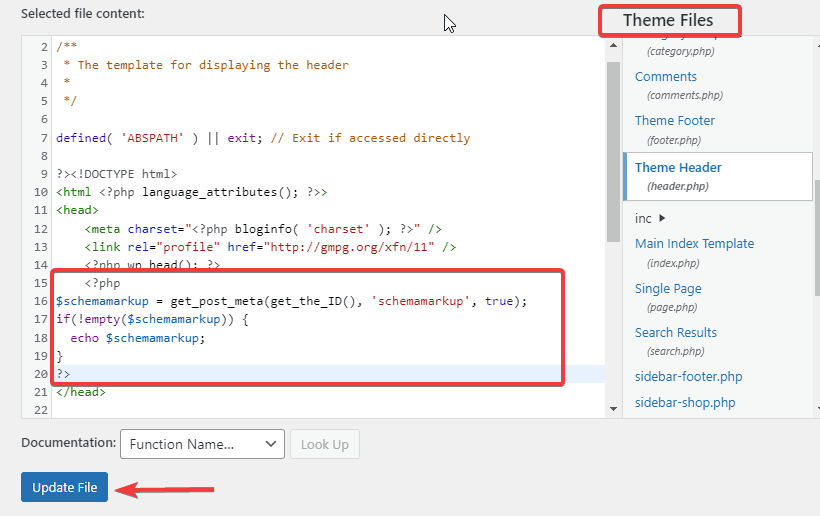
Once done, click the Update File button to save the changes.
And that’s it. You’ve completed adding schema markup to WordPress without a plugin.
To test if your schema markup is working well, you can use Google’s Structured Data Testing Tool.
You can use the method above to add any type of structured data to your site.
But there’s a better and easier way, using a plugin. So we look at that next.
Method #2: Adding WordPress Shema Markup with a Plugin
There are several WordPress plugins to help you add schema to WordPress.
Some allow you to perform basic schema, such as adding markup to a blog post, while others offer advanced and site-wide markup functionality.
RankMath, AISEO (All in One SEO for WordPress), and Yoast SEO are great SEO plugins with full Markup functionality.
This tutorial will show you how to add schema markup to WordPress using the Rank Math SEO plugin step by step.
Using Rank Math for WordPress Schema Markup Step by Step
- Step #1: Install and Set up the RankMath SEO Plugin
- Step #2: Activate Schema Module from Settings
- Step #3: Set up Default Schema Type for WordPress
- Step #4: Adding Schema to Posts and Pages in WordPress
Step #1: Install and Set up the RankMath SEO Plugin
The first step here is to install and activate the RankMath SEO plugin. If you need help, check out how to install WordPress plugins here.
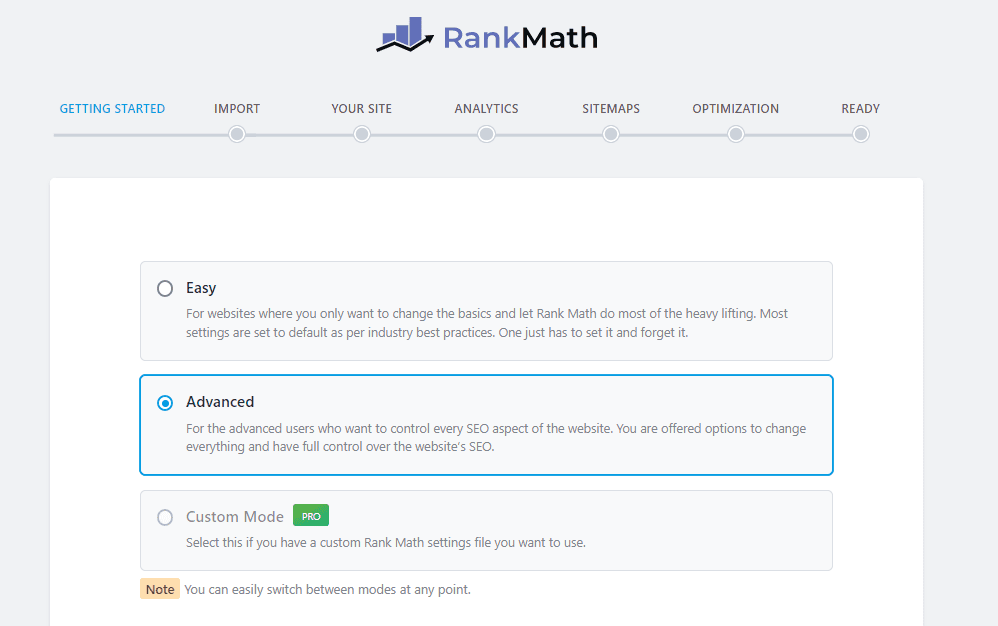
Once you activate the plugin, you’ll be prompted with the setup guide.
Follow the on-screen instructions to complete the setup.
Here’s how the setup wizard looks.
Step #2: Activate Schema Module from Settings
After that, you need to activate Schema markup from global options to enable schema throughout your website.
So go to your admin dashboard, click on RankMath, and select Dashboard from its options.
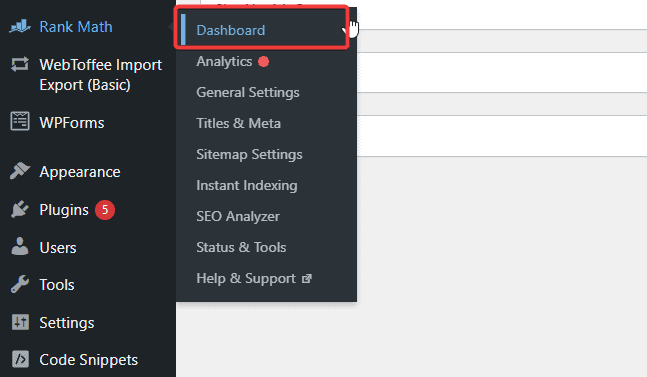
On the next screen, locate Schema (Structured Data) from the list of available modules and toggle on the radio button under it.
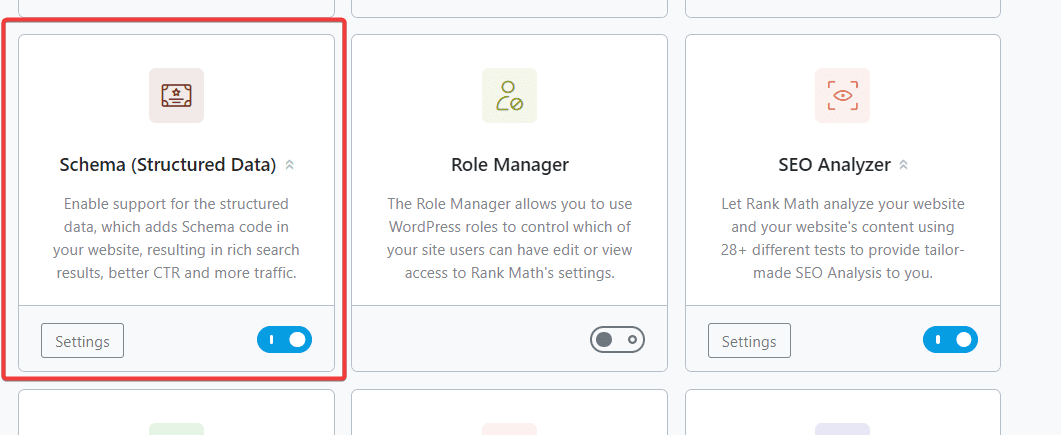
With that, you’ve enabled WordPress schema markup. What’s next is to configure the default global schema type.
Step #3: Set up Default Schema Type for WordPress
Now that you’ve enabled schema throughout your site, it’s time to select a default schema type that will appear on all posts and pages.
Here’s how.
Go back to RankMath on your admin dashboard and click on Title & Meta from the resulting menu.
The Global Meta page will open.
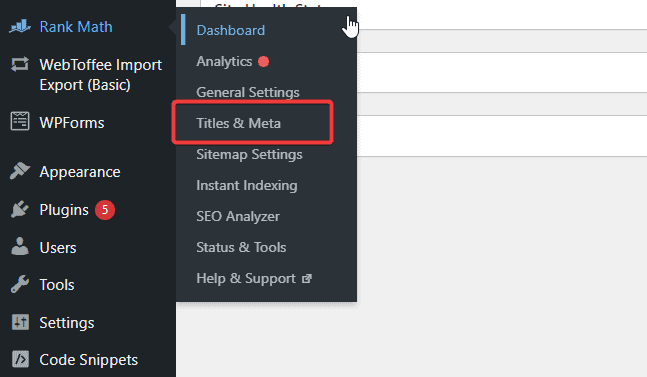
Next, click on Posts from the list of options on the left tab.
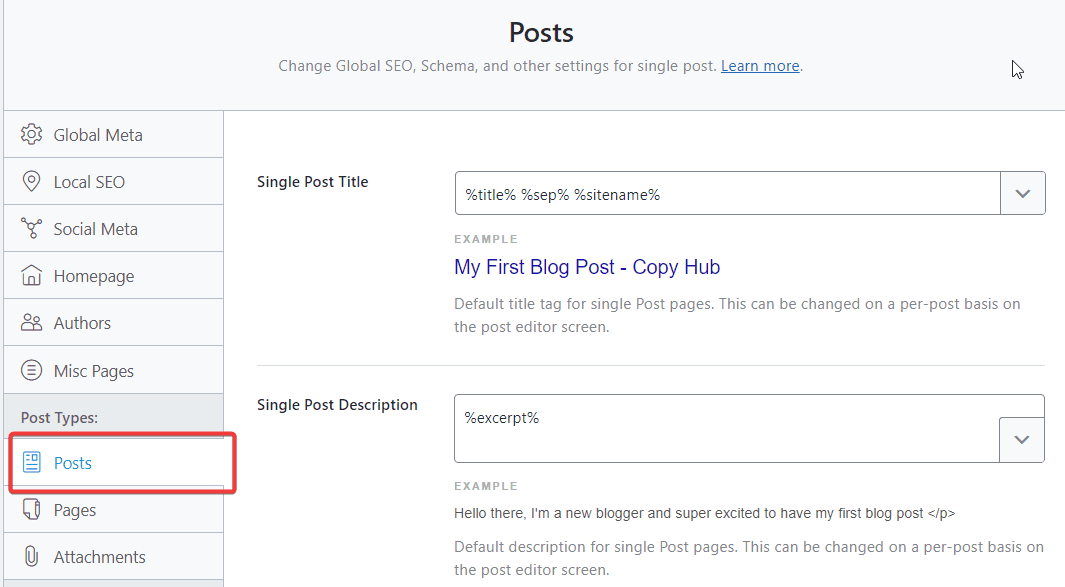
Here, you can set the default schema type for all posts across your entire WordPress site.
You also have the opportunity to customize Headlines and Descriptions for search engines.
Next, click on the Schema Type dropdown to see the list of all schema supported by RankMath.
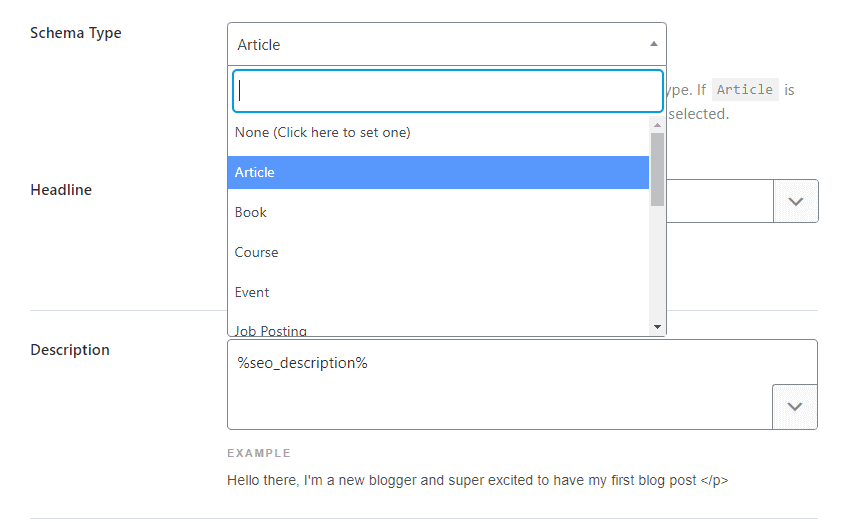
Select your most used schema type.
For instance, if you are a blogger, the right schema type for you will be Article.
E-commerce stores, on the other hand, can choose Product. We’ll choose Article to proceed.
Click the Save Changes button after selecting your option. You can follow the same process for your WordPress pages as well.
Up to this point, we’ve enabled global schema and specified the default schema type for all posts and pages on your site. However, we are yet to add schema to any particular WordPress post.
So that’s what we will show you next.
Step #4: Adding Schema to Posts and Pages in WordPress
After setting the default schema type for your posts and pages, it’s time to customize the schema for individual posts and pages.
Follow these steps to do it.
On your admin dashboard, go to Post on the left panel and select All Posts from its menu.
You can add schema to an existing post or create a new post by clicking the Add New button at the top. We’ll use one of our existing posts here.
Locate the post where you want to add markup and click the Edit link underneath. The post will open in the WordPress block editor.
At the top right corner of the block editor, click the RankMath button, which shows the post’s SEO grade.
A new menu will appear. Switch to the Schema tab. You’ll see the default schema type you selected above in the Shema in Use section.
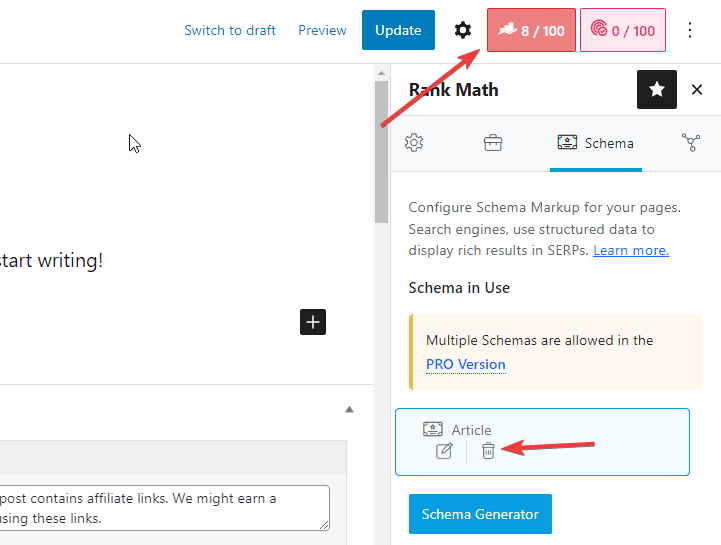
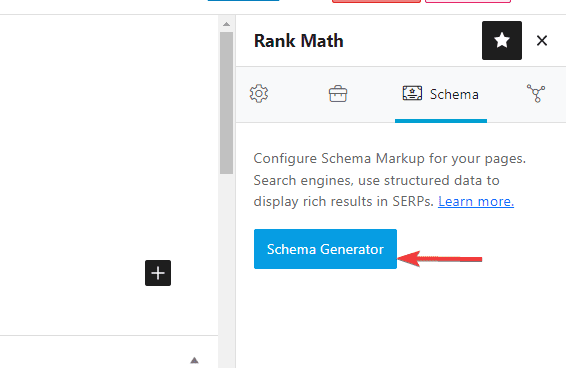
Since we want to add a custom schema to this post, click the Delete button next to the current (global) schema.
A dialogue will appear. Click Yes to continue.
You can create a brand new schema for this post by clicking the Schema Generator button.
The screen you will see should look like the one below with the list of all schema types available in RankMath, such as Articles, recipes, products, Job Listings, Books, etc.
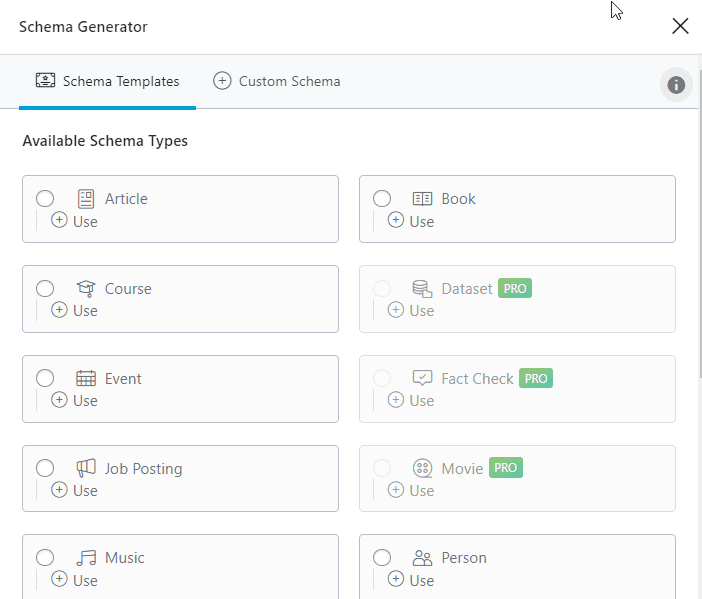
Pick anyone, and the Schema Builder window will pop up with the specific elements that are unique to that schema.
For instance, if you choose the Recipe schema, you’ll see fields for features like Cooking time, Cuisine, Preparation time, calories, Type, and more.
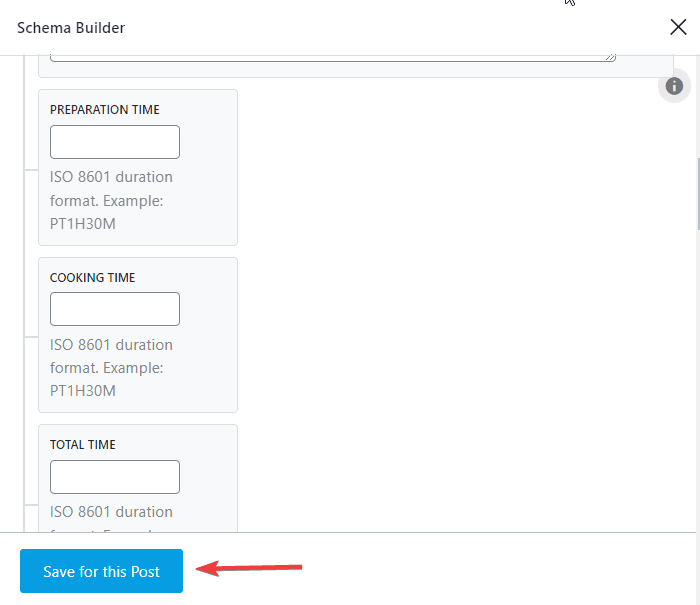
Fill out all the information you want search engines to know about this post.
Note that some fields, such as preparation and cooking, require a system-specified time format.
The ISO 8601 format looks like PTxHyM, where x stands for hours and y stands for minutes.
So, for example, if the preparation time for your recipe is 1 hour 30 minutes, the correct format to fill the field will be PT1H30M.
Once you complete the necessary information, click the Save for the Post button.
Lastly, you need to click the Update button (for an existing post) or Publish button (for a new post) to save the changes and prompt Google to index your post.
Congratulations. You’ve successfully added schema markup to WordPress using a plugin.
It usually takes up to 1-3 days for Google to crawl your edited post and identify new metadata.
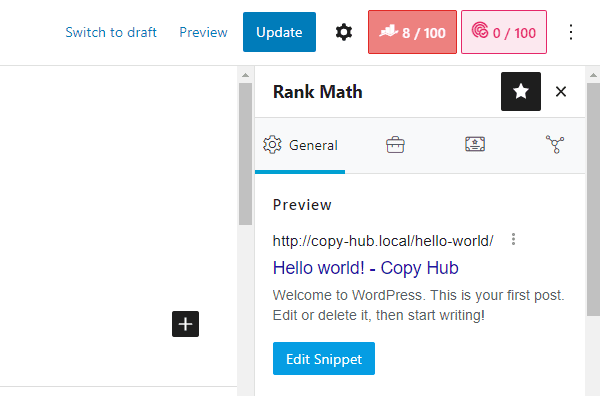
To be sure your schema mark is configured correctly, you can preview it. There are two ways to do this.
First, you can switch to the General tab in the RankMath menu inside the Block editor.
Then, you should see your post preview in a rich snippet form, as in this image.
Secondly, you can paste the URL of the post into Google’s Rich Results Test page. You will see the rich result and get a notification if anything is wrong with your schema.

More Helpful WordPress Tutorials:
- How To Create Rich Snippets in WordPress: Stop scratching your head on how to create rich snippets in WordPress. This guide simplifies the process of creating rich snippets. Check it out to give your website comprehensive visibility and a high rank in SERPs.
- How to Optimize for Google Discover: Do you want your site to appear in search results as often as possible? Optimizing your website and content for Google Discover is a secret SEO tactic used by only a handful of websites. Learn about Google Discover optimization here.
- How To Use Yoast SEO: If you’ve been looking for a tool to do the SEO heavy-liftings, a few SEO plugins are as effective as Yoast SEO. Learn how to use it by following this detailed guide.
Wrapping up
Done right, WordPress schema markup can be a huge source of organic traffic for your site.
You get more eyeballs on your content and brand name as Google ranks your posts or pages for rich snippets and results.
Today, only a handful of WordPress websites are already using schema markup.
Taking your time to set this up can be a great way to take away significant traffic from your competitors and edge them in sales and reputation.
We’ve shown you how to add schema markup manually without a plugin and how to use a dedicated SEO plugin for schema markup on your WordPress website.
Over to you now.
Are you ready to add schema to your WordPress site? What method do you prefer? Share your thoughts in the comments below.


