
The WordPress .htaccess file is an important file for all WordPress website owners to understand.
Located at the root of your WordPress website, you can use it to control how your website functions.
In this article, we will discuss what WordPress .htaccess is, how to find it and edit it, and the different things you can do with it.
Introduction to WordPress .htaccess File
The WordPress htaccess file controls access to your WordPress website and its content.
If you’ve ever seen a “404 Not Found” error, it’s because the server couldn’t adequately find or read the .htaccess file.
What Is the WordPress .htaccess File?
You’ll find the WordPress .htaccess server configuration file located in the root directory of your WordPress website.
The default WordPress setup process will automatically generate the .htaccess file.
The Name .htaccess Is Derived From Which Words?
The term .htaccess comes from the words “hypertext access.”
Hypertext access is the ability to access content on the internet.
The WordPress .htaccess file controls hypertext access to your website.
With it, you can control things like who has access to your website and how to display content on your website.
Locating .htaccess File on WordPress
Since it’s a hidden file, it’s sometimes difficult to locate the .htaccess file.
That’s why the name begins with a period.
How Do You Locate the .htaccess File?
To locate the .htaccess file on your WordPress website, you can use the “File Manager” in cPanel.
1. Log into cPanel.
2. Click on the “File Manager” icon.
3. In the file editor window, navigate to the root folder of your WordPress website.
4. The .htaccess file should be in the root directory.
If you don’t see it, click on the “Settings” button at the top of the window and enable the “Show Hidden Files (dotfiles)” option.
If you’re using FTP to connect to your WordPress website, you can also find the .htaccess file in the root directory.
On a Windows computer, you can view hidden files by opening File Explorer and going to View > Options > Change folder and search options.
Then, select the View tab and check the box next to Show hidden files, folders, and drives.
You can view hidden files on a Mac by opening Terminal and typing in “defaults write com.apple.Finder AppleShowAllFiles TRUE”.
What Are the Reasons You Can’t Find the .htaccess File?
If you can’t find the .htaccess file, it’s likely because your website hasn’t generated one yet.
Other reasons you can’t find the .htaccess file include the following.
- It remains hidden based on your computer’s file system
- Your WordPress website is in a subdirectory and not the root directory
- Your WordPress theme doesn’t use a .htaccess file
How To Create a .htaccess File if It Doesn’t Exist Already
There are two main ways to create your website’s .htaccess file.
How Do You Create .htaccess by Setting Permalinks?
One way to create the .htaccess file is by setting your WordPress permalinks.
To set your WordPress permalinks, follow these steps.
- Log into your WordPress website.
- Click on “Settings” and then “Permalinks.”
- Select the permalink structure you want to use and then click on the “Save
How Do You Create .htaccess by Generating .htaccess Manually?
Another way to create the WordPress htaccess file is by generating it manually.
To generate the .htaccess file, you need to connect to your website using an FTP client.
Once you’re connected, go to the root directory of your WordPress website.
In the root directory, create a new file and use “.htaccess” when naming it.
Don’t forget to include the period at the beginning of the file name.
Once you’ve created the file, add the following code to it:
RewriteEngine On
RewriteBase /
RewriteRule ^index.php$ – [L]
RewriteCond %{REQUEST_FILENAME} !-f
RewriteCond %{REQUEST_FILENAME} !-d
RewriteRule . /index.php [L]
Save the file and upload it to the root directory of your WordPress website.
That’s it!
You’ve successfully generated a WordPress .htaccess file.
How To Edit Your WordPress .htaccess File
Now that you know how to locate and generate your WordPress .htaccess file let’s take a look at how you can edit it.
What Are the Precautionary Measures You Need To Take Before Editing the .htaccess File?
It’s important to note that you should never edit your WordPress .htaccess file without backing up the original file first.
One small mistake during the editing process can cause significant problems on your website.
To back up your .htaccess file, you can either download it to your computer or create a copy of it on your server.
Once you’ve backed up the original file, you can proceed with editing the WordPress .htaccess file.
How Do You Edit .htaccess Using Plugin?
One of the easiest ways to edit your WordPress .htaccess file is using a plugin.
We recommend using the WordPress .htaccess editor plugin.
To use this plugin, follow these steps.
Install and activate the WP .htaccess editor plugin.
After activating the plugin, go to Settings » Permalinks and click on the “Edit” button next to the .htaccess file.
Make the changes you want, and then click on the “Save Changes” button.
You can also try these WordPress plugins.
- Htaccess File Editor
- Htaccess by BestWebSoft
- Htaccess Password Protect (Mainly a password protection option)
How Do You Edit .htaccess Using cPanel?
Another way to edit your WordPress .htaccess file is by using cPanel.
To edit your .htaccess file using cPanel, follow these steps.
Log into your cPanel account and go to the Files section.
In the Files section, click on the “File Manager” icon.
A popup will appear asking you which directory you want to open.
Select the “Web Root (public_html/)” option and then click on the “Go” button.
On the next page, select the “Settings” option from the top menu.
In the Settings popup, select the “Show Hidden Files (dotfiles)” option and then click on the “Save Changes” button.
Now that you can see all the files on your web server, locate the .htaccess file and click on it to edit it.
Make the changes you want, and then click on the “Save Changes” button.
What Can You Do With the .htaccess File in WordPress?
The WordPress .htaccess file is one of the most powerful files on your server.
You can use it to improve the performance of your website, secure it from hackers, and even redirect visitors to a different page.
WordPress .htaccess Redirects
One of the most common uses for the WordPress .htaccess file is redirecting visitors to a different page.
Meaning and Types of Redirects
A redirect is a way to send visitors from one URL to another.
There are two types of redirects: 301 (Permanent) and 302 (Temporary).
What Are Redirects?
You can use redirects for a variety of reasons.
The most common use is to redirect visitors from an old URL to a new one.
For example, if you change the permalink structure of your WordPress site, you will need to redirect visitors from the old URLs to the new ones.
Or, you may want to send visitors from a non-secure (non-HTTPS) page to a secure (HTTPS) page.
What Is 301 (Permanent) Redirect and What Is It Used For?
A 301 redirect is a permanent redirect.
It will permanently send visitors from the old URL to the new URL.
What Is 302 (Temporary) Redirect and What Is It Used For?
A 302 redirect is a temporary redirect.
It will send visitors from the old URL to the new URL for a short period.
After that, it will send them back to the old URL.
How Is Redirecting a Single Post or Page Done?
To redirect a single post or page, you will need to edit the .htaccess file on your server.
To accomplish this task, you will need to add a line of code to the .htaccess file.
How Is Redirecting Your Entire Site Done?
To redirect your entire site, you can use a WordPress plugin like WordPress SEO by Yoast.
The plugin will allow you to add a redirect from the old domain to the new one.
Or, you can edit the .htaccess file on your server.
To do this, you will need to add a line of code to the .htaccess file.
The code will look something like the following.
Redirect 301 / old-URL/ new-URL/Replace “old-URL” with the URL of the page you want to redirect, and replace “new-URL” with the URL of the page you want to redirect to.
Save the changes and upload the .htaccess file to your server.
Force HTTPS .htaccess WordPress
Sometimes, you will want to force visitors to use the secure (HTTPS) version of your website.
How Do You Force HTTPS on Your WordPress Site?
You can use a plugin or code to make your website only HTTPS.
Which Codes Can You Add to Your .htaccess File To Force HTTPS?
To force visitors to use your website’s secure (HTTPS) version, you will need to add code to your .htaccess file.
The first code you can add to your .htaccess file to force WordPress to use SSL is the following.
RewriteEngine On
RewriteCond %{HTTPS} off
RewriteRule ^(.*)$ https://%{HTTP_HOST}%{REQUEST_URI} [L,R=301]
The code will redirect all traffic from your WordPress site to the secure (HTTPS) version of the site.
You can use the following code to redirect traffic to HTTPS on a specific folder(s).
RewriteEngine On
RewriteCond %{HTTPS} off
RewriteRule ^(folder1|folder2|folder3) https://%{HTTP_HOST}%{REQUEST_URI} [R=301,L]
Custom Error Page
If you want to customize the error page that visitors see when they try to access a page that doesn’t exist, you can do so by editing the .htaccess file on your server.
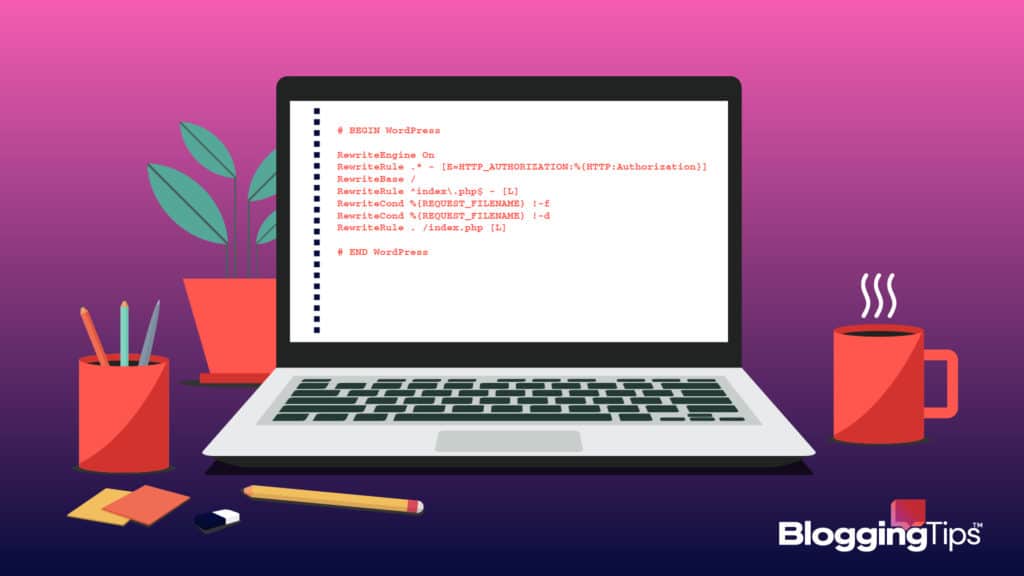
How Does Default .htaccess Look Like?
The basic WordPress default htaccess file looks like this for most websites.
# BEGIN WordPress
RewriteEngine On
RewriteRule .* – [E=HTTP_AUTHORIZATION:%{HTTP:Authorization}]
RewriteBase /
RewriteRule ^index.php$ – [L]
RewriteCond %{REQUEST_FILENAME} !-f
RewriteCond %{REQUEST_FILENAME} !-d
RewriteRule . /index.php [L]
# END WordPress
How Do You Modify the .htaccess for the WordPress Site in the Subdirectory To Fix the 404 Page Not Found Error?
To fix the “404 page not found” error, you will need to add a line of code to the .htaccess file in the subdirectory.
The code will look something like this.
ErrorDocument 404 /subdirectory/404.php
Replace “subdirectory” with the name of the subdirectory that you want to use for your custom error page.
Save the changes and upload the .htaccess file to your server.
Browser Caching
Browser caching helps your website to load faster for repeat visitors.
What Is Browser Caching?
Browser caching occurs when a browser stores files on the user’s computer.
When a visitor comes to your website, their browser will download a copy of the files and save them on their computer.
The next time they visit your site, their browser will use the cached version of the files.
The process helps your site’s pages load faster than forcing the user’s browser to download them again.
How Does .htaccess File Help in Browser Caching?
The .htaccess file can help in browser caching by adding code that will tell the browser how long to cache the files.
The code will look something like this.
ExpiresActive On
ExpiresByType image/gif “access plus 30 days”
ExpiresByType image/png “access plus 30 days”
ExpiresByType image/jpg “access plus 30 days”
The code will tell the browser to cache the files for 30 days.
File Caching
Sometimes, you need to use .htaccess to fix file caching issues.
What Is File Caching?
File caching is when a browser stores a copy of a file on the hard drive.
The next time the user goes to that website, their browser will load the cached version of the file instead of fetching it from the server again.
The process can speed up page loading times.
How Does .htaccess File Help in File Caching?
The .htaccess file can help in file caching by adding code that will tell the server how long to cache the files.
For example, you can add the following code to your .htaccess file:
# BEGIN Cache-Control Headers
<IfModule mod_expires.c>
ExpiresActive On
ExpiresByType image/jpg “access plus 30 days”
ExpiresByType image/jpeg “access plus 30 days”
ExpiresByType image/gif “access plus 30 days”
# END Cache-Control Headers
You can also use the .htaccess file to prevent the caching of files.
The code will look something like this.
Header set Cache-Control “no-cache, no-store, must-revalidate”
Header set Pragma “no-cache”
Header set Expires
Gzip Compression on Apache
Enabling gzip compression on your Apache web server will make your website faster for visitors using a slow internet connection.
What Is Gzip Compression on Apache?
Gzip compression is a process of compressing files so that they take up less space on a server.
It is helpful for reducing the size of HTML, CSS, and JavaScript files.
When a browser requests a file from a server, the server can compress the file before sending it.
The browser will then decompress the file to display it correctly.
How Does .htaccess File Help in Gzip Compression on Apache?
The .htaccess file contains instructions that prompt how the server behaves in certain situations.
One of the directives in the .htaccess file is the mod_gzip directive.
This directive tells the server to compress files before sending them to the browser.
To enable gzip compression, you need to add the following lines to your .htaccess file.
mod_gzip_on Yes
mod_gzip_dechunk Yes
mod_gzip_item_include file .(html?|txt|css|js|php)$
mod_gzip_item_include handler ^cgi-script$
mod_gzip_item_exclude mime ^image/.*- The first two lines enable mod_gzip and tell it to decompress files that have mod_gzip already compressed.
- The third line tells mod_gzip to compress HTML, CSS, JavaScript, and PHP files.
- The fourth line tells mod_gzip not to compress CGI scripts.
- The fifth line tells mod_gzip not to compress images.
Disable Image Hotlinking
Sometimes, other website owners use image hotlinking to use your website’s images.
What Is Image Hotlinking?
Image hotlinking is when another website owner links to one of your images directly.
The process negatively impacts your website because it uses your server’s bandwidth.
How Does .htaccess File Help in Disabling Image Hotlinking?
The WordPress .htaccess file can help you disable image hotlinking on your website.
By doing this, other website owners will not be able to use your images directly.
To disable image hotlinking, you need to add the following code to your .htaccess file.
RewriteEngine on
RewriteCond %{REQUEST_METHOD} !^(HEAD|GET)$ [NC]
RewriteRule .* – [F,L]
If you want to allow specific websites to hotlink your images, you can add the following code.
RewriteEngine on
RewriteCond %{REQUEST_METHOD} !^(HEAD|GET)$ [NC]
RewriteCond %{SERVER_NAME} =example.com [NC,OR]
RewriteCond %{SERVER_NAME} =example.net [NC,OR]
RewriteRule .* – [F,L]
Replace example.com and example.net with the websites that you want to allow to hotlink your images.
Disable Directory Browsing
If you’re concerned about hackers affecting your website, use the following method to fix the problem.
What Is Directory Browsing?
Directory Browsing is a WordPress security risk that allows hackers to find out what files and folders are on your website.
With directory browsing enabled, a hacker can easily see all the files on your website.
Seeing this information makes it easier for them to find vulnerabilities.
How Does .htaccess Help in Disabling Directory Browsing?
The .htaccess file can help disable directory browsing in two ways.
The first way is to add a rule that will prevent access to the .htaccess file.
Doing this will prevent a hacker from even seeing what is in a WordPress file.
The second way is to add a rule that will block all access to any folder that does not have an index file.
Using this option will make it so that a hacker can only see the files that you want them to see.
To disable directory browsing, you will need to add the following code to your .htaccess file.
Options -Indexes
FollowSymLinks
IndexIgnore *
Frequently Asked Questions
Although we’ve meticulously revealed how to use your WordPress .htaccess file for various use cases, you may still have questions.
Here are the answers to three commonly asked questions about the .htaccess file.
Does WordPress create a .htaccess file?
Yes, WordPress does automatically generate a .htaccess file.
You can find the file in the root directory of your WordPress dashboard.
If you can’t see it, make sure to set your FTP client to show hidden files.
Every time you change your permalink structure, WordPress updates your .htaccess file to reflect those changes.
For several reasons, WordPress sometimes can’t obtain the correct permissions to create the .htaccess file automatically.
For example, server obstructions might cause the problem.
In this case, you’ll need to create the file and upload it yourself.
Where is .htaccess Apache2?
The answer to this question depends on your server type.
If you’re using an Apache server, you can find the .htaccess file in the root directory of your WordPress installation.
However, if you’re using a different type of server, consult your web host’s documentation.
How do I enable .htaccess in WordPress?
The .htaccess file should enable itself by default.
In other words, you shouldn’t have to do anything to enable it.
However, if, for some reason, your .htaccess file isn’t working, there are a few steps you can take.
First, check to see if the file exists in the root directory of your WordPress installation.
If it doesn’t, try regenerating it by changing your permalink structure and saving the changes.
If that still doesn’t work, you might need to edit the file manually.
Wrapping Up
The .htaccess file is an important part of creating your WordPress blog.
It helps to secure your website, disable directory browsing, and change the permalink structure.
In this article, we’ve shown you how to use the .htaccess file for a variety of purposes.
As a next step, identify which challenge you need to overcome by learning how to navigate the .htaccess file.
Back up your website’s files and begin the editing process.
If you run into any trouble, reach out to your WordPress hosting company for help.