
Is your website making everyone go nuts with error 520 again and again?
If yes, then we can feel you. It’s easy to get frustrated with this error because it takes forever to disappear and it also doesn’t tell what precisely is wrong with your site.
We too encountered it on our site some time ago and lost a decent amount of money because of that.
However, you don’t need to face the same fate as ours. Because we’re here to share with you our experience of dealing with it and how we finally fixed it. Let’s find out!
What is Cloudflare 520 Error?
The Cloudflare 520 error is a generic error message that’s shown when Cloudflare can’t work fine due to a number of reasons. It’s a Cloudflare-specific server-side error so it’s shown only on websites that have the Cloudflare CDN enabled on their server.
What Causes Cloudflare 520 Errors?
There are many different reasons that can trigger a Cloudflare 520 error message. Your web server might have crashed, your firewall may be blocking Cloudflare IP addresses, there may be an issue with your header size or your server may be sending an empty response to Cloudflare.
What You’ll Need to Fix Error 520?
You’ll need the following things in order to fix error 520 on your site:
- Error logs: Access to the error logs of your server;
- HAR File: The HTTP Archive file that contains a record of all the requests that went to the origin server.
The steps to obtain both these things are also explained in the procedure outlined below.
How to Fix Error 520: Step-by-Step Instructions
Server-side issues are generally more technical and complex to fix than client-side issues, so this guide is going to be a bit long.
Please have patience, and try to stick with it till the end until you’ve identified the cause of the error and fixed it. Let’s start!
Before You Start: Preparations
Fixing error 520 requires some preparations to be done before we can start identifying the cause behind it and try to fix it. Therefore, let’s get started with those preparations first!
Step #1: Pause Cloudflare
Before you can do anything you need to pause Cloudflare so it doesn’t interfere with the steps you’re going to take. Here’s how it can be done:
Log in to your Cloudflare dashboard;
Click on the connected site that’s giving the error;
Scroll down to the ‘Advanced Actions’ section and click the “Pause Cloudflare on Site” link;
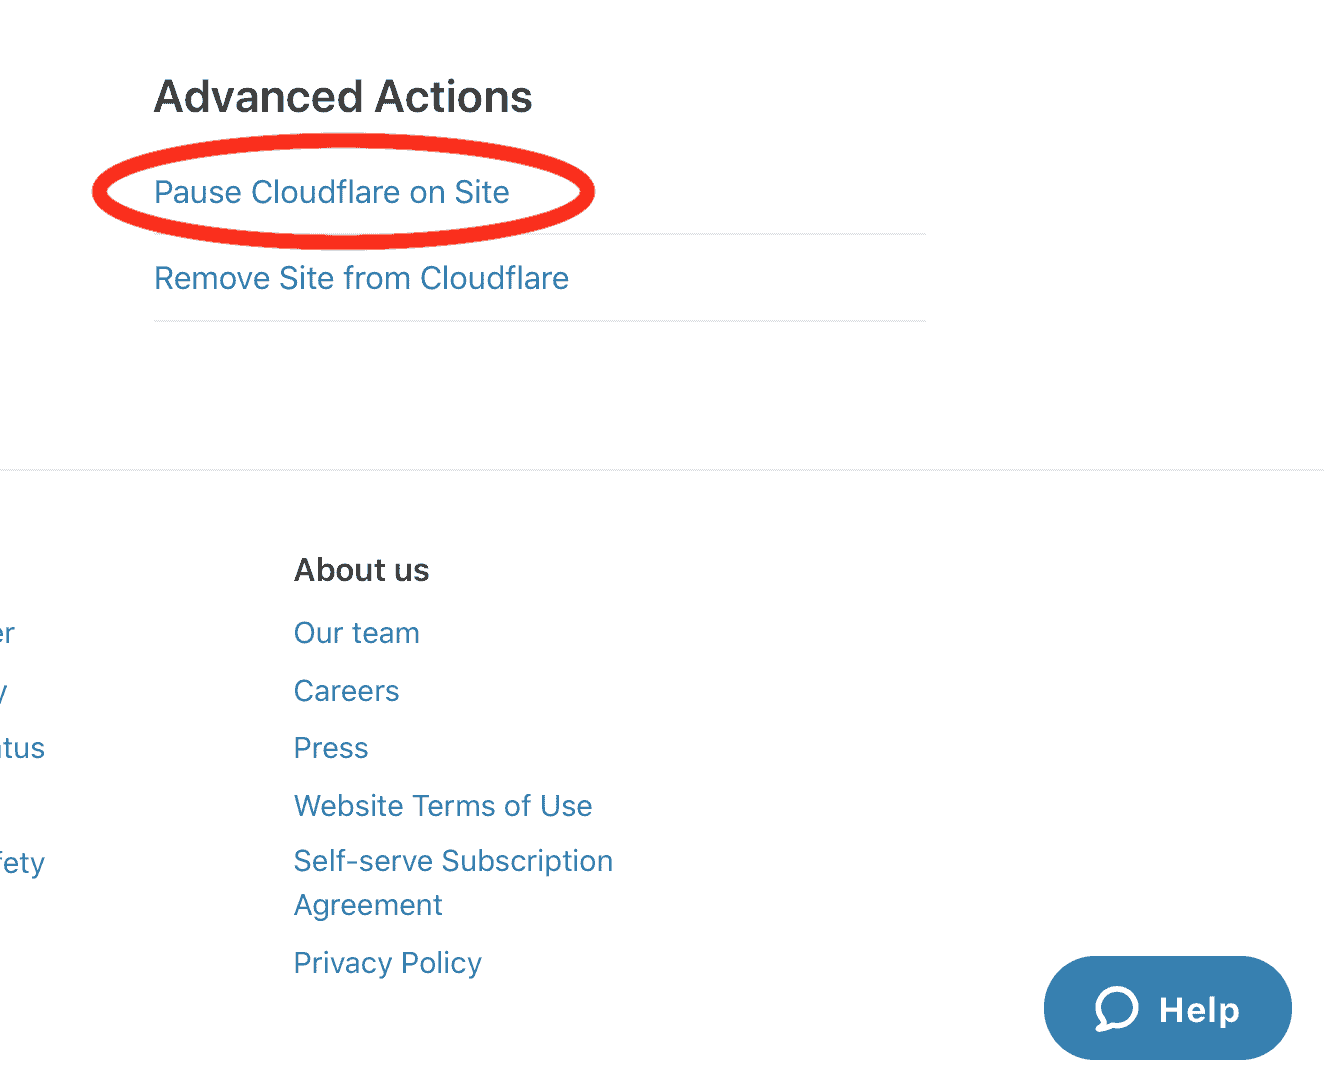
Image source: Cloudflare
A pop-up will appear now, asking you to confirm whether you really want to pause Cloudflare or not. Click the “Confirm” button to confirm it.
That’s it. Cloudflare is now paused and you can move ahead with the next steps.
Step #2: Check Your Error Logs
The exact steps to access the error logs of your server will vary depending on your web host. Here we’ll explain the process of how to find them on a cPanel server because that’s what powers the hosting for the majority of shared hosting providers.
Here’s how to access your error logs through cPanel:
- Log in to cPanel of your hosting server and navigate to the Metrics section;
- Now click on “Errors”.
- The error logs of your server should be opened before you now. Up to 300 errors are shown in this log, in reverse order (i.e. the latest error comes first).
You have to look into the error log now to figure out the actual error and file that triggered the 520 error from Cloudflare. The error messages in a log look like this:
[Thu Feb 11 17:00:30 2023] [cgid:error] [client 110.11.56.4] File Not Found [/home/public_html/home.php]The format of these log entries consists of the following elements:
- Date and time: First of all there’s the date and time of the error;
- LogLevel directive: After the date and time there’s a LogLevel directive that tells the security-level urgency of the error. These directives may be any of the following:
- ‘Emerg’ for an emergency error
- ‘Alert’ for an error that seeks urgent action, but is not as serious as an emergency error
- ‘Crit’ for critical conditions
- ‘Error’ for general errors that are not a security or stability concern for your server
- ‘Warn’ for a warning message that requires your attention but isn’t any serious concern for the server or website
- ‘Notice’ for situations when your server and website are performing fine, but there are details about them that should be checked by you
- ‘Info’ for general information
- ‘Debug’ for situations when you’ve enabled debugging on the server and there’s detail in the error messages to help you with debugging.
- Client IP address: The IP address of the client request that caused the error;
- Error message: Description of the error that occurred;
- File name: Path of the file or resource that triggered the error.
Now you can download the error log to your computer, or if the download option is not there then you can copy its content. These logs will come in handy later when we are diagnosing the issue. For now, move on to the next step.
Step #3: Send a cURL command
cURL commands are generally used to send HTTP or HTTPS requests to a server through SSH for performing a certain action, but they can also be used for fixing HTTP errors. Here’s the command that you can execute over SSH to request an HTTP response header from your server:
curl -vso /dev/null --user-agent "Mozilla 5.0" -H "Host: your-website.com" http://123.45.6.789/wp-login.phpDo not forget to replace your-website.com with your domain name and the IP address with your server’s IP address before executing the command.
If your request was successful, you’ll receive a response header ending like this:
HTTP/1.1 200 OK

< Content-Type: text/html

< Date: Day, DD, Month Year Hour:Minute:Second Timezone

{ [12345 bytes data]
On the other hand, if a 520 error interrupted the request again, then the header will be ending with an error message like this:
Empty reply from serverNow, while this doesn’t fix the error, it at least tells you what’s wrong with your server that’s causing the error 520.
Depending on the error message that you receive, you can skip straight to the relevant step below in this tutorial that explains how to fix that particular issue (i.e. step #9.2 for the “empty reply” message shown in the example above).
Step #4: Create A HAR File
An HTTP Archive file, also known as a HAR file, is another resource that can be used to fix error 520.
This file contains a record of all the HTTP and HTTPS requests that were sent to the server, including requests sent by Cloudflare.
Just like a cURL command, analyzing these records can help you pinpoint the cause of the error by comparing the response headers coming from the origin server and response headers coming through Cloudflare.
Follow the steps outlined below to create a HAR file:
Launch Google Chrome.
Open the URL that’s generating error 520. Right-click on the error page, then click “Inspect” to open Inspect panel;
Inside the Inspect panel, navigate to the Network tab and make sure that the Record Activity button is active.
A red circle will appear in the top-left corner of the panel if it’s active. If it’s not active then the circle will be grayed out, and you need to click it once to activate it;
Now check the “Preserve Log” checkbox and also click on the Clear button next to the record activity button;
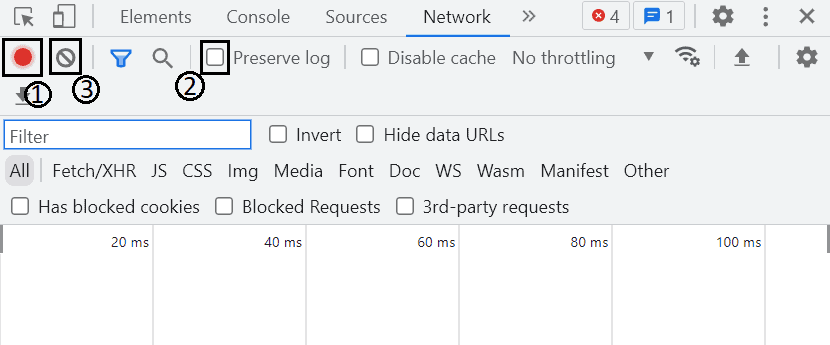
Now reload the page that’s generating error 520. All network activity will be recorded now, and it will appear in the messages section of Inspect panel that’s open;
Right-click anywhere in the messages part of Inspect panel, then click “Save as HAR with content”;
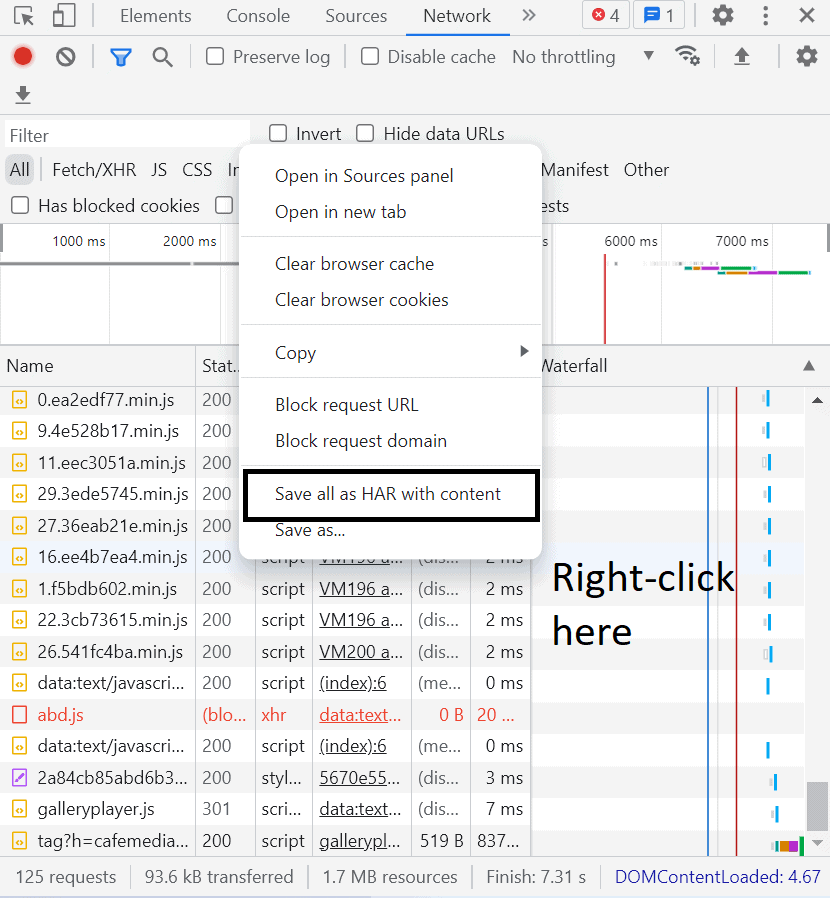
Save the file to any location on your computer.
This file will come in handy for the steps given below to figure out the root cause of the error.
Fixing Error 520
With our error logs and HAR file in place and Cloudflare service paused on site, now we can start debugging to fix this error. Let’s begin!
Step #5: Check the Status of Your Server Application
If PHP applications (i.e. Apache) on your origin server have crashed, the Cloudflare service may return error 520 because it won’t receive a valid response from your server for its requests.
You’ll be able to find out if this happened by looking at the error log that you downloaded in the preparatory steps.
If that has happened, it can be fixed easily by restarting the PHP application. Here’s the command that you can execute over SSH to restart it:
apache2ctl restartIf your server is not running an Apache application and running Nginx instead, you may get an error. Here’s the command you need to give in that case:
service nginx restartAlternatively, you can also navigate to the Apache configuration of your cPanel and restart the service from there, if you don’t prefer doing things over the command line.
Once you’ve restarted the service, check if the error is fixed or not by reloading the page.
Step #6: Check if Your Firewall is Blocking Cloudflare
Error 520 may also occur if your Firewall is blocking the Cloudflare IP addresses. And again, your error logs can help you determine if that’s what happened.
The solution, in that case, is to modify the rules of your firewall and whitelist the Cloudflare service IP addresses.
The exact steps to do it will vary depending on your host and firewall, so you may have to ask your hosting company’s support team about it.
If you’ve not done it before, we won’t recommend you modify sensitive security settings like Firewall rules on your own.
Step #7: Increase the TCP Idle Timeout of the Server
There’s an idle timeout setting in the TCP protocol configuration of each computer, including web servers.
This setting defines for how long a connection request is made if the server is not responding (i.e. idle), before being terminated automatically.
The default setting for it is 300 seconds, but if it’s less than that on your server for any reason then it can lead to error 520.
The error logs can tell you if a timeout interrupted the connection request. And the solution is, as expected, to increase the TCP timeout limit of your server. You can do that easily by executing the following command over SSH:
set service Service-HTTP-1 -svrTimeout 300Once you execute this command successfully, the TCP idle timeout limit of your server will be increased to 300 seconds.
You can also increase it up to 500 seconds by replacing 300 with 500 in the command given above.
Once you’ve done that, your site should start loading normally without error 520.
Step #8: Check Header Size
Cloudflare permits a maximum header size of 8kb in the responses sent by a server.
If your server is sending responses with header sizes more than that, then those responses can’t be processed by Cloudflare systems, which can lead to error 520.
To check the header size of your server we’ll need the HAR file that you prepared in the preparatory steps. Run that file through Google’s HAR Analyzer tool and it will tell you the page header size.
If your header is larger than 8kb, most probably that’s because of the cookies that are placed in it.
On WordPress sites that happens usually because of plugins — either a plugin you’re using requires too many cookies, or you’re using too many plugins on your site.
Disable some of them to reduce the header size, and see if that fixes the error and makes your site load normally.
Step #9: Analyze Your Server’s Response
If header size is not the issue, then something may be wrong with your server’s response message itself.
It may be sending empty responses to Cloudflare, the header may be missing altogether from the server, or the response may be having improper HTTP response code.
Here’s how to check for each of them and how to fix them:
#9.1: Check for empty responses
An empty response is when either the HTTP status code or the contents of the response body is missing from the response sent to Cloudflare.
Such issues may arise because of incorrect DNS configuration. You’ve to make sure that your domain’s DNS configuration (or nameservers, as they’re popularly known) is pointing to Cloudflare.
If not, you need to change it to Cloudflare’s nameservers to resolve the error.
You can check and update the nameservers by following the steps outlined in this tutorial on Cloudflare documentation. On the other hand, if they’re correct then leave them as they’re!
Once you’ve changed the nameservers, regenerate the cache of your WordPress website (if you’re using Cloudflare with WordPress).
How you do that will depend on which WordPress cache plugin you’re using, so you may have to look it up yourself in the plugin documentation or settings.
#9.2: Check for missing headers
If your response is missing the headers altogether, that will also be disclosed by the HAR file analyzer of Google.
In that case, you need to use a debugging tool like Fiddler or Charles to figure out the reason behind missing headers and fix it so your server is able to send a normal response to service requests.
#9.3: Check for improper HTTP response codes
When your server sends a response with an HTTP response code that doesn’t fit in the list of standard HTTP response codes, Cloudflare can generate a 520 error. Again, the HAR file analysis will help you determine if that’s the case.
There’s no exact reason behind this and it can happen for a number of reasons, including any of your plugins or some problem with the PHP applications running on your server.
The best option to troubleshoot the issue is by turning off some of your plugins. If it doesn’t fix the issue, get in touch with Cloudflare support.
Step #10: Enable Cloudflare Again
Once you’ve fixed the cause of the error and fixed it, don’t forget to enable the Cloudflare service again.
Enable it by logging in to your Cloudflare dashboard and resuming the service from where you paused it in step #1, and make sure that the error is not appearing again.
And if it still appears, reach out to Cloudflare support.
Similar Tutorials to Check Out
- How To Fix 401 Error: The 401 error code is shown when you’re trying to access a webpage or a resource without adequate authentication of your credentials. This tutorial explains how you can overcome this error to access the desired webpage or resource.
- How to Fix Redirected You Too Many Times Error: This error is shown when a website generates a redirect loop in the browser of a visitor. If your site is doing this, you can fix it by following the steps outlined in this tutorial.
- How to Fix Error SSH Connection Refused: Secure Shell or SSH allows us to execute commands and perform actions on our web server when we can’t access the website directly due to some bug or cyberattack. However, sometimes we receive an SSH connection refused error when trying to use it. This tutorial explains how can we overcome it.
Wrapping Up
Fixing error 520 is a complex task and requires at least an intermediate-level understanding of server infrastructure and technology.
It also requires a bit of web development and debugging skills, as you can see in the steps explained above. However, we’ve tried to keep it as thorough and easy to understand as possible even for non-technical users.
Do let us know if we were successful at that in the comments, and if you learned something useful from here then share this tutorial on your social media handles.


