
Whether you are an avid WordPress user or you are a total beginner, knowing how to create a backup is one of the fundamentals of using WordPress.
There are several articles on how to back up a WordPress site and how straightforward the process is.
But how do you restore WordPress from backups? This is where a lot of users get stuck.
Backups help you restore your WordPress website back to normalcy when something goes wrong.
In the event of virus attacks, hackers invasion, website crashes, or other WordPress bugs, restoring backups is your best shot at having your website up and running again.
In this article, we’ll look into several methods to restore a WordPress website from backups.
- Frequently Asked Questions
- What You’ll Need to Restore WordPress from Backup
- How to Restore WordPress from Backup
- Use cPanel Restore WordPress from a Backup
- Use cPanel and FTP to Restore WordPress from Backup Manually
- Use a Plugin to Restore WordPress site from backup
- More Helpful WordPress Tutorials:
- Wrapping up
Frequently Asked Questions
Can a WordPress Site be Recovered?
You can recover a WordPress site no matter what.
Maybe a malware or plugin causes your site to break or you inadvertently broke your site when making changes to the WordPress core.
There are several ways to recover your WordPress site.
Restoring backups is one of the most effective way.
Can I Restore a WordPress Site Without a Backup?
Yes.
Google Cache can help you restore a WordPress site when you don’t have a backup.
Just search your website on Google SERP.
Click on the arrow next to your website listing and select cache from the options.
You’ll see a cached version of your website.
Copy the source code and save it on your server to restore your website.
What is the Easiest Way to Restore a WordPress Site From a Backup?
The easiest way to restore a WordPress site from backup is to use a WordPress backup plugin.
However, restoring a backup depends on how you created the backup in the first place.
So if you created a backup manually, you can only restore it manually.
Likewise, backups created with a plugin can only be restored using the same plugin.
What You’ll Need to Restore WordPress from Backup
- An FTP Client: An FTP client is a third-party software that allows you to edit, add and remove files on your server. If you back up your site manually, you may need an FTP client to restore it from the backup. We’ll show you how.
- Hosting Account cPanel: Most hosting providers have scheduled automatic backups as part of their services. If your hosting plan supports this feature, you may want to restore WordPress from the backup in your hosting Cpanel. You need access.
- A WordPress Backup Plugin: With a backup plugin, restoring your WordPress website is a matter of a few clicks. We’ll show you some of the best plugins for creating and restoring backups and how to use them in this guide.
How to Restore WordPress from Backup
There are different ways to restore a WordPress site from backups.
Again, the one that applies to you depends on the type of backup you’ve created.
We’ll look into 3 different methods to restore a WordPress site from a backup.
- Use cPanel Restore WordPress from a Backup
- Use cPanel and FTP to Restore WordPress from a Backup Manually
- Use a Plugin to Restore WordPress from a Backup
Use cPanel Restore WordPress from a Backup
If you use managed WordPress hosting, restoring WordPress shouldn’t give you any headaches as your hosting provider will most likely have a one-click website restore feature.
Your web host routinely, and automatically backs up your website for you.
Each backup created will have a complete version of your website files and database when created.
So when you restore the backup, you roll back to the live version of your website when the backup was created.
We’ll use the Hostinger restore website feature in this guide.
Let’s see.
Log in to your hosting account dashboard.
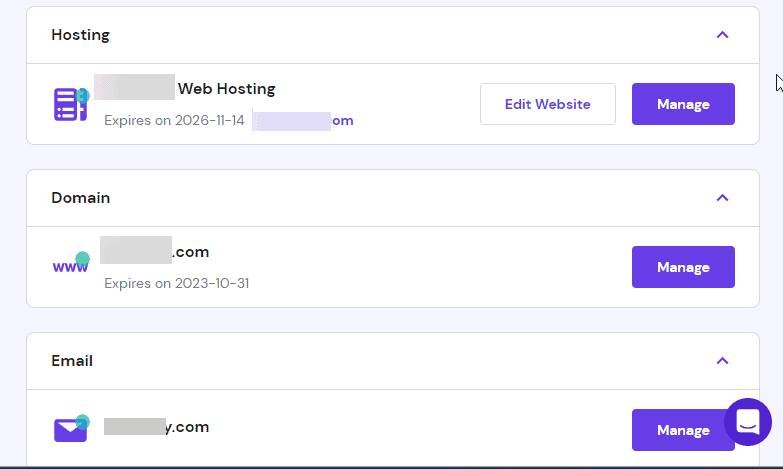
Go to the website you want to back up and click on the Manage button.
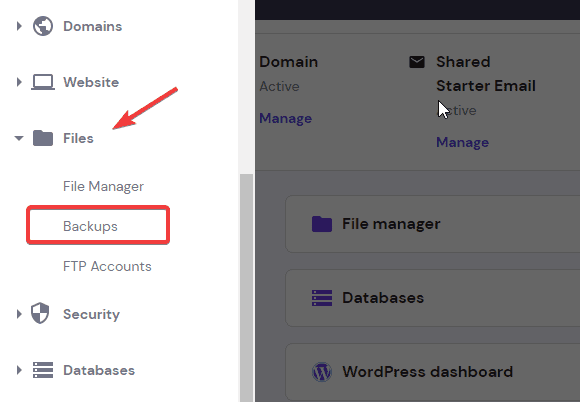
Locate Files on the left sidebar, click on it and choose Backups from the options.
This will open the backup screen.
Here, select Restore Website from the options.
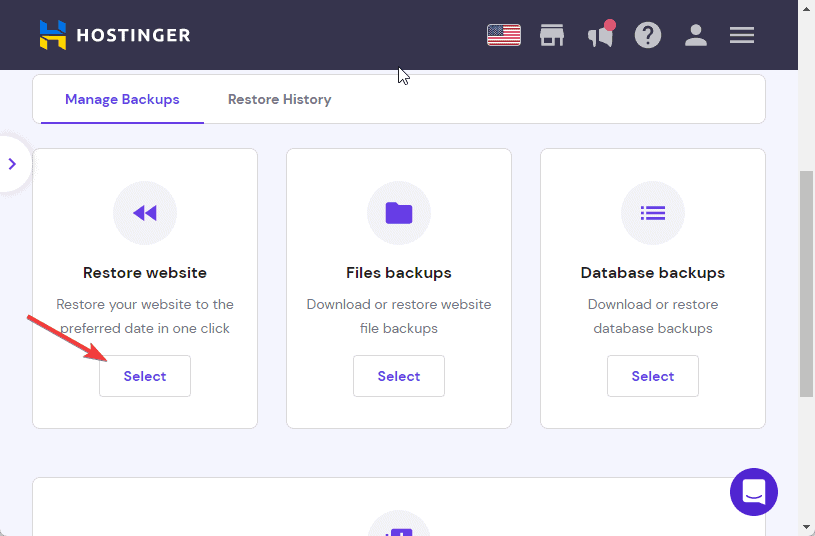
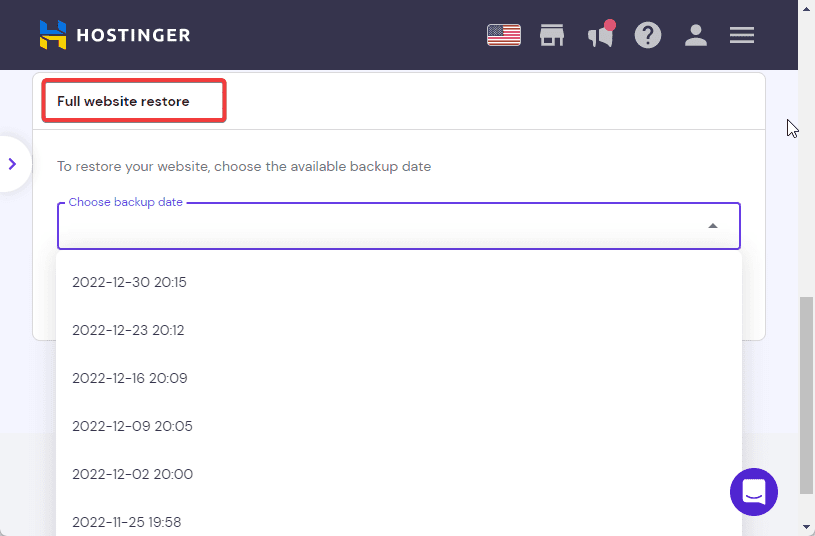
The Full website restores section will appear.
Here, you’ll see the dates of your most recent backups.
Select the backup date you want and click the Restore button.
A warning dialogue will pop up.
Check the box to confirm you want to replace all your website files and database and click the Restore button to proceed.
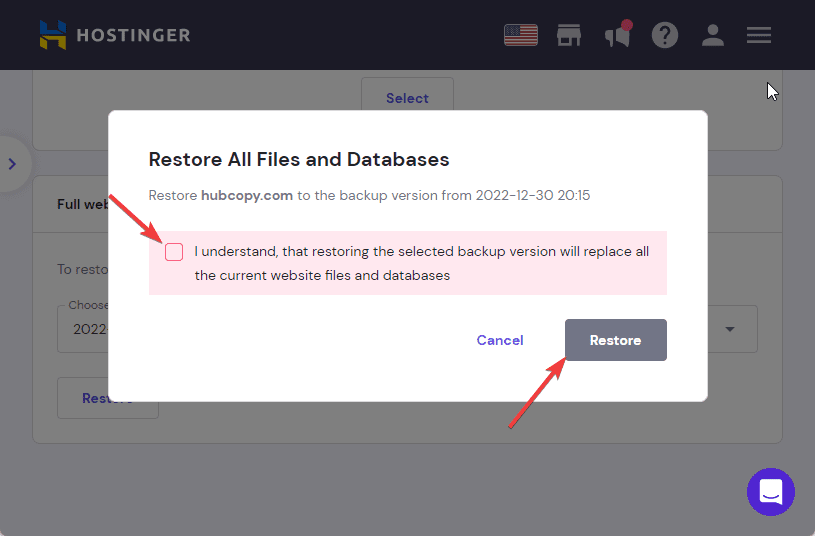
The process will take a while depending on the size of your website.
Once done, all your website files and database will be restored to the backup date you select.
Use cPanel and FTP to Restore WordPress from Backup Manually
To use this method to restore WordPress, you’ll need to have your website file and database backed up to your local storage.
You can check out this guide on how to back up WordPress websites manually.
If you have that, you can restore your WordPress site from a backup using an FTP client.
This method requires 2 steps.
- Step #1: Import Your WordPress Database via phpMyAdmin.
- Step #2: Upload WordPress Files via FTP
Step #1: Import Your WordPress Database via phpMyAdmin.
Log in to your hosting account dashboard.
Locate and Enter phpMyAdmin.
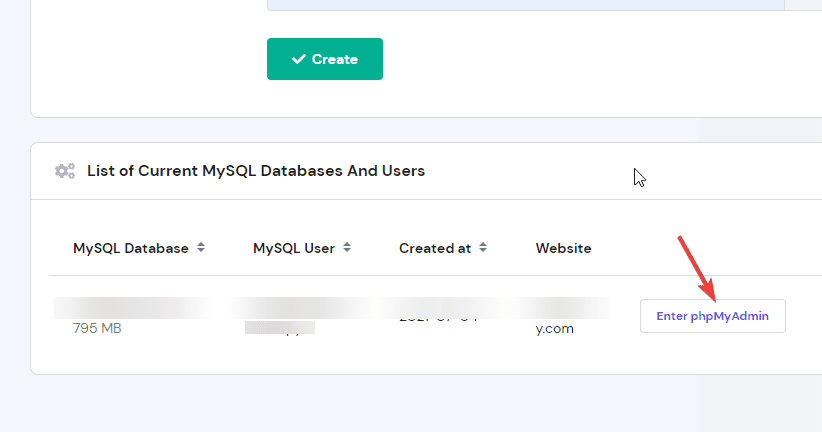
You should find this under Database in your cPanel.
We use the Hostinger dashboard for this tutorial, but don’t worry, once you locate phpMyAdmin in your Cpanel, all other steps are the same.
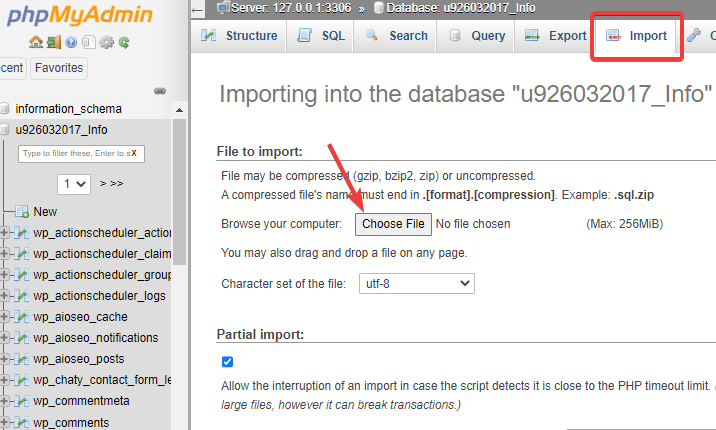
On the phpMyAdmin page, switch to the Import tab at the top of the screen.
Click on the Choose File button and upload the Database File on your computer.
Next, scroll down to the Format section and select SQL for the dropdown.
Make sure you keep SQL compatibility mode to NONE and check the AUTO_INCREMENT box under it.
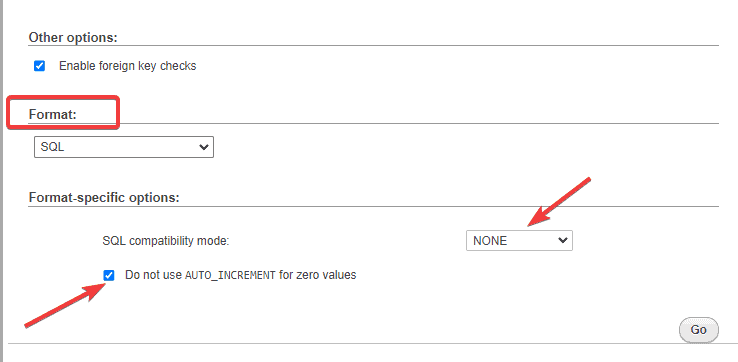
Lastly, click on the Go button at the bottom left corner.
phpMyAdmin will start importing your database.
This may take a few minutes.
Once the import is complete, the next step is to restore your WordPress files.
Step #2: Upload WordPress Files via FTP
To do this, you can use either an FTP or your hosting account File Manager.
For our example, we’ll use an FTP client called Cyberduck.
If you like, you can go ahead with your web host file manager.
The broad steps are the same.
You first need to download Cyberduck FTP to your computer.
After that, launch the app and click on the Open Connection at the top left corner.
The connection window will appear to input your FTP credentials.
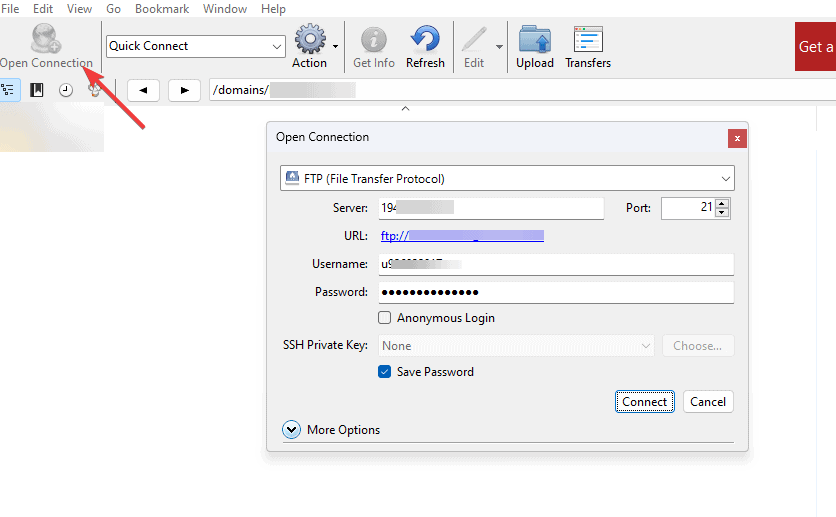
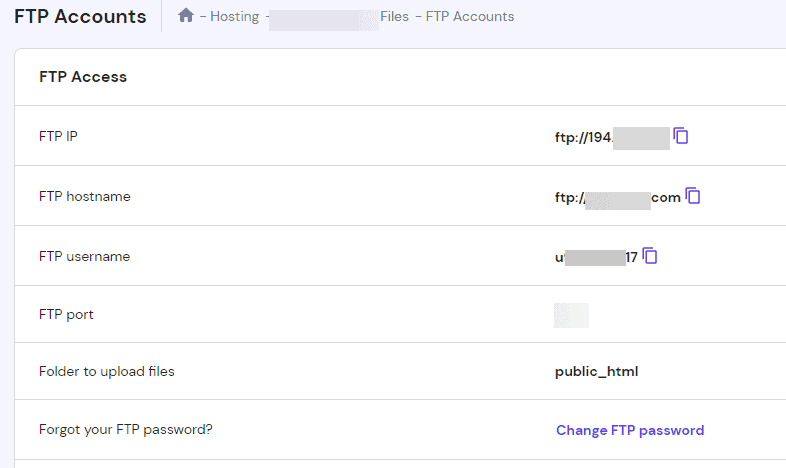
You’ll find this information in your hosting Cpanel.
For most providers, these credentials are usually located in FTP Accounts under Files.
Once you find the information, enter the FTP Accounts details and click the Connect button.
Cyberduck will now establish a secure connection to your server.
This will take a few seconds.
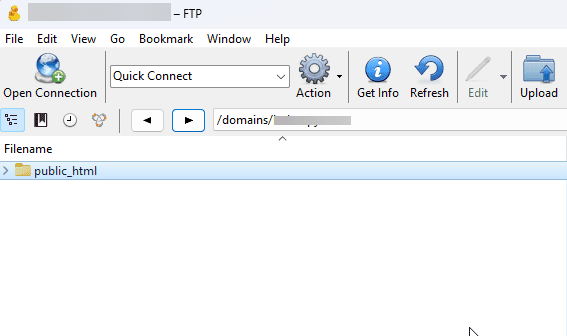
In Cyberduck, navigate to domian> yourwebsite.com>public_html folder.
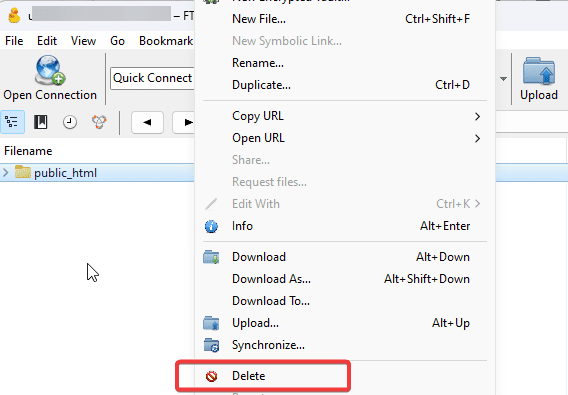
Now you’ll need to delete the existing public_html root directory from your server.
Again, make sure to have a backup of this file on your computer before proceeding with this step as you can’t undo the delete.
Right-click on the folder and select Delete from the option.
Next, you want to upload the backup version of the file on your computer.
Click the Upload icon on the top toolbar.
This will open your device storage.
Go to where you stored your WordPress file backup, select the unzipped folder, and click the Choose button to upload.
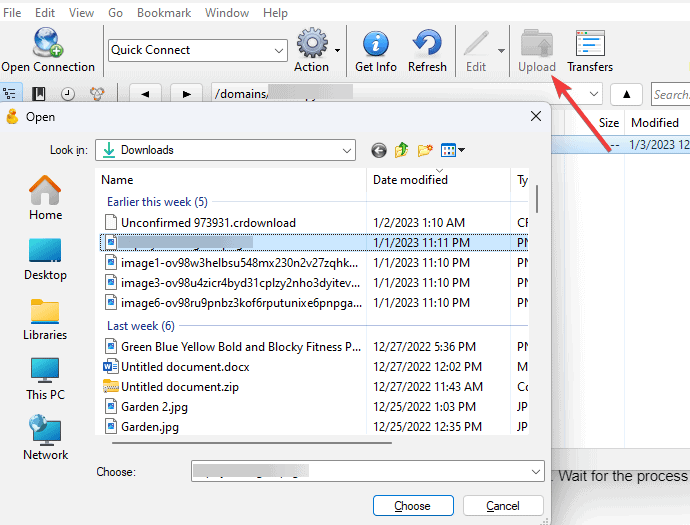
Depending on the size of your site, the upload will take a few minutes.
Wait for the process to complete.
Once done, you’ve successfully restored your WordPress from backup.
Load your website to see if everything is okay.
Use a Plugin to Restore WordPress site from backup
As an alternative to restoring WordPress backup manually, the widely accepted method is the use of a plugin, and the reasons are not far-fetched.
A backup plugin makes the process simpler and faster as you don’t need a separate tool to backup and another to restore.
On top of this two-in-one functionality, restoring WordPress backups with plugins requires a few clicks.
There’s no moving file around whatsoever involved.
There are many backup plugins you can look at, each with unique features.
For this example, we’ll show you how to restore WordPress backups by using 2 of the most popular backup plugins; UpdraftPlus and BlogVault.
UpdraftPlus WordPress Backup Plugin
UpdraftPlus is a famous freemium WordPress plugin for backing up and restoring WordPress.
This plugin allows you to create a complete backup of all your website files, database, themes, and plugins.
When you back up your site with UpdraftPlus, you can restore your entire site or a certain component of WordPress.
UpdraftPlus also supports multiple storage locations for your backup files, Google Drive, Dropbox, Microsoft Azure, Google Cloud, and Microsoft OneDrive.
Using UpdraftPllus Plugin to Restore WordPress from Backup Step by Step
Say you’ve already backed up your site with updraft plus, restoring your backup is easy.
Follow these steps
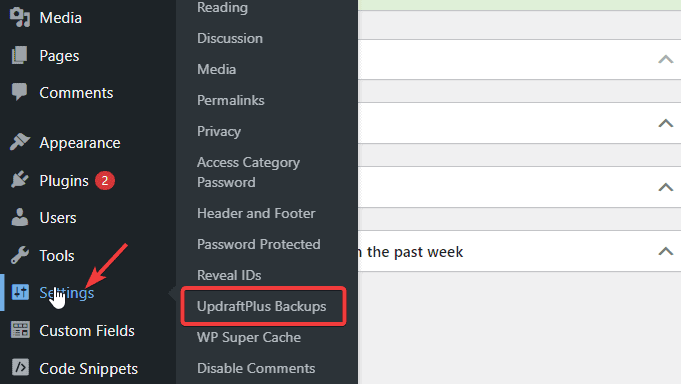
Log in to your WordPress admin dashboard, select Settings on the left panel, and choose UpdraftPlus Backup from the menu.
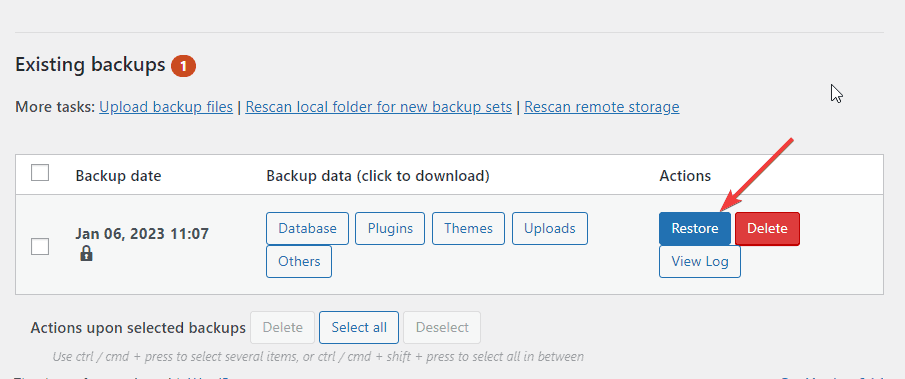
Once it opens, stay on the Backup/Restore tab then scroll down to the Existing Backups section.
You’ll see a list of recent backups.
Choose the backup you want and click on the Restore button.
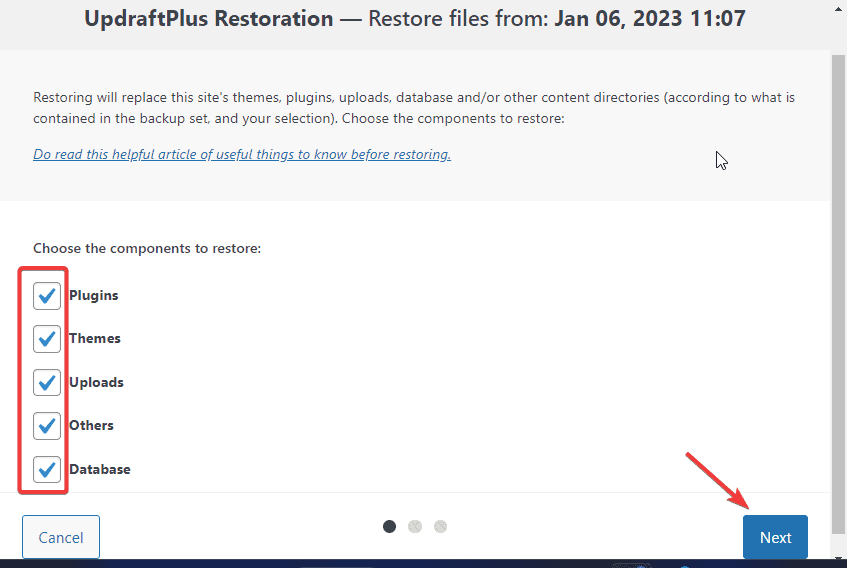
On the next screen, UpdraftPlus will have you select which components to restore.
Check all the boxes to restore your entire WordPress website and click the Next button.
The plugin will then start preparing your backup files.
Once It’s done, Click the Restore button to continue.
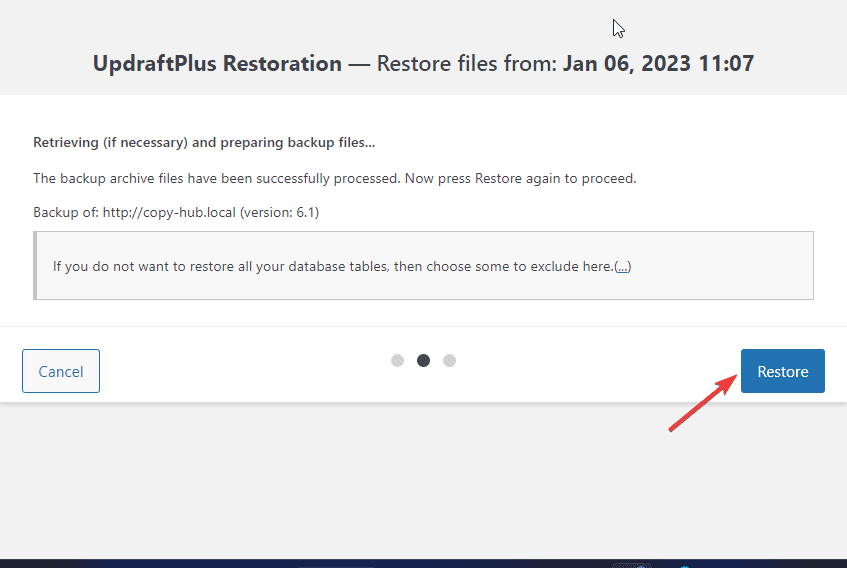
The restoration will begin and might take a while.
Once done, you’ll see Restore successfull at the bottom of the page.
And that’s all.
You are done restoring WordPress from backup using the UpdraftPlus backup plugin.
BlogVault WordPress Backup Plugin
Another great plugin to restore WordPress from backup is BlogVault.
BlogVault is an all-in-one WordPress backup plugin used by over 400,000 websites.
This plugin supports incremental backup.
Meaning, the system automatically detects and creates a backup every time your website database or file changes.
So if nothing changes since the last scan, Blogvault won’t create a new backup file.
That way, you can avoid keeping dozens of unnecessary backup files on your server.
Using BlogVault Plugin to Restore WordPress from Backup Step by Step.
Using BlogVault to restore Backup is fairly straightforward.
The steps are similar to the above.
Log in to your BlogVault dashboard.
Scroll to Backups and click on the Restore button under it.
Next, BlogVault will ask you to enter your FTP credentials.
You’ll find this under FTP Accounts in your hosting account Cpanel.
We’ve shown you how to find this in method 2 above.
Next, select the backup version you want to restore.
If you want, use the advanced option to define the scope of restoration.
Once you are done with your configuration, Click the Restore button.
BlogVault will start restoring your website.
Wait for the process to complete then check your website that the restoration is successful.
More Helpful WordPress Tutorials:
- How To Back Up WordPress: If you are looking for a hassle-free way to back up WordPress, This article explains what a WordPress backup is, why it’s necessary and how to do it step by step.
- How to Create a WordPress Staging Site: Want to make changes to your WordPress site without any worry? A staging site is all you need. Learn how to create yours using the steps in this guide
- How to Migrate a WordPress Site: Want to change your WordPress web host? Migrating WordPress sites can be tricky. This step-by-step guide makes it simple.
Wrapping up
Whether you go the plugin way or you opt for the manual process, restoring WordPress from backup is relatively easy.
Whenever you restore a backup, make sure you check your site to make sure that everything is working fine.
Plugins and permalinks are two must-check components.
Some plugin needs to be reinstalled or reactivated after restoring a backup.
Your permalink may also be affected and result in multiple broken links which are bad for SEO and user experience.
Go to settings>permalinks on your dashboard to verify all is well and make necessary corrections if any.
We hope this guide helps you.
If you have any questions, use the comment box below to reach out.


