
Is your internet browsing experience interrupted by the “DNS server not responding” error?
Are you feeling stuck because you don’t know how to get rid of this issue, despite having reconnected your internet connection several times?
Well, you’re not alone. This error is faced by almost every internet user many times in their life, and there are a number of reasons that cause it.
That’s why in this article we’ll try to explore all the reasons that can contribute to it, and how it can be fixed. Let’s start!
What Causes a DNS Server to Not Respond?
DNS servers are decentralized internet infrastructure, so they almost always work fine. If you are receiving a “DNS server not responding” error, then it means something is wrong on your part.
It may be something with your browser, with your internet connection, or with your computer.
Is it Safe to Reset DNS?
Of course, it is. You can reset your DNS and IP by flushing your DNS cache, or in a more dramatic change by switching to a different DNS server.
In either case, as long as you enter the correct details and be careful, it’ll be totally safe and harmless.
How to Fix the DNS Server Not Responding Error: Step-by-Step Instructions
This is going to be a long list of steps because there are a lot of things that may cause this error. So without taking any more time, let’s start:
#1. Change Your Browser
The first and easiest change that you can make to fix this error is by changing your web browser.
Try accessing the website you were trying to load through a different web browser on your computer.
For instance, if you were using Chrome, on Windows you can try using Microsoft Edge. If you’re a Mac user, you can try Safari.
In a lot of cases that’s the only change that is required to be done for fixing the “DNS Server not responding” error.
#2. Restart Your Router
Rebooting your internet connection fixes a lot of problems, and this error is no different.
If nothing has been able to fix the “DNS server not responding” error for you till now, you need to restart your router and see if it works.
In many cases that’s the only thing it takes to fix this annoying error, which is why we try it early on in our efforts.
#3. Use Safe Mode
If there are any issues with your OS, or any program recently installed by you is causing network issues, that may also be the reason behind this error.
To Check if that’s the case, you’ll have to restart your computer in safe mode. Here’s how it’s done:
On Windows
- Click on the Windows button;
- Click on Power;
- Hold the Shift key, and while holding it click on Restart;
- A Blue screen will come before you now. On that screen, select Troubleshoot;
- Click on “Advanced”;
- Select “Startup Settings”;
- Click “Restart”;
- Press 5 to restart in safe mode with networking enabled
- Once your PC has started, try accessing the websites that you were not able to access because of the “DNS server not responding” error.
On Mac
- Turn on your computer;
- While it’s booting up, hold the Shift key until the Apple logo appears;
- Release the Shift key when you see the Apple logo on the screen. Your Mac will now boot in Safe mode.
- Once it has booted in Safe mode, try accessing the website(s) you were trying to access earlier.
#4. Turn-Off Your Antivirus or Firewall
If you’ve not yet been able to fix the DNS server not responding error, maybe it’s time to temporarily toss away your antivirus protection.
Sometimes the firewall built into your antivirus may be the culprit behind this error. In such a situation, there’s no choice but to temporarily turn it off and see if it fixes the issue.
The exact steps to do that vary depending on your antivirus, but here are the instructions for some popular vendors:
- Disable Kaspersky Antivirus Firewall
- Disable Windows Defender Firewall
- Disable Avast Firewall
- Disable Avira Web Protection
- Disable Norton Firewall
- Disable McAfee Firewall
If disabling your antivirus protection fixes the “DNS server not responding” error, it’s time to speak with the customer support of your antivirus or find another antivirus for your computer.
#5. Disable Secondary Connections
If you are having more than one internet connection on your computer, that can also be a reason behind the error.
Make sure that you’re having just one active network connection on your computer at a time. Given below are the methods to ensure that:
On Windows
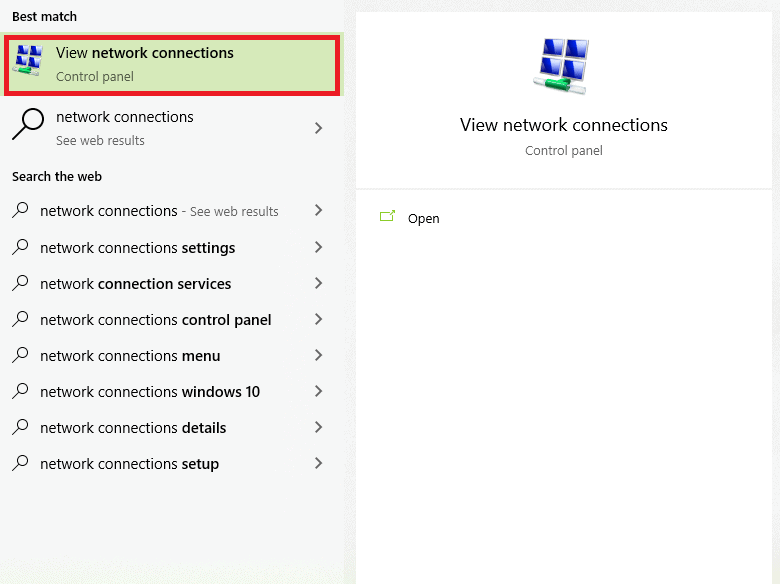
In the Windows search bar, search for Network connections
Launch the “View Network Connections” application;
This will bring you to a window in which you’ll find all your network connections. Disable all the connections which have a red cross on them by right-clicking and selecting “Disable”.
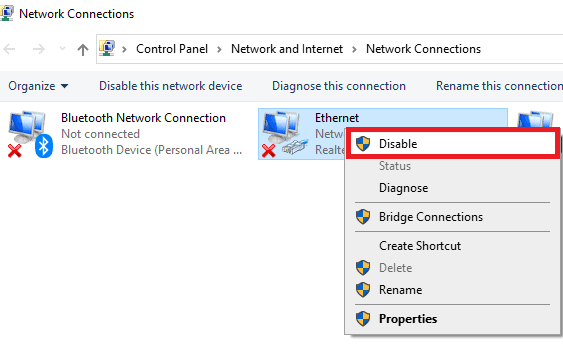
That’s it! Start browsing the web now and see if you still get the error.
On Mac
- Go to System Preferences >> Network;
- Select an inactive internet connection from the panel on the left side;
- Click the “-” button below to disable it.
Now try checking if the error is fixed or not.
#6. Disable the Windows P2P Feature
Windows Peer-to-Peer feature was not meant for affecting your browsing experience, but it has some unintended consequences which can cause the error we are talking about.
It’s a feature that shares Windows update files between computers on a local network to save your internet bandwidth while keeping all systems in the network up-to-date with the latest version of Windows.
To do so, the Windows update files are shared between all systems on the same local network once they are downloaded on any one computer of the network.
Now, since this transfer uses network resources and involves large files, sometimes it can leave the network bandwidth unavailable for other applications (i.e. internet browsing).
To check if that’s the case, you need to turn off the peer-to-peer feature in Windows Update. Here is how to do that:
Launch the Windows Settings app by searching in the search bar;
Go to “Update and Security”;
Click “Delivery Optimization”;
Disable the “Allow download from other PCs” option.
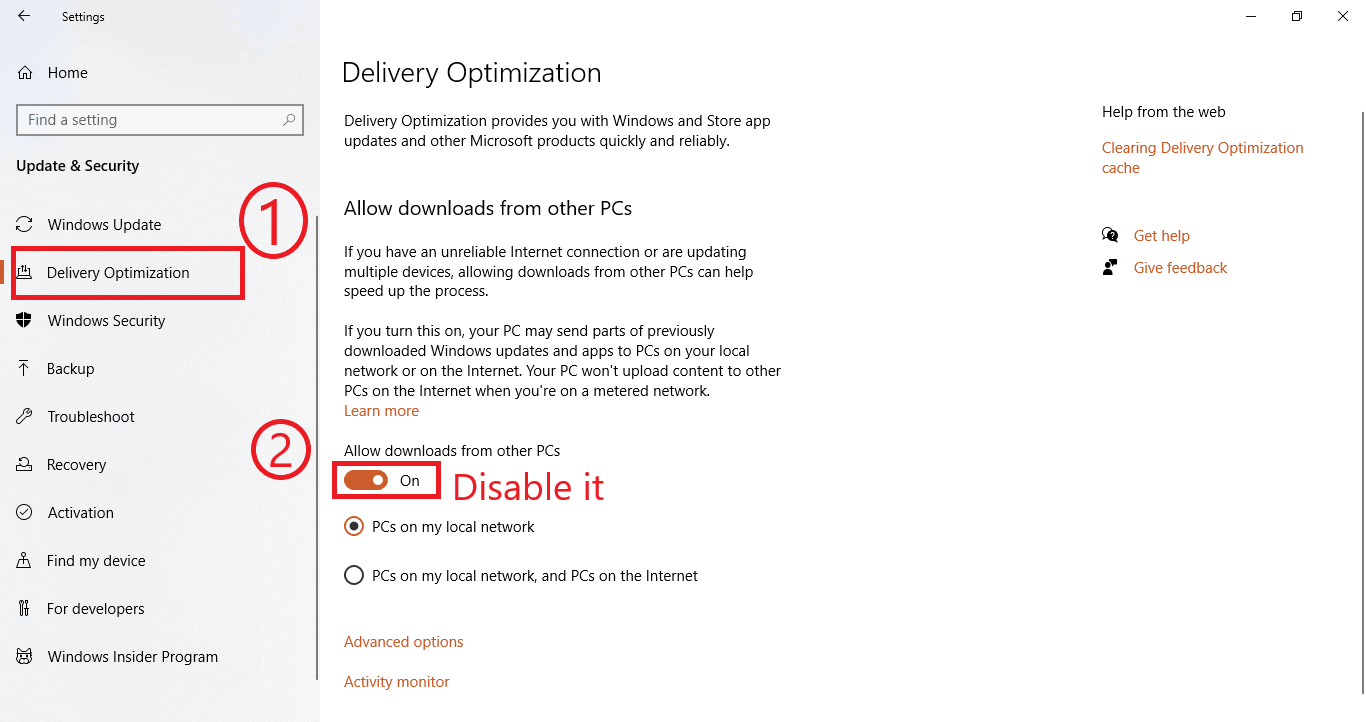
Now check if you are still getting the error or if it’s gone.
#7. Update Your Network Drivers
On Windows systems outdated network drivers can also cause a lot of issues, and the “DNS server not responding” issue is also one of them.
If you have tried all of the above-explained options but still have not been able to fix the error, it will be better if you update your network drivers.
Now, there are many ways to update your network drivers, including manual methods, but if you do something wrong then you may lose the complete functionality associated with that driver.
Therefore, we’d suggest that you update a driver using Windows Device Manager only.
Here’s how you can use it to update your drivers:
Go to your Windows Search bar and search for “Device Manager”. When it appears, launch it by hitting Enter on your keyboard;
Expand the Network adapters category;
Select your active network adapter by clicking on it;
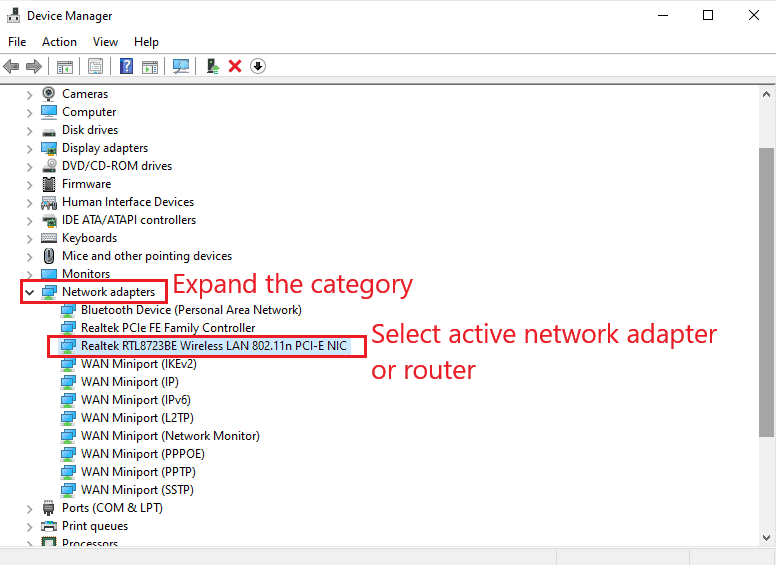
Right-click on the selected network adapter, and select “Update driver”;
On the next screen, click “Search automatically for drivers”;

If a new driver is available on your computer that can be installed for the network adapter, it’ll be installed automatically.
On the other hand, if you get a message saying that your driver is already up to date then you don’t need to do anything and move on to the next step.
#8. Flush DNS Cache
Just as your browser maintains a cache of websites you visit frequently, your computer maintains a DNS record cache of websites that you browse often.
So instead of resolving the IP address every time, the IP addresses of frequently visited websites are obtained from this cache by your browsers.
Now, the thing is… IP address records maintained in this cache may become outdated sometimes, thus resulting in this error. As a result, you may be experiencing the “DNS server not responding” error.
The solution to that, in this case, is to flush your DNS cache. Here’s how it’s done:
On Windows
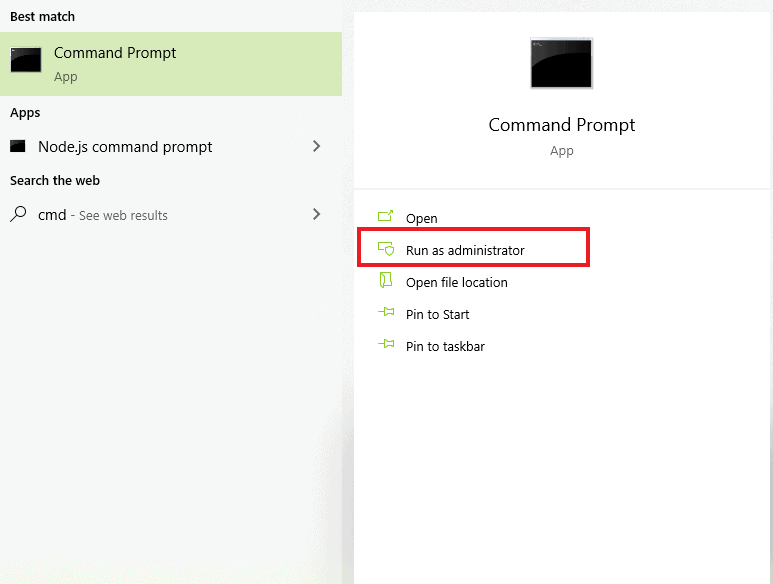
In the Windows search bar, type “cmd”, and when you see Command Prompt, click on “Run as administrator”;
A command prompt window will be launched. Inside it, type the following command:
ipconfig /flushdnsHit Enter, and wait for the success message.
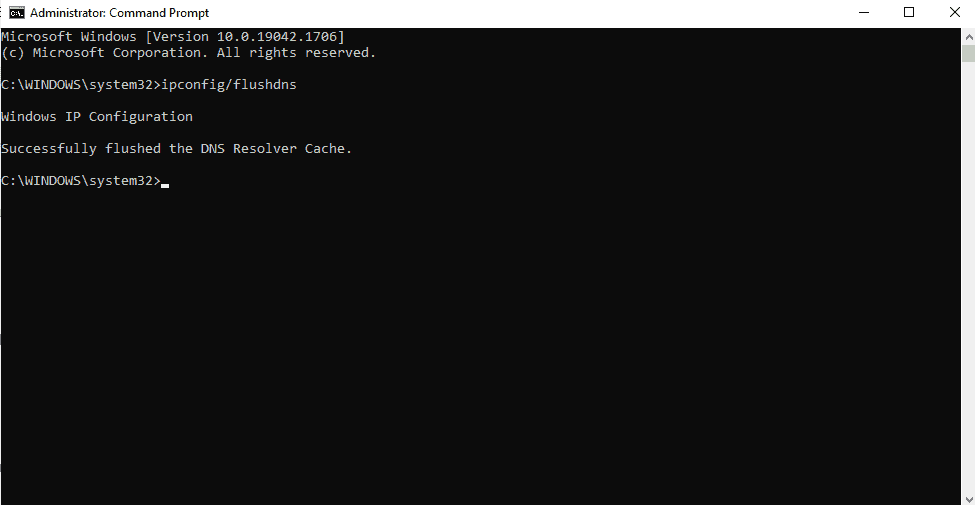
That’s it — you have successfully flushed your DNS cache. Now check if the error is gone or not.
On Mac
Launch a Terminal window by searching for “Terminal” in the launchpad search box;
Type the following command, and hit the Return key on your keyboard;
sudo dscacheutil -flushcache; sudo killall -HUP mDNSResponderEnter your system password, and hit Return again.
Wait for the success message, and once you receive it, try browsing the web again.
#9. Disable IPv6
IPv6 is the latest protocol for the generation of IP addresses that are unique to each computer, and it’s not supported yet by many computers across the globe.
So if you have an old PC, there’s a chance that IPv6 may be the reason behind the “DNS server not responding” error that you’re seeing.
Therefore, one of the solutions to fix it is to turn off the IPV6 protocol on your computer. Here’s how it’s done:
On Windows
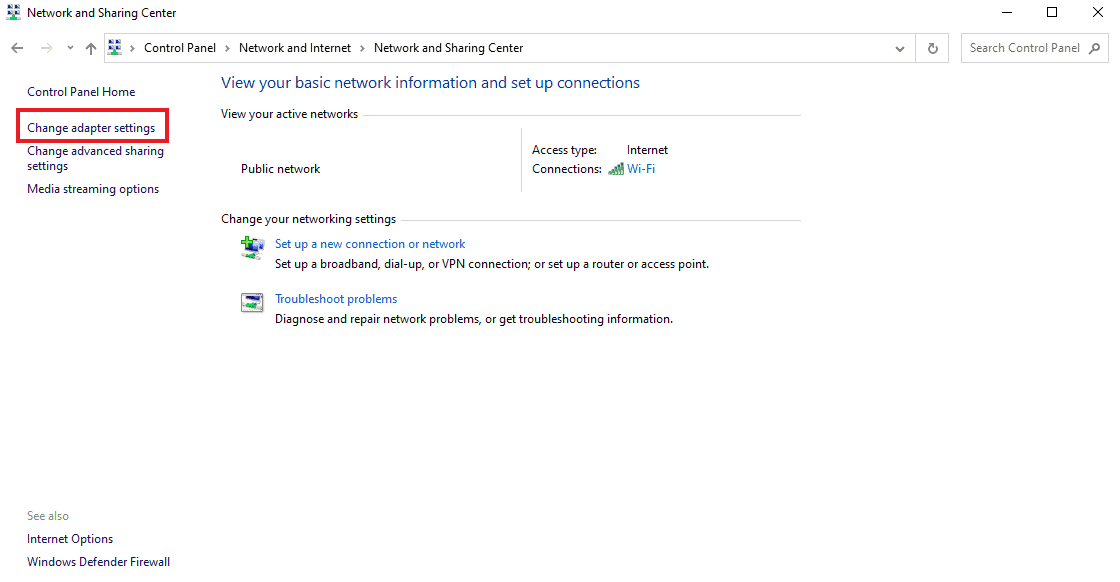
Go to Control Panel >> Network and Internet >> Network and Sharing Center;
Click on “Change adapter settings”;
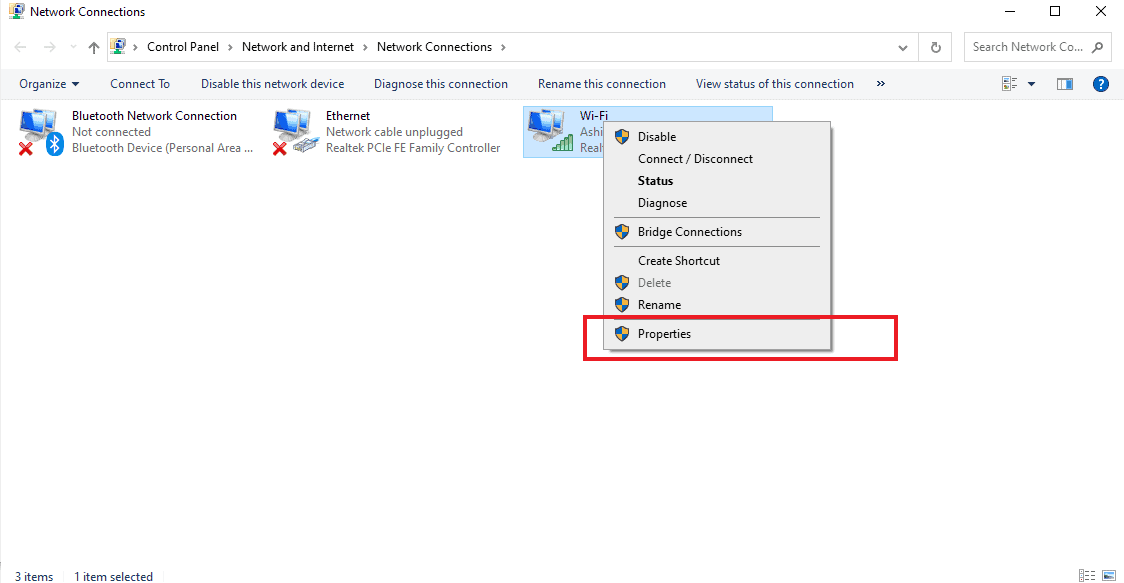
Right-click on your active Internet connection, and then select “Properties”;
Under “This connection uses the following items”, scroll down to select “Internet Protocol Version 6 (TCP/IPv6)” and uncheck its checkbox;
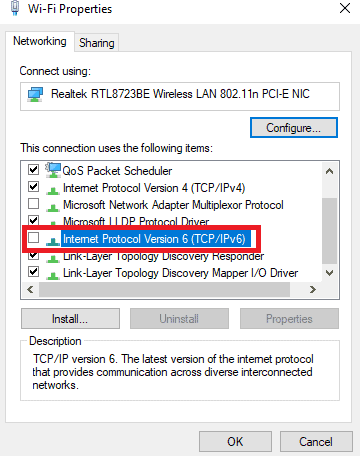
Hit “OK” to save your changes.
On Mac
- Go to System Preferences >> Network;
- Select your active network, and then click on the “Advanced” button;
- Navigate to TCP/IP tab and set the “Configure IPv6” option to “Off”.
Now try checking if the error is gone or not.
#10. Change Your DNS Server
At last, if nothing works, we’d suggest that you change your DNS server.
There are a number of reliable options, like OpenDNS, Google’s Public DNS, and Cloudflare DNS that are more reliable than the default DNS servers used by ISPs, so switching to them may fix the “DNS server not responding” error for you.
Here’s how to do that:
On Windows
Go to Control Panel >> Network and Internet >> Network and Sharing Center;
Click on “Change adapter settings”;
Select your active connection, right-click on it and choose “Properties”;
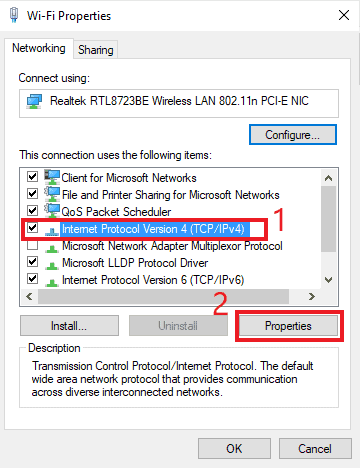
Select Internet Protocol Version 4 (TCP/IPv4);
Click on “Properties”;
Select the “Use the following DNS server address” option and then enter any of the following IP addresses:
| Field | Google Public DNS | OpenDNS (by Cisco) | Cloudflare DNS |
| Preferred DNS Server | 8.8.8.8 | 208.67.222.222 | 1.1.1.1 |
| Alternate DNS Server | 8.8.4.4 | 208.67.220.220 | 1.0.0.1 |
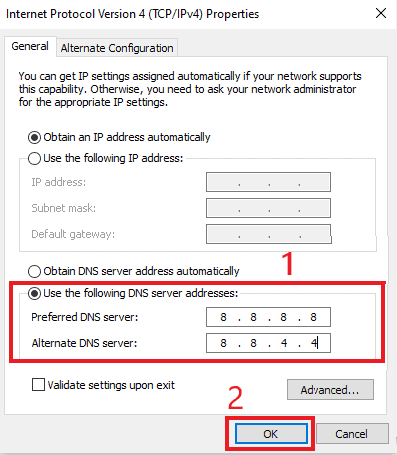
All of these are reputed public DNS options, and you can use them in place of your ISP’s default DNS resolver without having to think twice.
On Mac
- Navigate to System Preferences >> Network;
- Choose your active internet connection and click on “Advanced”;
- Tap on the DNS tab;
- Click the “+” button;
- Enter any of the DNS nameservers mentioned above (i.e. Google Public DNS, OpenDNS, or Cloudflare DNS);
- Save your changes by hitting “OK”.
Changing the DNS server fixes almost all DNS-related errors, so this one should also be fixed by now. Try checking it out by browsing the website(s) you wanted to browse.
Similar Tutorials to Check Out
- How To Change GoDaddy Nameservers: If you just bought a domain from GoDaddy, but your hosting is from another web host, you may find yourself stuck about how to take the next steps to bring your site online. This tutorial explains how to do that by changing your GoDaddy nameservers to the nameservers of your web host, so your website is accessible through the domain you just bought.
- How to Fix This Site Can’t Be Reached Error: Everyone has seen this error at least once, and it’s a frustrating experience to face it while browsing the web. This tutorial explains how to fix it easily when you face it the next time.
- How to Fix “This Site Can’t Provide a Secure Connection” Error: This error happens when your website has some problem with its SSL installation. As a result, the visitors of your site feel that they’re being led to a malicious or insecure website. This tutorial explains how you can fix it.
Wrapping Up
Fixing the “DNS server not responding” error can be easy or tricky depending on the issue that’s causing it. Regardless, if you follow this guide then you’ll be able to find the issue causing it and fix it in the end.
What are your thoughts about this guide? Share them in the comments. Also, if you liked the information provided here then do share it on your social media handles too.


