
Want to start selling online? Building an online store is the way. And it’s easier than ever to start an online commerce business.
When you build an online store and establish a strong presence, you can connect with a wide audience, increase brand recognition, foster customer loyalty, and consistently raise revenue.
But everything starts with planning well and right.
You have to decide on a niche, choose a brand and domain name, select a web host and choose an ecommerce platform.
In this article, we’ll show you how to make an online store step by step and turn your online business selling dream into a reality.
- Frequently Asked Questions
- What You’ll Need to Make an online store
- How to Make an Online Store Step by Step in 8 Steps
- Step #1: Pick Your Target Audience
- Step #2: Choose a Product for Your Market
- Step #3: Choose a Brand Name and Logo
- Step #4: Choose an Ecommerce Platform
- Step #5: Setting up WordPress
- Step #6: Make Your Online Store with WooCommerce
- Step #7: Setting up Payment for Your Online Store
- Step #8: Add Products to Your Online Store
- More Helpful Online Selling Tutorials:
- Wrapping up
Frequently Asked Questions
What is the Best Website to Make an Online Store?
Shopify and WordPress WooCommerce are the 2 best online store builders for businesses who want to get up and running quickly.
From product listing, sales and marketing, and payment gateways to cart management and order fulfillment, Shopify has everything you need.
With WooCommerce, there are plugins and extensions for anything you could ever think.
How Much Does It Cost to Build an Online Store?
The cost of building an online store depends on the size of the store you plan to launch and the features you need to run it successfully.
For startups and small businesses, it’s possible to launch an online store for less than $1,000.
And since there are many aspects to an ecommerce shop, you can choose and pay for only what you need.
What You’ll Need to Make an online store
- An ecommerce Platform: There are many ecommerce platforms out there that you can select from. For this tutorial, we’ll use WooCommerce in WordPress.
- A Domain name and Store Name: You also need a store name which should also be your domain name for a better user experience. You’ll learn more about this shortly.
- A Web Hosting Account: Like all other websites, your online store will be hosted on a web hosting provider platform for a small amount. Even though there are free web hosting services, it’s not in your best interest if you are ready for a serious business.
How to Make an Online Store Step by Step in 8 Steps
- Step #1: Pick Your Target Audience
- Step #2: Choose a Product for Your Market
- Step #3: Choose a Brand Name and Logo
- Step #4: Choose an Ecommerce Platform
- Step #5: Setting up WordPress
- Step #6: Make Your Online Store with WooCommerce
- Step #7: Setting up Payment for Your Online Store
- Step #8: Add Products to Your Online Store
Step #1: Pick Your Target Audience
It’s important to have a clear picture of your target market and product offerings before you launch your online store, as in, who you’re trying to sell to and what you’re selling to them.
A target audience streamlines your digital marketing efforts and makes finding and attracting new customers to your online store easier, leading to higher sales and revenue.
Depending on what you are trying to sell, there are three main aspects to consider when creating a target audience: demographics, location, and interests.
Selecting a target market is simpler if you have a product.
Who purchases your products? What interests? What motivates them to buy?
Find answers, create a buyer persona using this data, and integrate it into your business strategy. If not, check step #2.
Step #2: Choose a Product for Your Market
Once you have a target audience, deciding what to sell becomes easier.
Unfortunately, for most new entrepreneurs, coming up with product ideas is where their business fails. And there’s only one trick to this.
You must analyze the market and ensure your products meet your target audience’s needs, demands and expectations.
Whether you are dropshipping, manufacturing yourself or reselling other people’s products, there are many ways to search and identify profitable and market-meeting products.
One way is to look for market gaps that are yet to be filled in your niche. You can capitalize on trends to identify what product categories sell best in online marketplaces.
Alternatively, you can introduce something completely novel to the market.
Whatever you decide on, the key to success is ensuring it’s tied to your target audience’s needs, wants and desires.
Step #3: Choose a Brand Name and Logo
Now that you understand your target audience and products. Let’s discuss your business identity.
Choosing a name for your online shop is the first step in building brand recognition.
The right name for your brand isn’t necessarily creative. Rather it’s crips, short, relatable, memorable, and unique.
It’s equally important to ensure your business name matches your domain name. You don’t want to confuse your customers.
So, verify the domain availability by checking through a domain name registrar.
You can use Namechk to check if your store name is available as a domain and on social media before choosing it.
You may need to come up with several names and weed them out until you finally settle on one. It will take some time, but the stress is worth it.
Remember that logo is also essential on all your digital channels. You can create a logo yourself with a free logo maker or hire a designer.
Just make sure it’s bold, simple and catchy.
Once you have a name you are satisfied with, you can purchase your domain name and hosting.
There are several web hosts you can approach. We’ve compiled this list of the best web hosting providers for you.
Step #4: Choose an Ecommerce Platform
Going with the cheapest ecommerce platform might sound like a good idea, but the implication is that you may need to migrate your store once your business booms.
That doesn’t mean you should spend a fortune on a platform when starting.
The point is to choose a scalable platform that will accommodate your business growth irrespective of how small you start and how fast and vast you are expanding.
Ecommerce platforms come with different functionalities and add-ons. But two platforms can let you start small and grow however big, Shopify and WooCommerce for wordpress.
Starting at $29 per month, Shopify is a fully hosted plug-and-play ecommerce platform where you can start selling instantly.
The only disadvantage is that it can get quite expensive as you grow, plus there are limited payment options.
That’s why we recommend the World’s most popular ecommerce platform, WooCommerce, for WordPress.
It’s flexible, highly scalable and has a plethora of plugins to run a successful online store.
For this tutorial, we’ll walk you through how to make an online store with WooCommerce. Let’s start.
Step #5: Setting up WordPress
By following our hosting and domain name registration guide above, we’ll assume you’ve already had your website hosted and installed wordpress as most hosting platforms come with one click wordpress installation.
You should be able to do that from your account dashboard. After that, you have to log in to wordpress.
You can add wp-admin to your website URL as in https://www.mywebsite.com/wp-admin/. Or click on Manage WordPress from your hosting account.
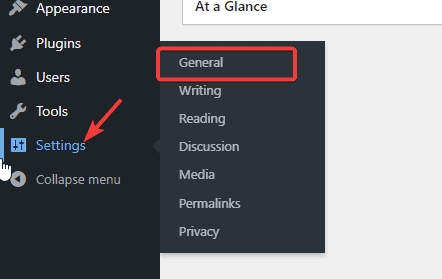
Once you log in to wordpress, locate Settings on the left panel on your admin dashboard and select General from the options.
You are to input your store name and description on the next screen.
Use the Site Title and the Tagline fields to do that, respectively.
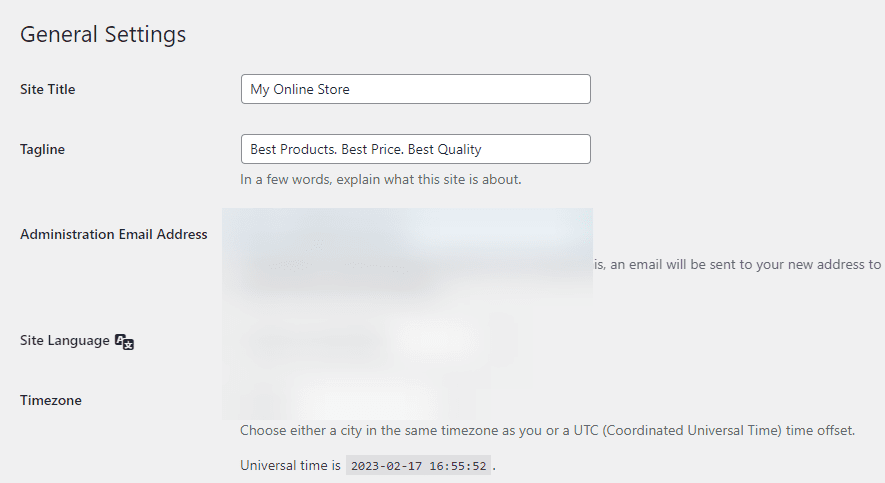
The Tagline field is optional. Leave it blank if you still need to come up with a catchy description.
Next, you need to configure your WordPress Address and Site Address.
Input the HTTPS version of your domain name and make sure both fields use www or non-www URLs.
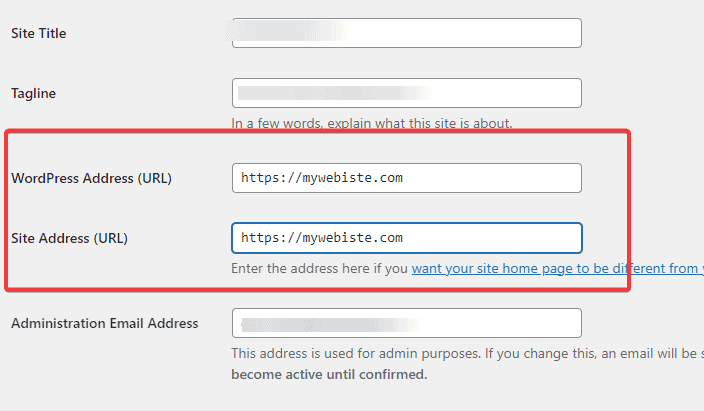
Once done, scroll to the bottom of the page to click the Save Changes button.
Done. You’ve successfully set up WordPress. It’s time to make your online store.
Step #6: Make Your Online Store with WooCommerce
WooCommerce is the number one Ecommerce solution on the internet.
Since it’s built on WordPress, users have the same flexibility as a wordpress website. You can make any type of online store with WooCommerce.
The first step is to install and activate the WooCommerce plugin. If you need help, follow this WordPress plugin installation guide.
Once you activate the plugin, you’ll be taken to the WooCommerce Welcome Page and Setup Screen.
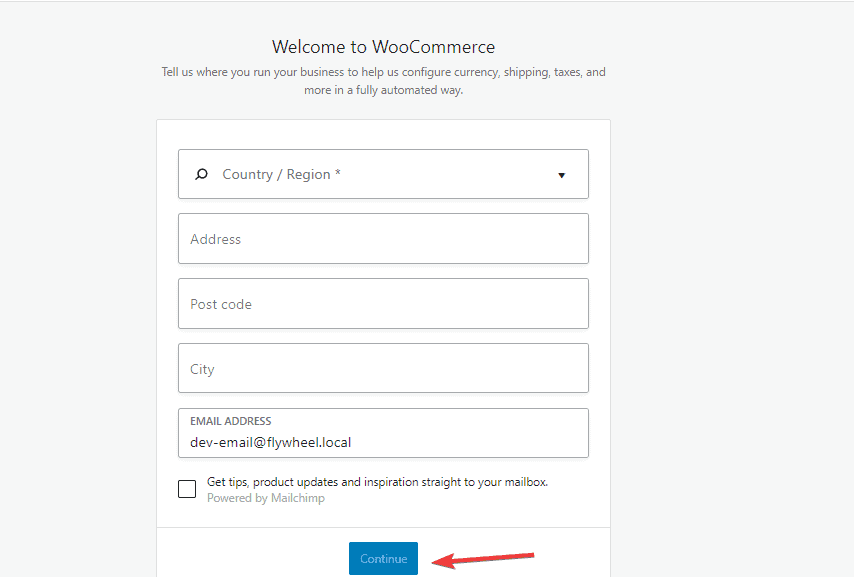
Here, you are to fill in basic information about your online store.
Enter the requested details and click on the Continue button. On the next screen, you are to choose your Store industry.
If you can’t find a specific one, choose any available ones closest to your store.
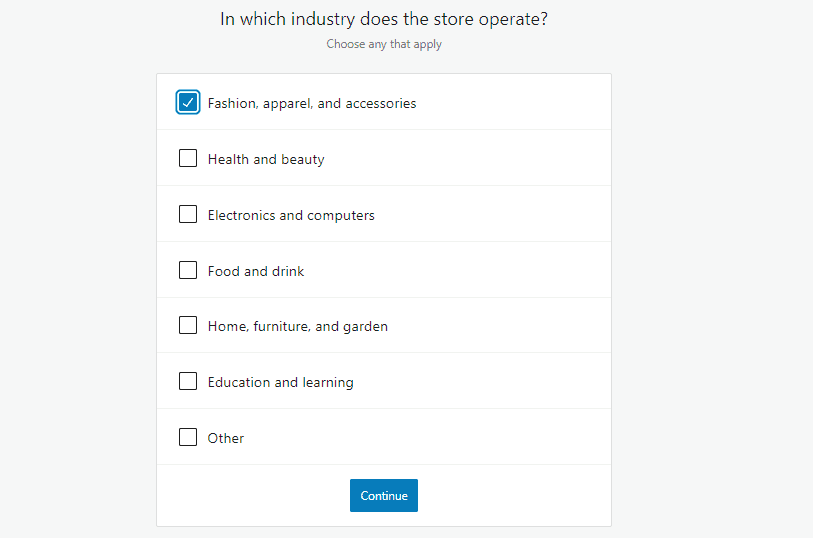
After that, Click on the Continue button to proceed.
On the next screen, stay on the Business Details tab. You’ll be asked to select the type of product that will be listed on your store.
For instance, you can select Download if it’s a digital product.
If you are shipping products to buyers, you’ll choose Physical products.
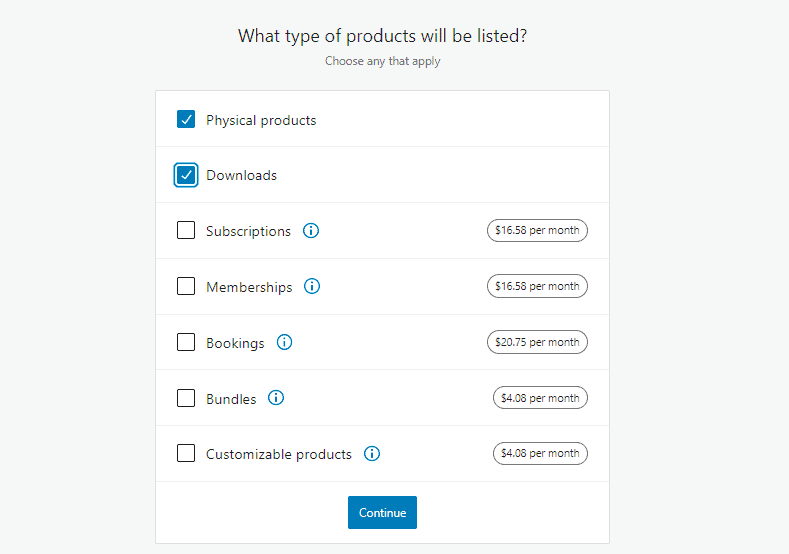
You can select multiple options if your store sells different product types. Once done, click the Continue button.
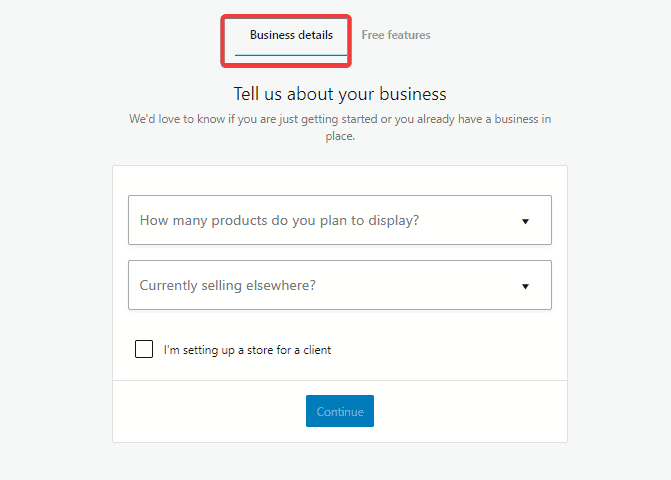
Next, you are to input your Business details. Enter the number of products you are planning to sell.
If you aren’t sure yet, choose the, I don’t have a product yet option from the dropdown.
For the Currently selling elsewhere option, select Yes or No as applicable.
Now to the Free Features tab.
You’ll see a pre-checked box with Add recommended business features to my site.
You should uncheck it as it will automatically install plenty of other WooCommerce extensions that might not be useful. The good thing is that you can add them when the need arises.
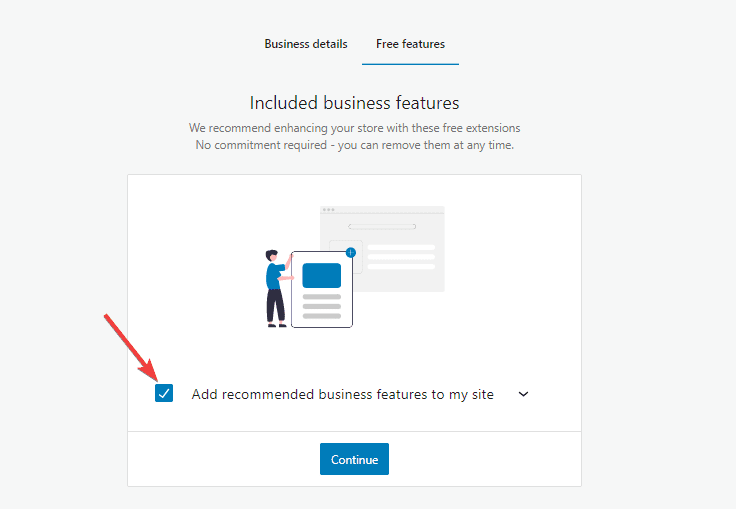
Once done, click on the Continue button.
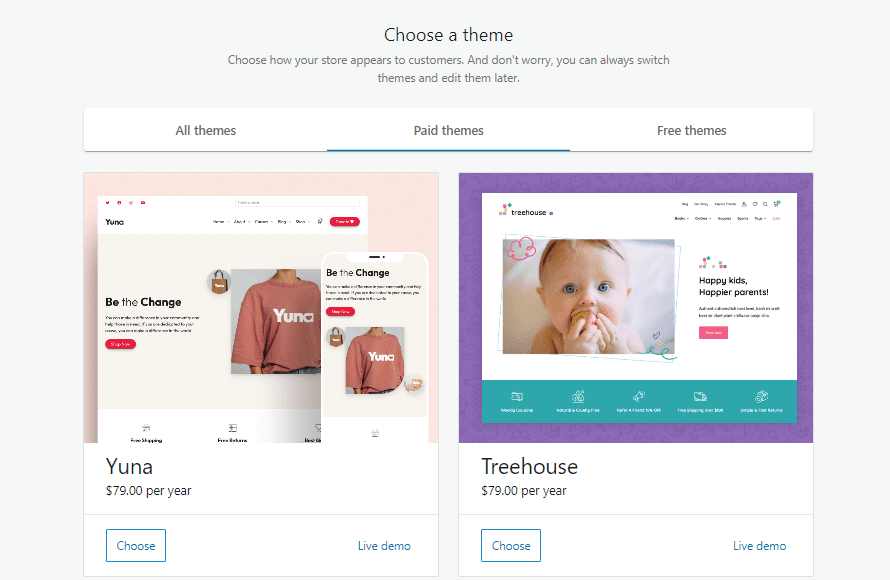
On the next screen, you’ll see where to choose a theme for your online store.
You don’t have to worry too much about this at the moment. Just proceed with the default theme or pick any of the listed free themes.
You can always choose a theme later.
And that’s it. You’ve successfully set up WooCommerce.
Now let’s look at other essential aspects of your online store.
Step #7: Setting up Payment for Your Online Store
You must first set up payment to accept payments on your online store.
With WooCommerce, there’s an abundance of payment gateways you can select from.
On your admin dashboard, hover over WooCommerce and Select Settings from the options.
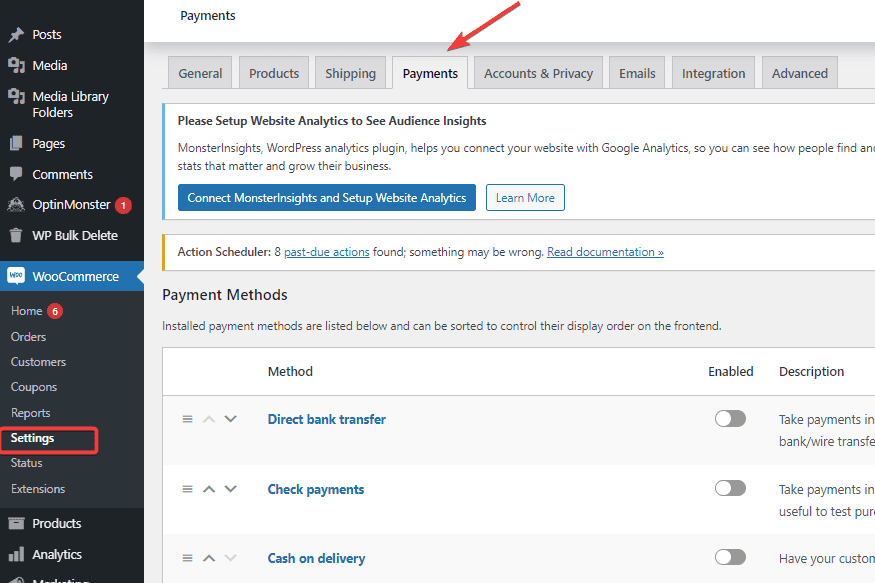
Next, switch to the Payments tab.
Since you’re yet to add any extensions, the default payment options you’ll see are Direct bank transfer, Check payments, and Cash on delivery.
Ignore them and scroll to the Recommended payment providers section.
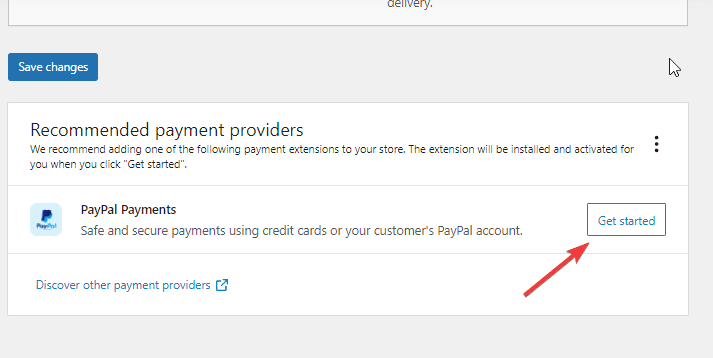
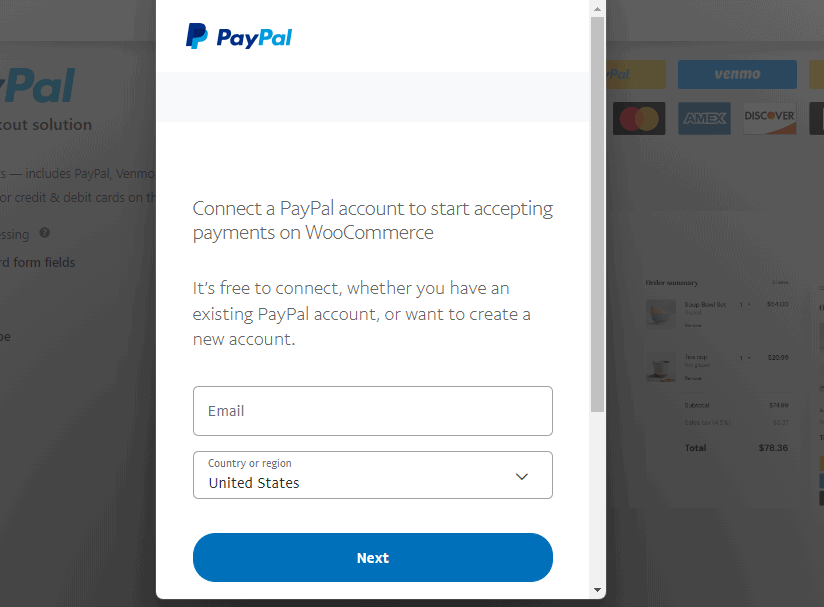
There, you’ll find PayPal Payments.
Paypal is one of the most widely used payment platforms. It’s used in nearly all parts of the world.
We’ll select it by clicking on the Get Started button.
Next, you’ll see the option to configure PayPal. Check the box to accept all major debit and credit cards, then click on the Activate PayPal button.
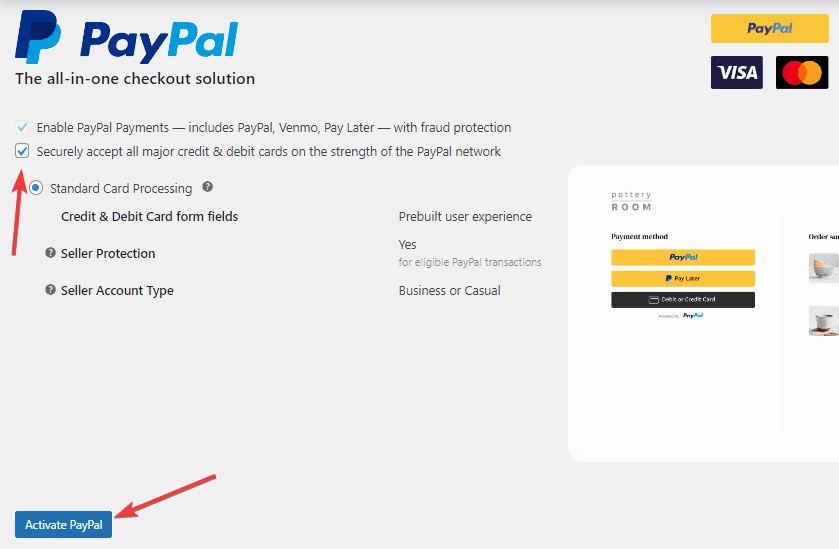
The PayPal connection window will pop up. From there, you can log in to your existing Paypal account or create a new one.
Once done, follow the on-screen instruction to complete the setup.
And that’s all. You can now receive payment on your online store.
Next, let’s add your first product.
Step #8: Add Products to Your Online Store
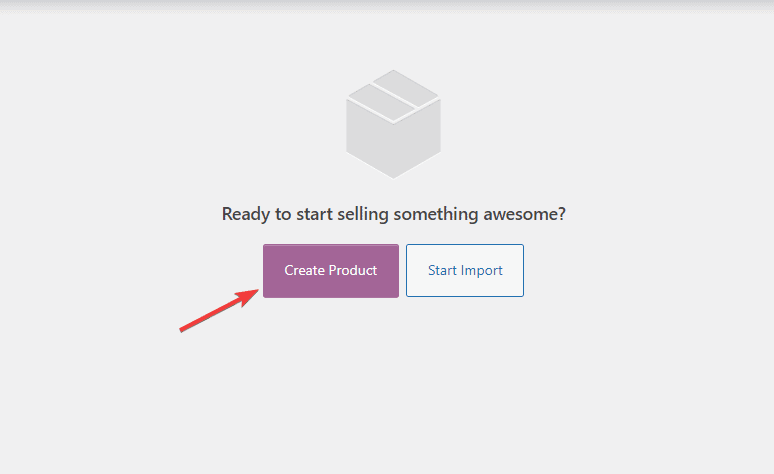
To add the first product to your online store, go to WooCommerce on your dashboard and select Products from the options.
Your store product page will open. You won’t see anything since you are yet to add any product.
Click the Create Product button.
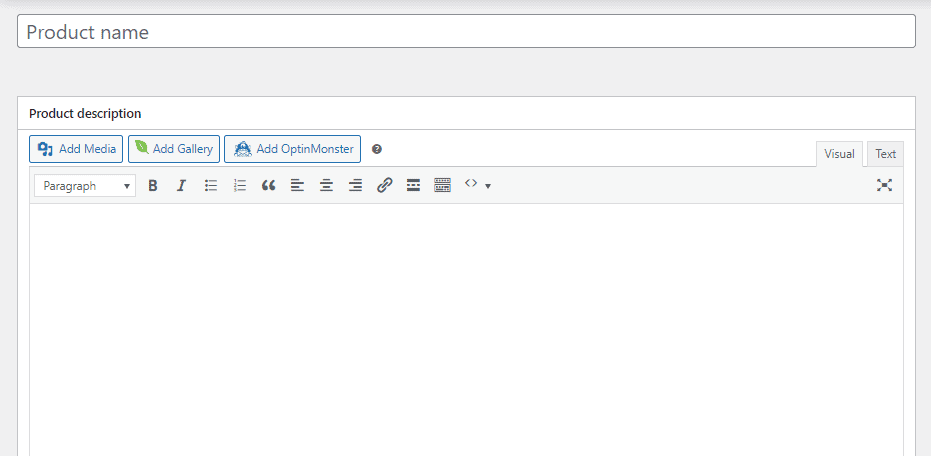
Next, enter your Product Name and input Product Descriptions in the available boxes.
On the right panel, you’ll see a Product Categories box.
Click the +Add new category link, input the category name in the resulting box and click the Add new category button under it.
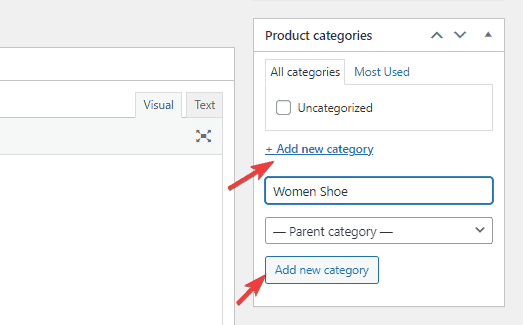
Creating product categories makes browsing and filtering them easy for you and your customers.
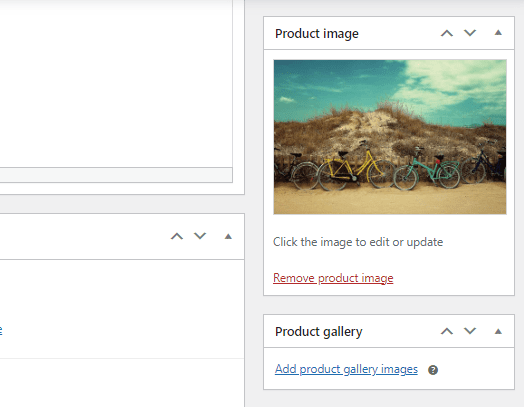
Under the Category tab are the main Product image and the Product gallery.
Click on the Set product image link to select an existing image from the Media Library or upload a new image from your device.
Next, scroll to the Product data section.
Here, you can put product-specific information such as Inventory, Shipping, pricing, etc.

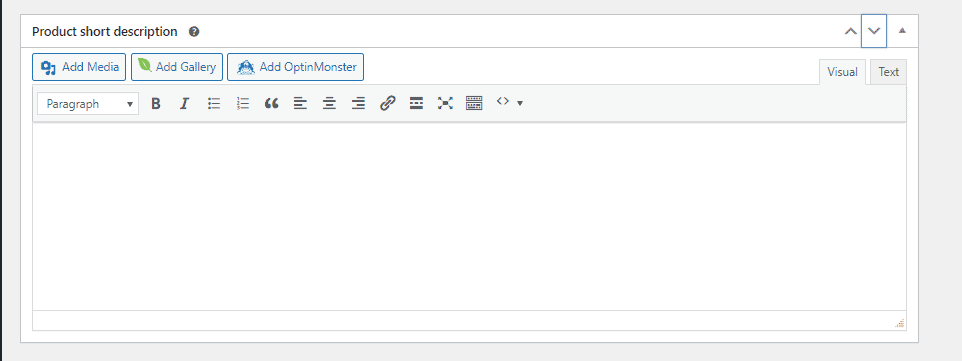
Under the product data section, you’ll see the Product short description section.
Expand it and input a short, catchy description of your product in the box.
This short description is crucial because it’s what potential buyers see when looking at multiple products on a page.
Once you are done inputting the product information and are satisfied with it, expand the Publish tab at the top and click on Publish.
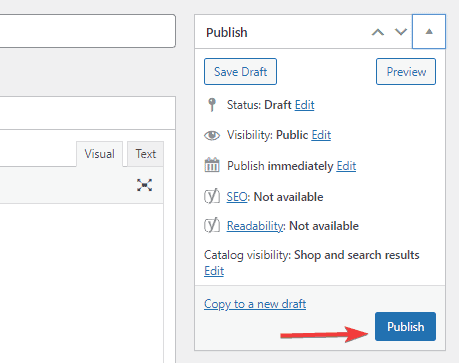
That’s it. Your product is now live, and visitors can buy it. To add more products, follow the same steps.
More Helpful Online Selling Tutorials:
- How to Start a Clothing Store: Want to start an online clothing store? Learn the How, the What, and the Where in this comprehensive guide.
- How to Start an Online Boutique: Starting any online business can be a big gamble, but an online boutique is a good place. Learn how to get started here.
- How to Use WooCommerce: Using WooCommerce to build an online store is far less daunting than many assume. It’s easy if you are ready to learn. This actionable guide will make it even easier.
Wrapping up
Now that your online store is ready, you can add more features to help run your store successfully. And that’s where WordPress plugins come in.
You can use plugins to add whatever features to your online store.
Want to set up customer support, promote your product on social media, increase site traffic via SEO, and build your email list?
Name it. WooCommerce has an abundance of plugins and extensions, free and paid to extend your online store.
Hopefully, with this guide, you can make an online store and start selling your products online.
If you need more help, feel free to reach out in the comment section below.


