
“There has been a critical error on this website. Please check your site admin email for instructions.”
Seeing this critical error on your WordPress website can be frustrating. But you don’t need to fret. The problem is simpler than it appears.
This error blocks users from accessing your website. And in some cases, it denies you entrance into the WordPress admin area.
Be rest assured that nothing is lost. There are easy fixes you can employ to get your WordPress site up and running again.
In this article, we’ll show you how to resolve the “There has been a critical error on this website” using different methods.
- What is the Meaning of Critical Error on a Website?
- What Causes a Critical Error on WordPress?
- What You’ll Need to Fix “There Has Been a Critical Error on This Website” in WordPress
- How to Fix “There Has Been a Critical Error on This Website” in WordPress
- Fix #1: Fixing WordPress Critical Error in Recovery Mode
- Fix #2: Activate WordPress Debug
- Fix #3: Deactivate and Reactivate Plugins
- Fix #4: Switch to a Different Theme
- Fix #5: Increase PHP Memory Limit
- More Helpful WordPress Tutorials:
- Wrapping up
What is the Meaning of Critical Error on a Website?
The “There has been a critical error on this website” message in WordPress simply means a fatal error stops PHP scripts from running during code execution.
This error tells you that WordPress has failed to load core files due to resource limitations or code-related conflicts.
What Causes a Critical Error on WordPress?
Malfunctioning plugins or themes, corrupt database files, viruses, and malware infections cause this critical error in WordPress.
Sometimes, adding custom codes to WordPress can also trigger this critical error. In the coming section of this guide, we’ll look at the causes and fixes of this error.
What You’ll Need to Fix “There Has Been a Critical Error on This Website” in WordPress
- WordPress Admin Access: If you can still log in to your admin dashboard, you can try fixing the problem from there. You must have an admin or super admin role on the website.
- Hosting Account Cpanel: If the critical error stops you from accessing the admin area, you must access website core files on your WordPress hosting platform Cpanel to resolve the error.
- Admin Email Access: WordPress sends an error notification email to your admin email address whenever this error occurs. Your admin email is the email address you provide when installing WordPress. You’ll see instructions on the cause and how to fix the critical error in your inbox.
How to Fix “There Has Been a Critical Error on This Website” in WordPress
If you’ve been using WordPress for a while, the White Screen of death error shouldn’t be a new term to you. You most likely have heard about it or even possibly encountered it.
But since WordPress 5.2, the blank screen error has been replaced with this critical error message to give more context to the problem.
Unlike the White Screen of Death error, where you are left with no clue, the critical error message contains a link to the WordPress debug guide.
Also, WordPress will send an error message to your admin email with details on the cause of the problem and a link to fix it in recovery mode.
That’s the first solution we’ll show you in this guide. But before that, here are some preliminary fixes you can employ;
- Reinstall WordPress: A corrupt WordPress core file may be why you see a critical error on your site. The solution is to reinstall WordPress. You must be careful with reinstallation to avoid losing your site data. Check out this guide on how to safely reinstall WordPress without losing data.
- Restore WordPress from Backup: If you’ve created a recent backup of your WordPress website before the critical error shows up, restoring WordPress from the backup could be the only fix you need.
- Run Malware and Antivirus Detection: A malware or virus attack on your WordPress site could also trigger a critical error. In this case, the best WordPress security plugins can help you detect and fix the issue.
At times you won’t exhaust these potential fixes before the error disappear. However, if the problem persists, proceed with the major fixes below.
- Fix #1: Fixing WordPress Critical Error in Recovery Mode
- Fix #2: Activate WordPress Debug
- Fix #3: Deactivate and Reactivate Plugins
- Fix #4: Switch to a Different Theme
- Fix #5: Increase PHP Memory Limit
Fix #1: Fixing WordPress Critical Error in Recovery Mode
The best way to fix “There has been a critical error on this website’’ is to follow the instructions in the recovery email.
Check your spam folder if you don’t see the message in your inbox,
Instead of using any other troubleshooting method, which may or may not work, the WordPress debugging email is your best shot at getting your website back up.
In this email, WordPress will pinpoint the exact cause of the problem. Let’s see.
Once you reach your inbox, look for the mail with the subject line “Your Site is Experiencing a Technical Issue.”
Once you open the email, you’ll find information about the cause and what you can do to fix it.
In the screenshot below, you’ll see that WordPress detected an error with one of the plugins on our website.
Not just that, it tells us the exact plugin.
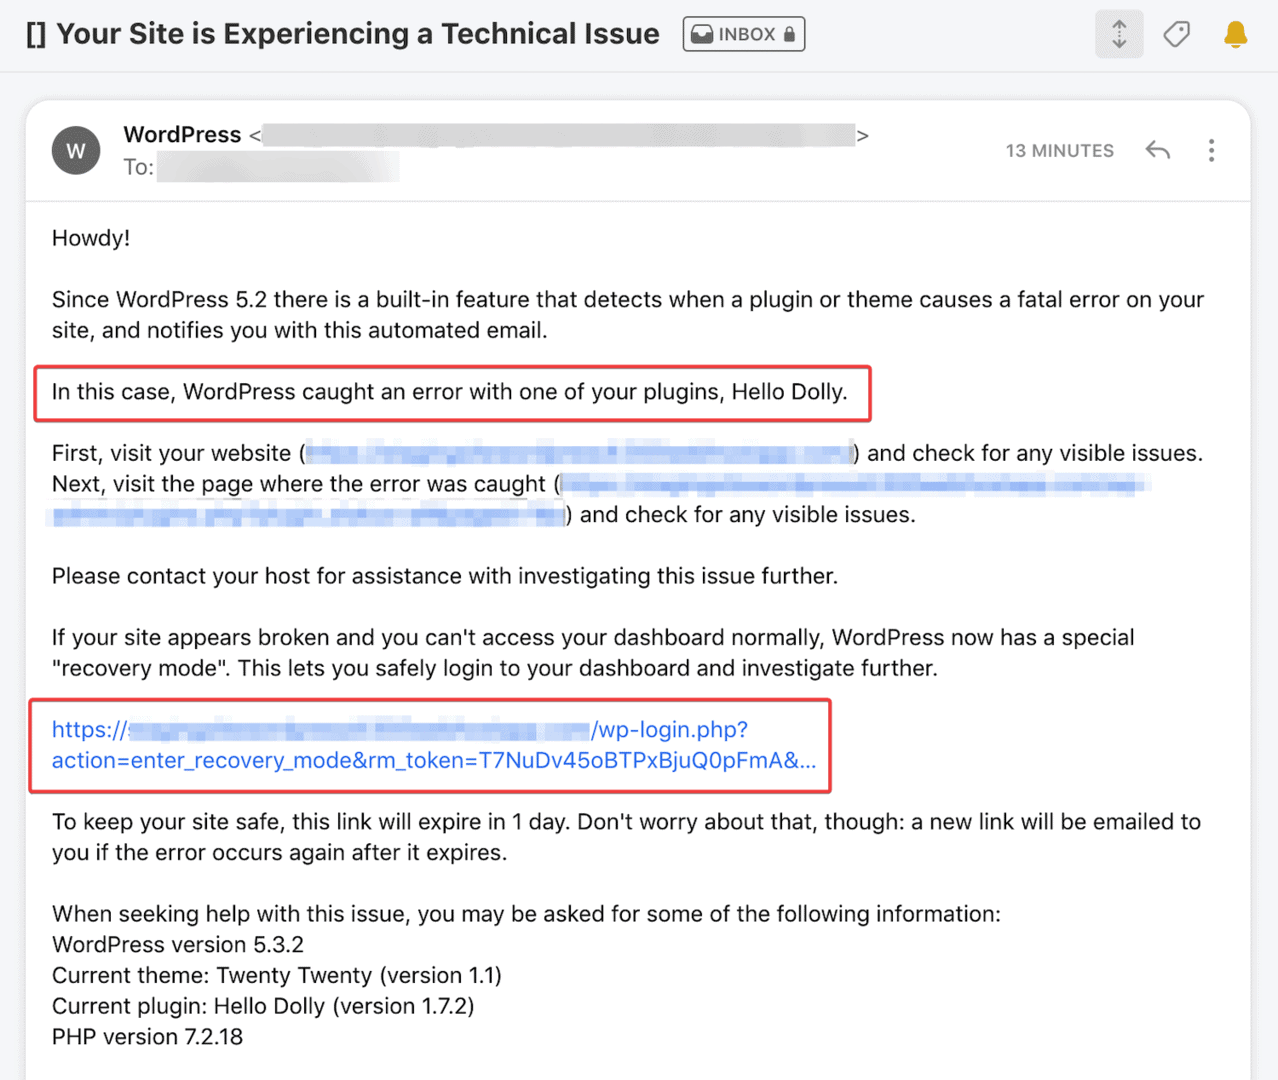
The message also contains a unique link for logging in to WordPress in recovery mode to fix the issue.
At the bottom of the email, you’ll see even more specific information about the code and file.
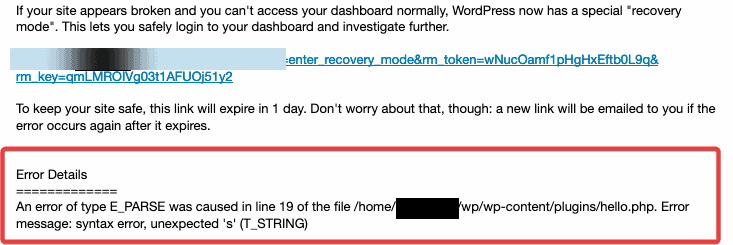
In the screenshot above, the code at line 19 in the hello.php file caused the problem. Now you know the cause.
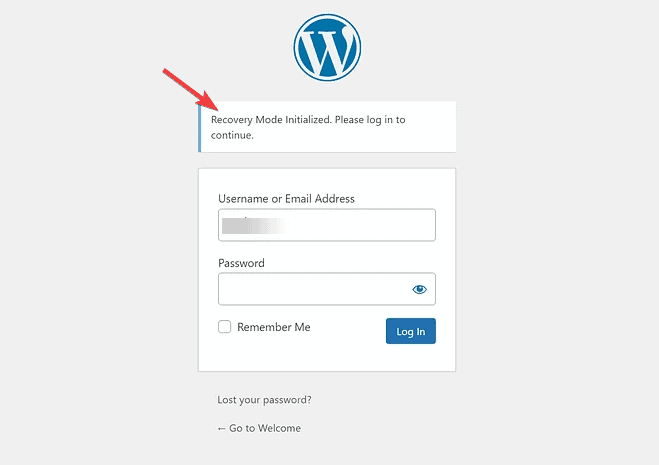
To fix it, click on the link to the WordPress recovery mode. This will redirect you to your admin dashboard.
But you’ll need to log in first.
Once you are in, the first dashboard prompt notifies you are in recovery mode and how to exit it.
Under that, you’ll see another notification about the problem and a link to fix it.
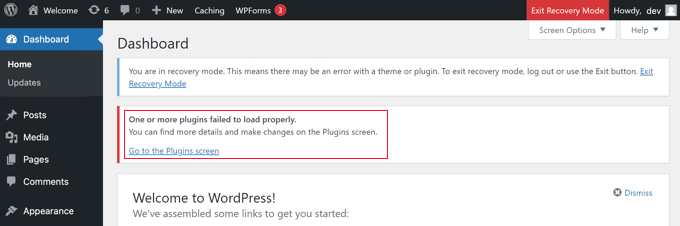
WordPress is telling us that one of our plugins failed to load properly.
By clicking on the Go to the Plugin Screen link, you’ll be taken to the problematic plugin page where WordPress spells out the exact line of code in the plugin triggering the error.
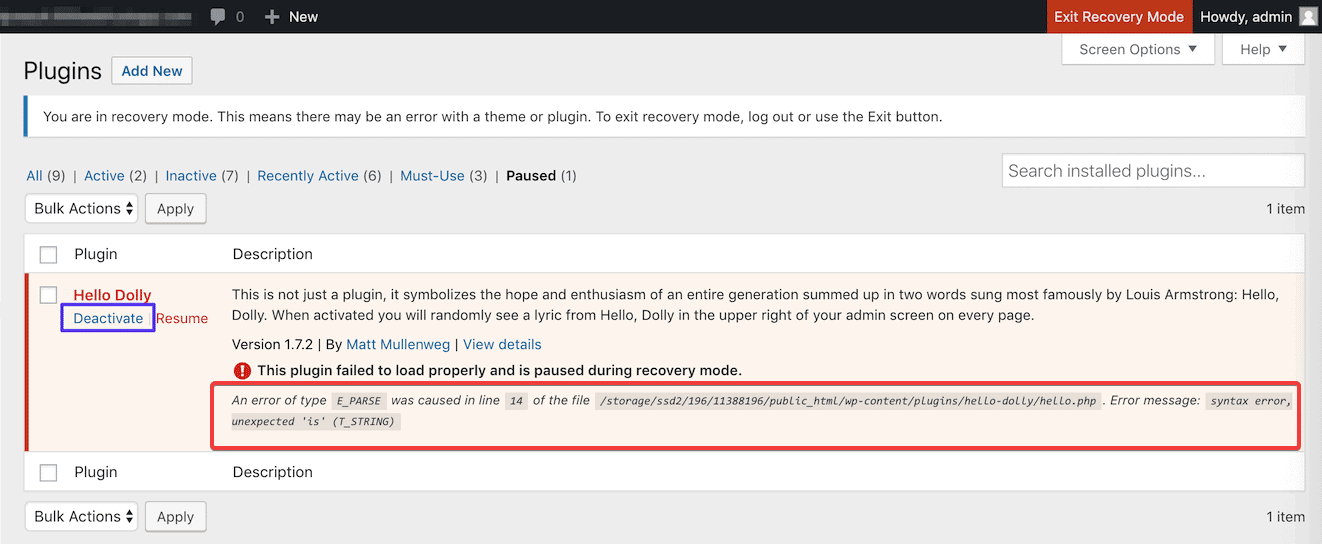
Now you can go ahead to Deactivate the plugin for normalcy to be restored on your site.
If you still need the plugin, you can check for updates and update to the latest version. You can also contact the plugin developer for help.
Alternatively, look for another plugin that offers the same functionality. Similarly, if the problem is with a theme, you’ll see a notification and a link to the theme page.
Likewise, you’ll see the theme causing the issue at the bottom of the page.
To fix it, you can simply install an up-to-date version of the same theme and see if the error disappears. Else, you may need to change your WordPress theme.
Once the critical error has been fixed, click the Exit Recovery Mode button at the top bar.
You should have your website working again. This method should fix it in most cases, however, if the problem continues, other fixes could help.
Also, other options will come in handy when you can’t access your WordPress administrator email for whatever reason.
Let’s see how to use them to fix “There has been a critical error on this website” step by step.
Fix #2: Activate WordPress Debug
WordPress has a built-in debugging feature that detects and points out code errors in themes, plugins, and WordPress core.
Follow the steps below to enable debug mode in WordPress.
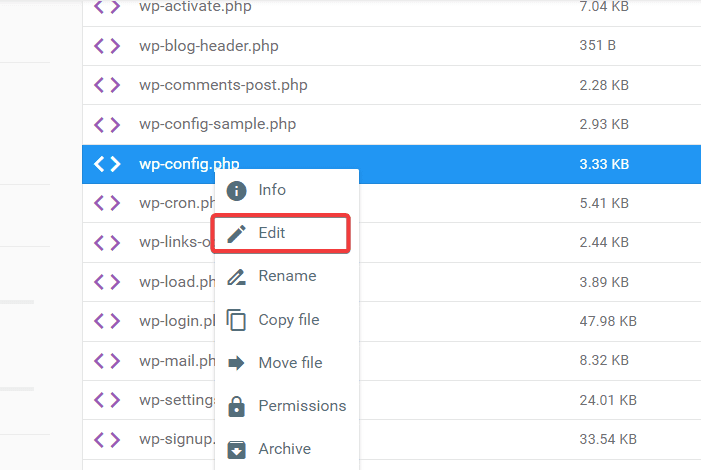
Open your website root directory- public_html folder using the same steps as in the fixes above.
Once there, locate the wp-config.php file, right-click, and select Edit from the options.
Next, find the following lines of code inside the file:
define( 'WP_DEBUG', false );

define( 'WP_DEBUG_DISPLAY', false );

define( 'WP_DEBUG_LOG', false );

define( 'SCRIPT_DEBUG', false );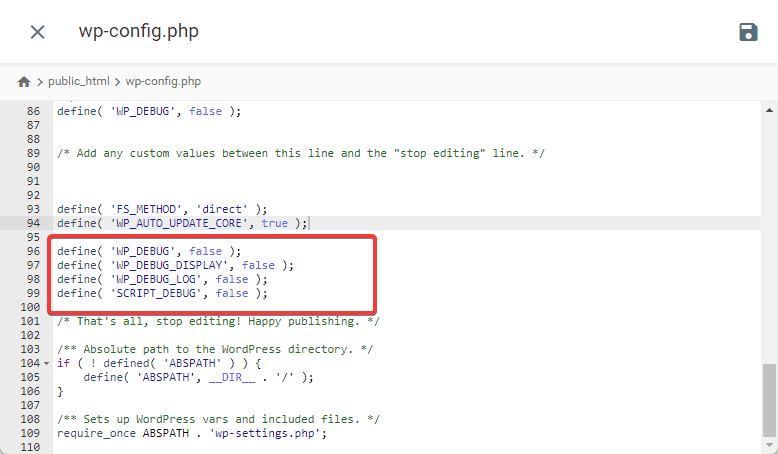
The “false” in each line means that the debug function is deactivated.
To activate it, simply change all the “false” to “true”.
If those lines are absent in your wp-config.php file, you can add them yourself. Make sure to add the “true value” to all the lines.
After that, paste the code above the line that reads; /* That’s all. Stop editing! Happy publishing.*/
Once done, Save your changes and reload your site. Now you’ll see the error details above the critical error message.
To fix it, follow the instructions. Once you resolve the issue, you can disable the debug mode by changing the values back to false.
Fix #3: Deactivate and Reactivate Plugins
If the method above doesn’t work for you, then you may need to manually deactivate and reactivate all your WordPress plugins to know if one of your plugins is culpable.
Don’t be surprised that critical errors can occur after installing a new plugin or updating an existing one.
It can be due to incompatibility issues with your version of WordPress. That’s why It’s important to always update WordPress to the latest version.
Also, code conflicts with other plugins can result in this critical error. If you can identify the plugin, the simple fix is to remove it.
However, it’s difficult to know which plugin is causing the problem.
So you need to deactivate and reactivate all your WordPress plugins one at a time and check your website after each deactivation and activation to find the culprit.
Let’s see how.
On Your Admin Dashboard
The easiest way to do this is via your admin dashboard.
Here are the steps:
Log in to your admin dashboard, locate Plugins on the left panel, and select Installed Plugins from the menu that pop up.
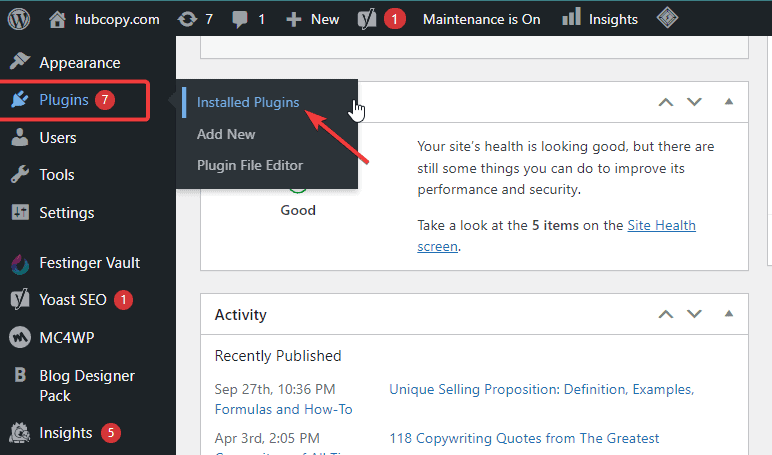
Now, you’ll deactivate plugins on this list from the most recently installed.
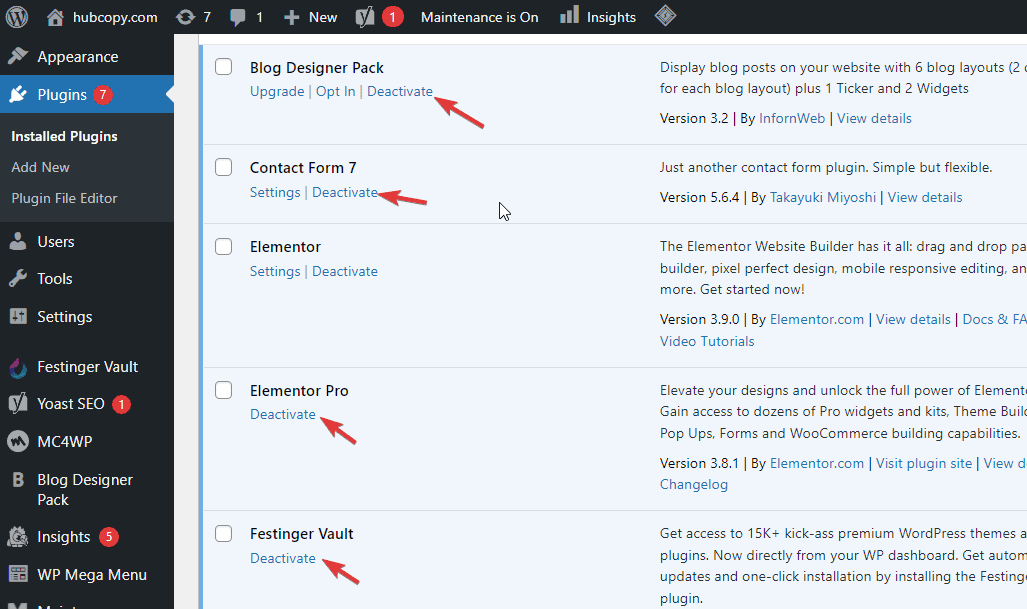
Check your website after each plugin you deactivate. If the critical error disappears after a particular plugin, that’s the culprit.
Once you find it, you can choose to update the plugin’s latest version to see if it works. If not, remove the plugin and install an alternative.
On Your Web Host Cpanel File Manager
Sometimes, the critical error can make it impossible to access your admin dashboard.
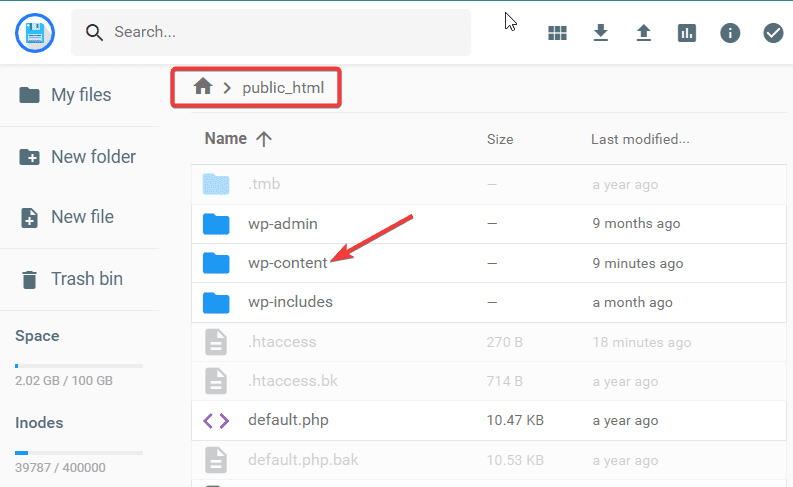
You must access your website file managers from your web host Cpanel to deactivate plugins. Here’s how.
For this example, we’ll be using the Hostinger dashboard. But irrespective of your WordPress hosting provider, you only need to navigate to the File section and open File Manager.
Follow these steps to do it.
Once you are in, go to the public_html folder and select wp-content.
Locate the Plugin folder and double-click to open it.
You’ll see all your installed plugins inside this folder.
Next, right-click on any plugin you want to deactivate and select Rename from the options.
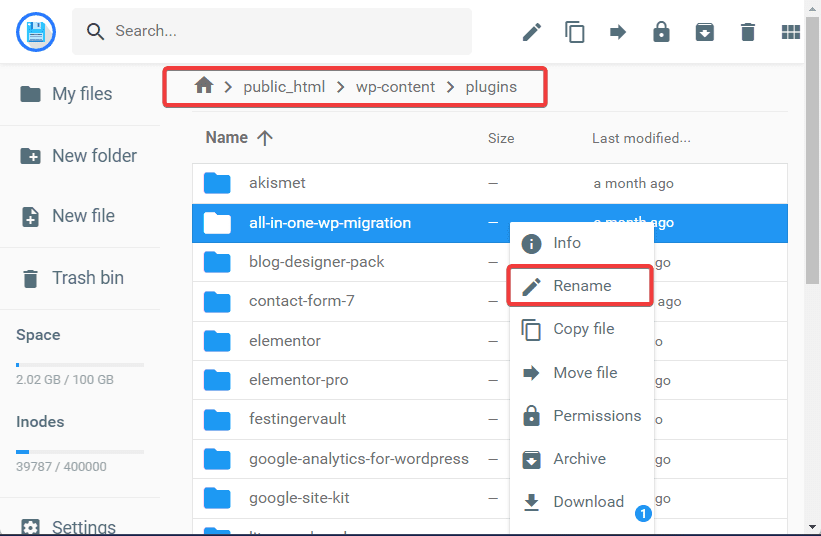
Add _disabled after the plugin name, as in the screenshot below. You can add any word you like. Renaming the plugin will automatically disable it.
To reactivate the plugin later, simply revert to its original name.
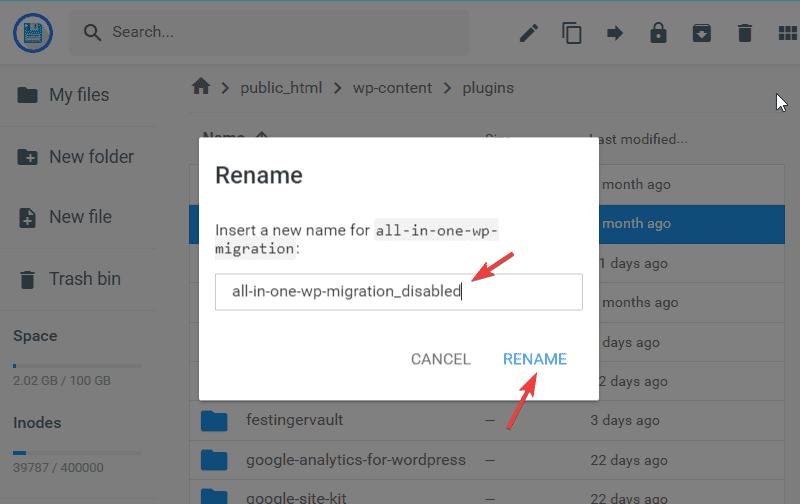
Once done, click the RENAME button.
That’s it! You’ve successfully deactivated the plugin. Reload your website to verify that the critical error is no longer there.
To find the culprit, you’ll repeat these steps for as many plugins as possible. Once you do, you can reinstall, remove or substitute it for another plugin.
Fix #4: Switch to a Different Theme
The critical error could also be due to a faulty theme installation, updates, or theme code.
Switching to a different theme can be the way out.
On Your WordPress Admin Area
If you can access your admin dashboard, install a new theme from the WordPress repository or pick from the pre-installed theme.
Follow these steps:
Log in to your WordPress admin area, and navigate Appearance> Themes.
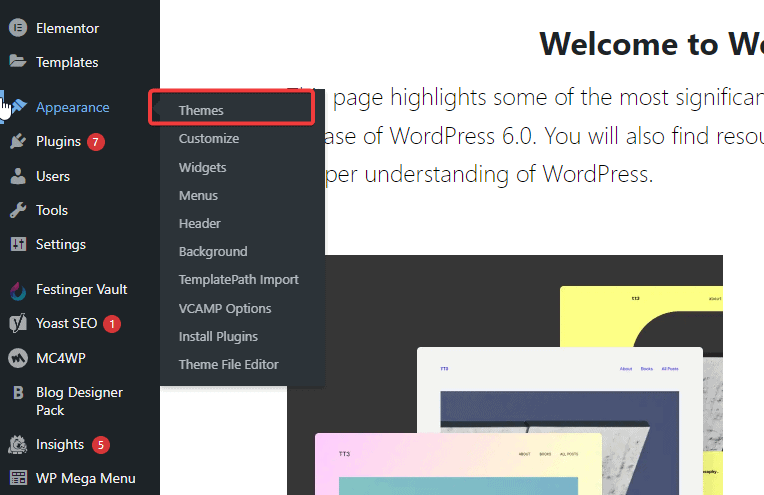
Next, Select any of the preinstalled themes and click the Activate button.
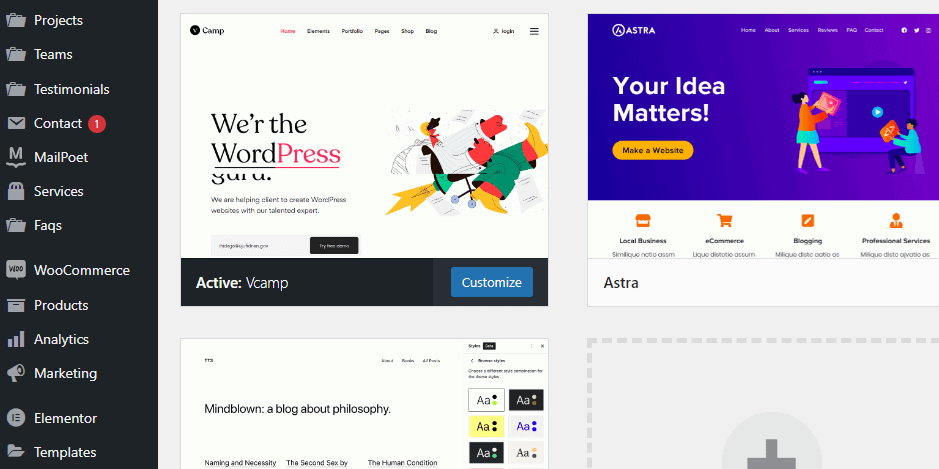
Once done, visit your website to see if It’s back online.
From WordPress Database
You can switch your WordPress theme from the database if you can’t access the admin area. Here’s how.
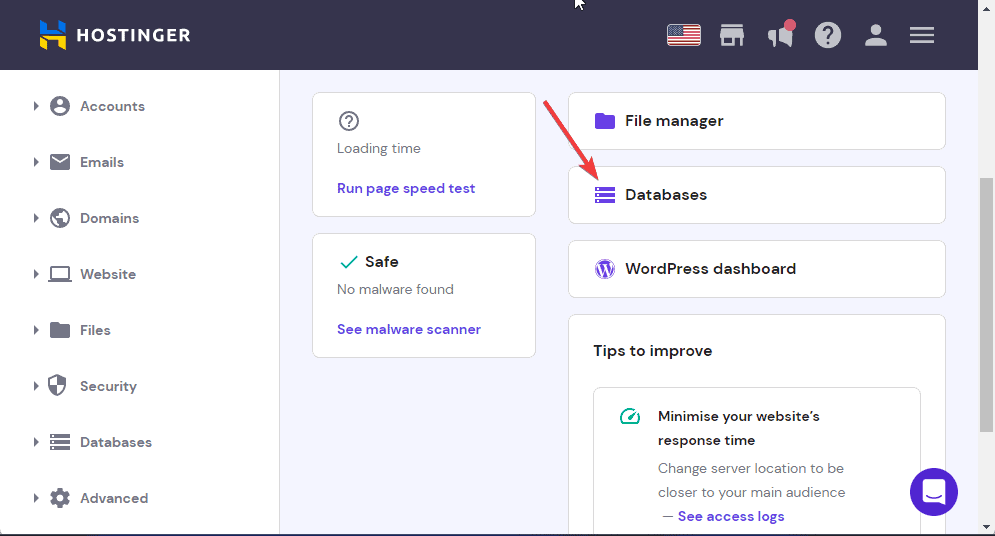
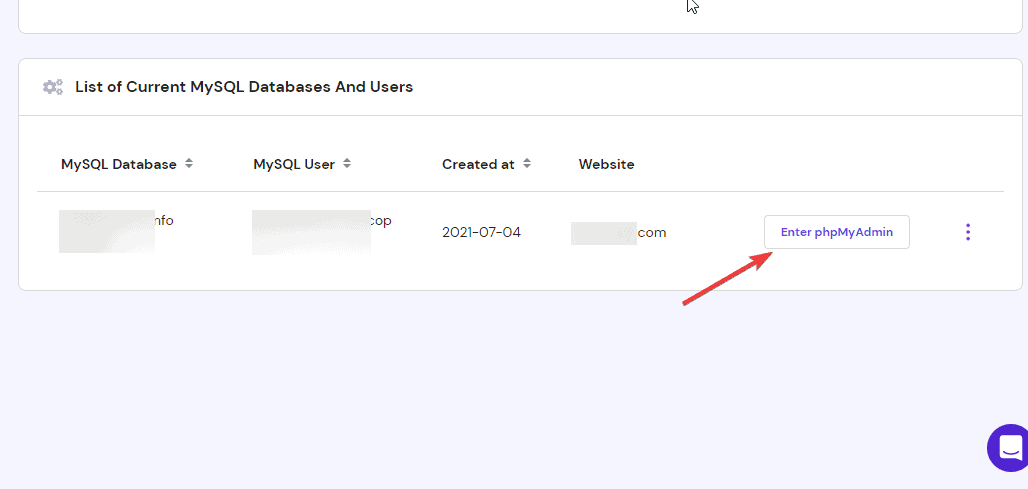
Log in to your web host Cpanel, locate Databases, and click to open.
Once it opens, select your Database from the list (if It’s more than one).
After that, click the Enter PhpMyAdmin button.
Inside your website database, locate the wp_options table.
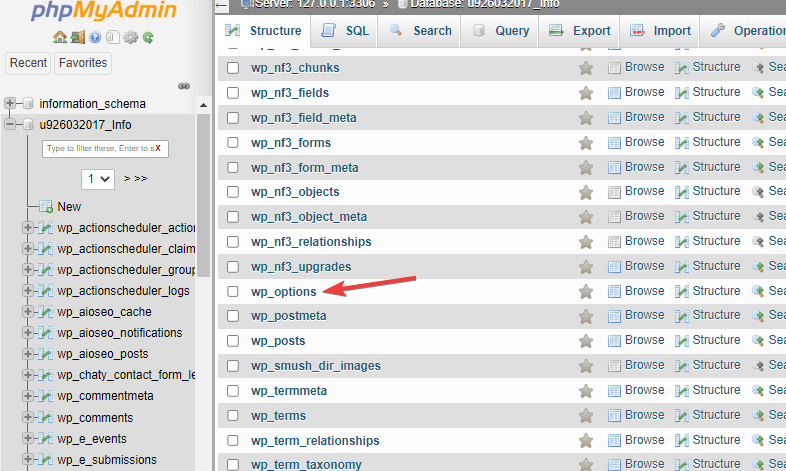
Next, navigate to the template and stylesheet rows.

Replace the value of the template and stylesheet with a default theme name like Astra.
Finally, click the Save button to apply the changes.
Now reload your site to see if the error has been resolved.
Fix #5: Increase PHP Memory Limit
Insufficient memory space on your server to run scripts can halt the execution of codes and the load time of WordPress core.
One of the results is the “There has been a critical error on this website’’.
If this is your case, which you might not be aware of, the solution is simple- increase your PHP memory limit.
Here’s how:
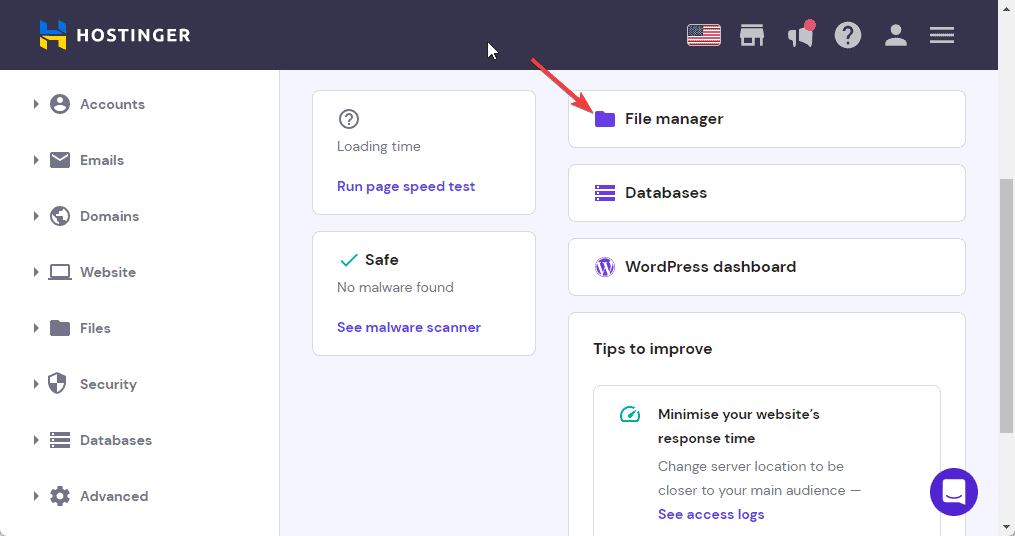
Once you log in to your hosting account, locate File Manager and open it.
On the next screen, open the public_html folder, and locate the wp-config.php file.
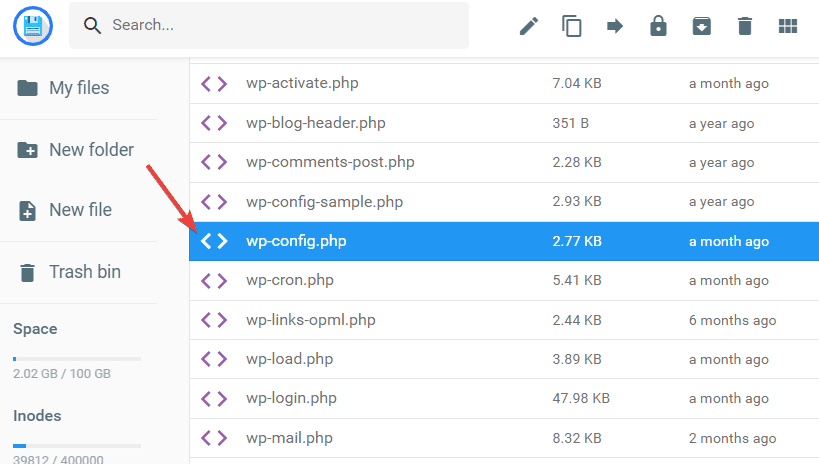
Open the file and add the following code snippet as in the screenshot below.
define( 'WP_MEMORY_LIMIT', '128M');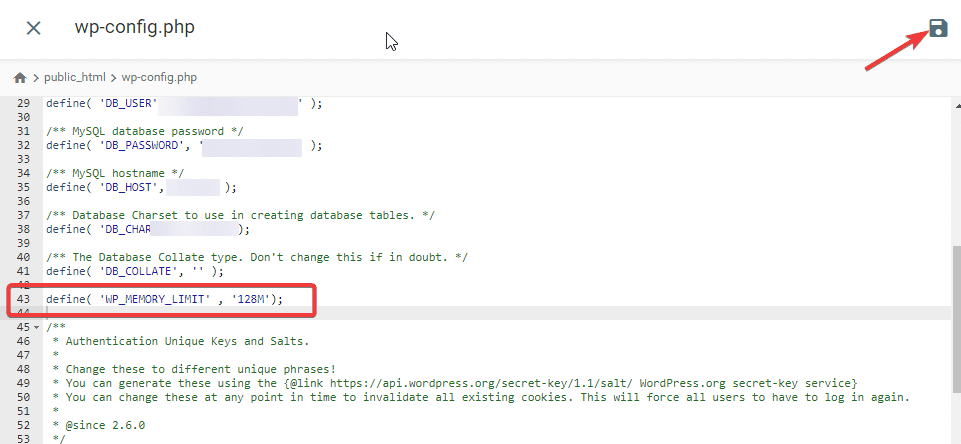
Once done, click the Save icon to apply your new PHP memory limit.
More Helpful WordPress Tutorials:
- How to Fix WordPress Maintenance Mode Stuck: Is your WordPress website stuck in maintenance mode? Fear not. You won’t break a sweat fixing it. Follow this stepwise guide.
- How To Fix The “Briefly Unavailable For Scheduled Maintenance” WordPress Error: It’s normal for your website to be in maintenance mode for a few seconds when WordPress is undergoing a major update. But if this lasts more than 5 minutes, there’s a problem. Learn how to fix it.
- How to Fix White Screen of Death Errors: White screen of death is a common but fixable problem in WordPress websites. You can easily resolve it by following this guide.
Wrapping up
Now you know what to do when you see,
“There has been a critical error on this website. Check your site admin email for instructions.”
We recommend the recovery mode as the first solution to this problem. Only resort to others if it doesn’t resolve the issue.
We hope you find this guide helpful. If you need further assistance on this topic or other WordPress errors, let us know in the comment below. We’ll be glad to help.


